Getting Started
This chapter will be about getting started with Git. We will begin by explaining some background on version control tools, then move on to how to get Git running on your system and finally how to get it set up to start working with. At the end of this chapter you should understand why Git is around, why you should use it and you should be all set up to do so.
About Version Control
What is ``version control'', and why should you care? Version control is a system that records changes to a file or set of files over time so that you can recall specific versions later. For the examples in this book, you will use software source code as the files being version controlled, though in reality you can do this with nearly any type of file on a computer.
If you are a graphic or web designer and want to keep every version of an image or layout (which you would most certainly want to), a Version Control System (VCS) is a very wise thing to use. It allows you to revert selected files back to a previous state, revert the entire project back to a previous state, compare changes over time, see who last modified something that might be causing a problem, who introduced an issue and when, and more. Using a VCS also generally means that if you screw things up or lose files, you can easily recover. In addition, you get all this for very little overhead.
Local Version Control Systems
Many people’s version-control method of choice is to copy files into another directory (perhaps a time-stamped directory, if they’re clever). This approach is very common because it is so simple, but it is also incredibly error prone. It is easy to forget which directory you’re in and accidentally write to the wrong file or copy over files you don’t mean to.
To deal with this issue, programmers long ago developed local VCSs that had a simple database that kept all the changes to files under revision control.

One of the most popular VCS tools was a system called RCS, which is still distributed with many computers today. RCS works by keeping patch sets (that is, the differences between files) in a special format on disk; it can then re-create what any file looked like at any point in time by adding up all the patches.
Centralized Version Control Systems
The next major issue that people encounter is that they need to collaborate with developers on other systems. To deal with this problem, Centralized Version Control Systems (CVCSs) were developed. These systems (such as CVS, Subversion, and Perforce) have a single server that contains all the versioned files, and a number of clients that check out files from that central place. For many years, this has been the standard for version control.
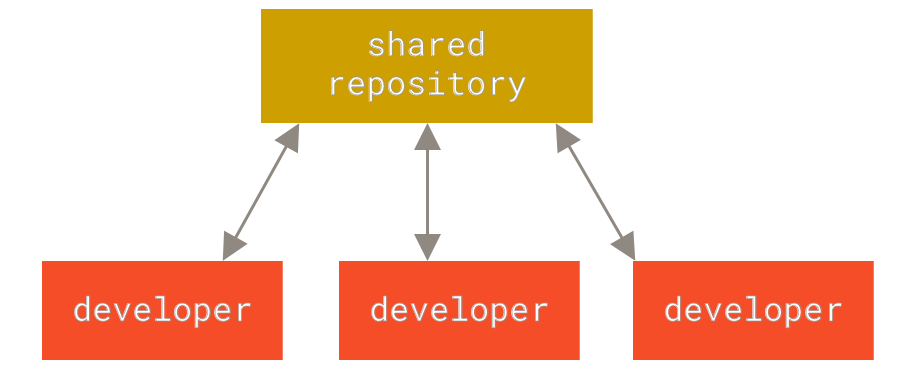
This setup offers many advantages, especially over local VCSs. For example, everyone knows to a certain degree what everyone else on the project is doing. Administrators have fine-grained control over who can do what, and it’s far easier to administer a CVCS than it is to deal with local databases on every client.
However, this setup also has some serious downsides. The most obvious is the single point of failure that the centralized server represents. If that server goes down for an hour, then during that hour nobody can collaborate at all or save versioned changes to anything they’re working on. If the hard disk the central database is on becomes corrupted, and proper backups haven’t been kept, you lose absolutely everything — the entire history of the project except whatever single snapshots people happen to have on their local machines. Local VCS systems suffer from this same problem — whenever you have the entire history of the project in a single place, you risk losing everything.
Distributed Version Control Systems
This is where Distributed Version Control Systems (DVCSs) step in. In a DVCS (such as Git, Mercurial, Bazaar or Darcs), clients don’t just check out the latest snapshot of the files; rather, they fully mirror the repository, including its full history. Thus, if any server dies, and these systems were collaborating via that server, any of the client repositories can be copied back up to the server to restore it. Every clone is really a full backup of all the data.
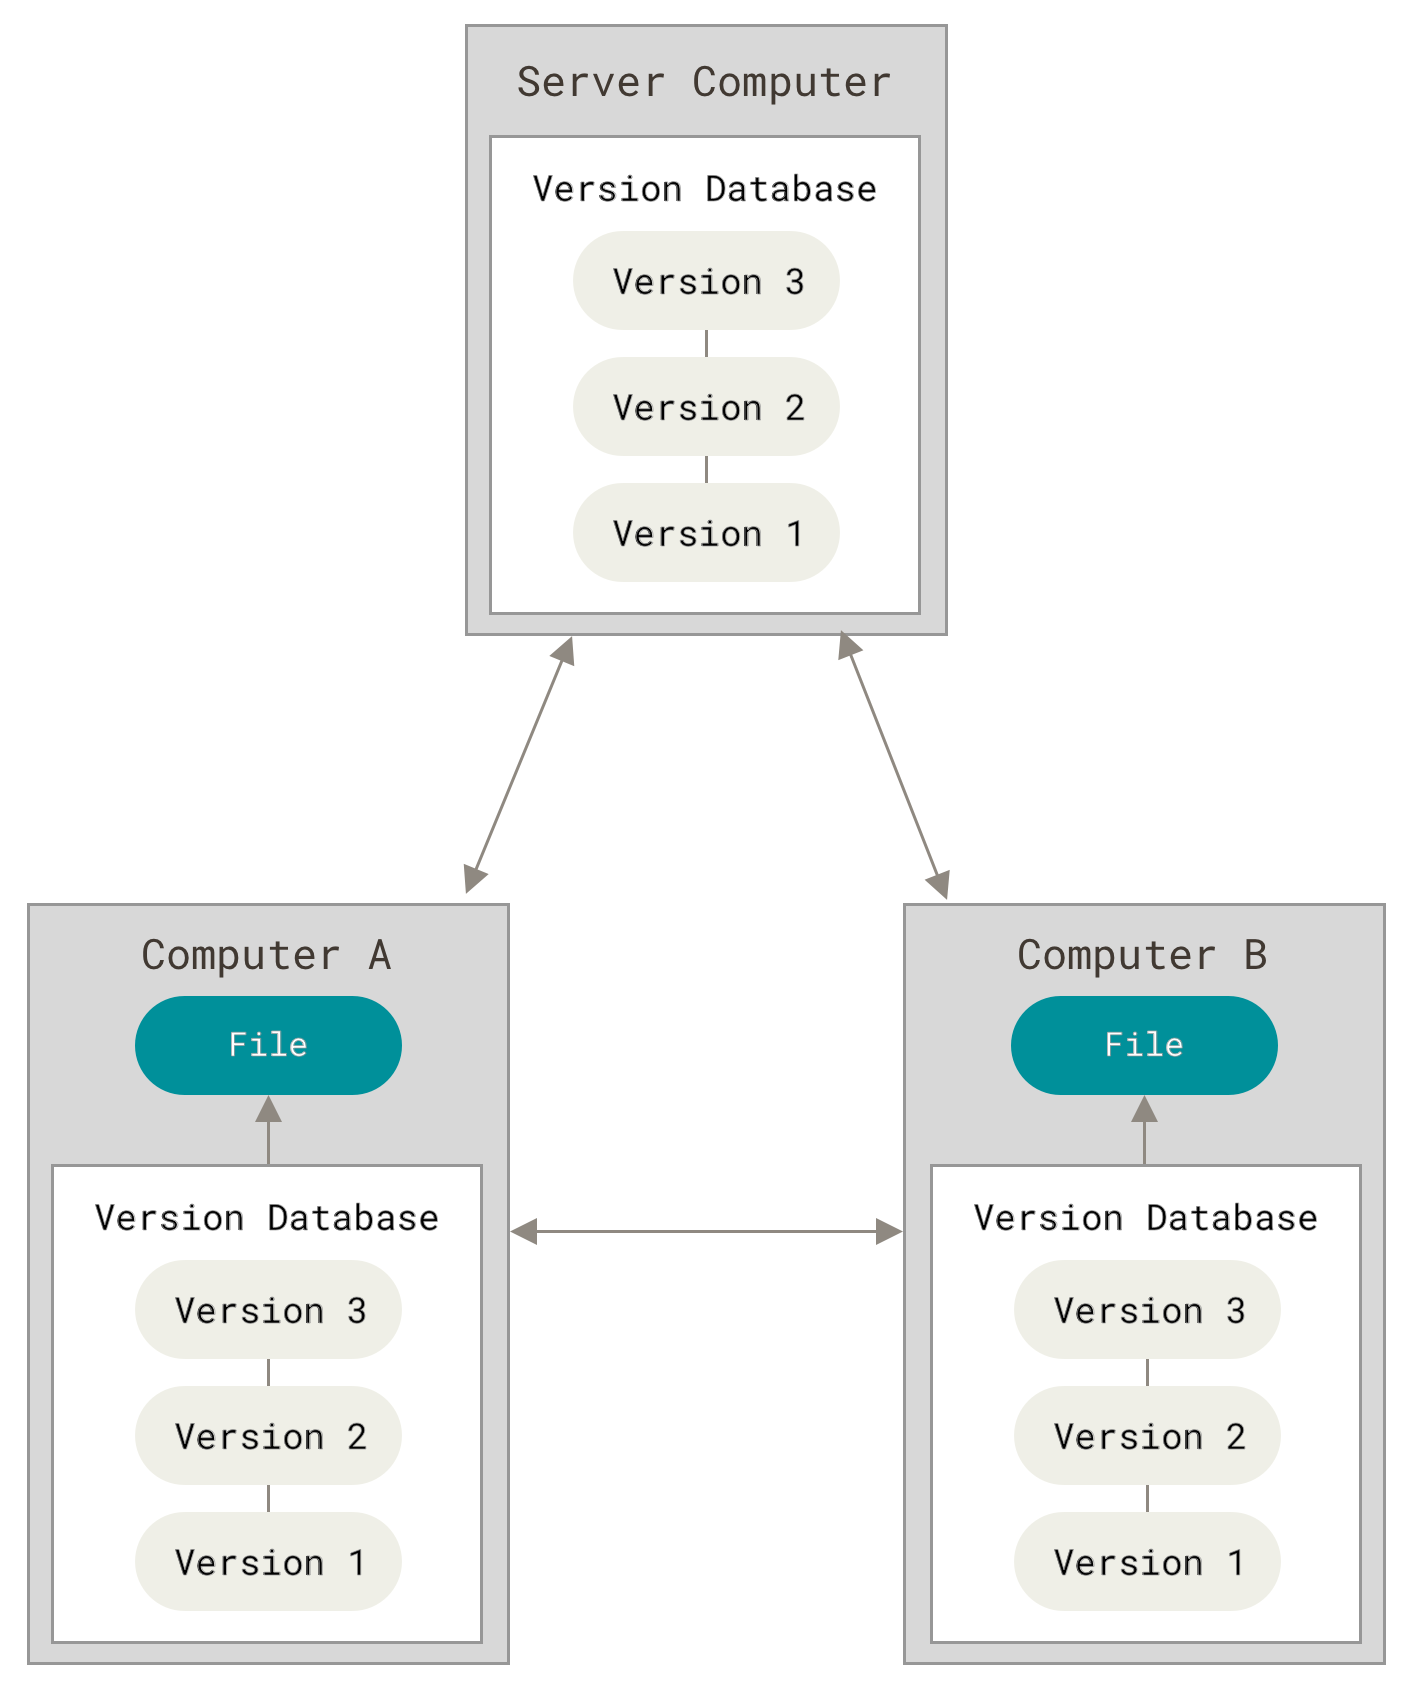
Furthermore, many of these systems deal pretty well with having several remote repositories they can work with, so you can collaborate with different groups of people in different ways simultaneously within the same project. This allows you to set up several types of workflows that aren’t possible in centralized systems, such as hierarchical models.
A Short History of Git
As with many great things in life, Git began with a bit of creative destruction and fiery controversy.
The Linux kernel is an open source software project of fairly large scope. For most of the lifetime of the Linux kernel maintenance (1991–2002), changes to the software were passed around as patches and archived files. In 2002, the Linux kernel project began using a proprietary DVCS called BitKeeper.
In 2005, the relationship between the community that developed the Linux kernel and the commercial company that developed BitKeeper broke down, and the tool’s free-of-charge status was revoked. This prompted the Linux development community (and in particular Linus Torvalds, the creator of Linux) to develop their own tool based on some of the lessons they learned while using BitKeeper. Some of the goals of the new system were as follows:
-
Speed
-
Simple design
-
Strong support for non-linear development (thousands of parallel branches)
-
Fully distributed
-
Able to handle large projects like the Linux kernel efficiently (speed and data size)
Since its birth in 2005, Git has evolved and matured to be easy to use and yet retain these initial qualities. It’s amazingly fast, it’s very efficient with large projects, and it has an incredible branching system for non-linear development (See Git Branching).
What is Git?
So, what is Git in a nutshell? This is an important section to absorb, because if you understand what Git is and the fundamentals of how it works, then using Git effectively will probably be much easier for you. As you learn Git, try to clear your mind of the things you may know about other VCSs, such as CVS, Subversion or Perforce — doing so will help you avoid subtle confusion when using the tool. Even though Git’s user interface is fairly similar to these other VCSs, Git stores and thinks about information in a very different way, and understanding these differences will help you avoid becoming confused while using it.
Snapshots, Not Differences
The major difference between Git and any other VCS (Subversion and friends included) is the way Git thinks about its data. Conceptually, most other systems store information as a list of file-based changes. These other systems (CVS, Subversion, Perforce, Bazaar, and so on) think of the information they store as a set of files and the changes made to each file over time (this is commonly described as delta-based version control).
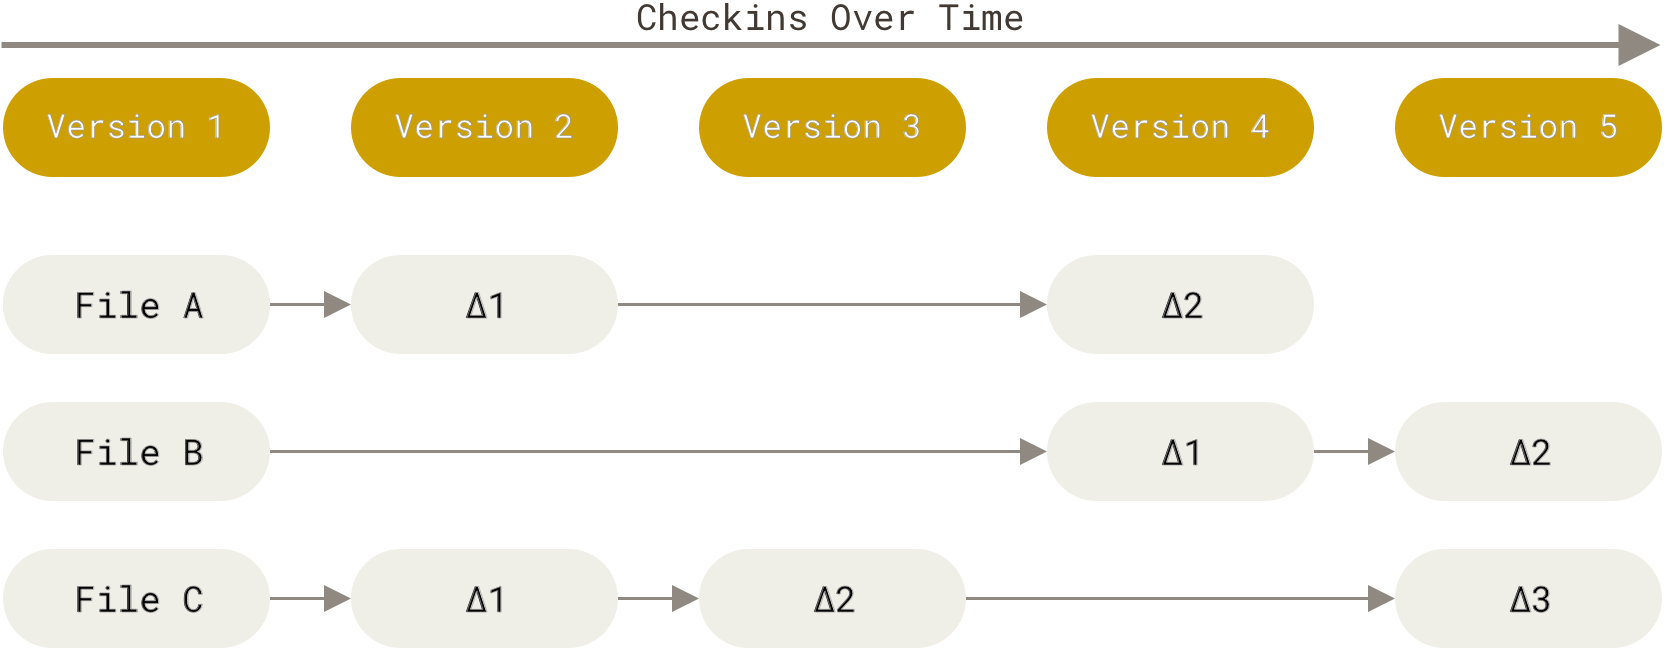
Git doesn’t think of or store its data this way. Instead, Git thinks of its data more like a series of snapshots of a miniature filesystem. With Git, every time you commit, or save the state of your project, Git basically takes a picture of what all your files look like at that moment and stores a reference to that snapshot. To be efficient, if files have not changed, Git doesn’t store the file again, just a link to the previous identical file it has already stored. Git thinks about its data more like a stream of snapshots.
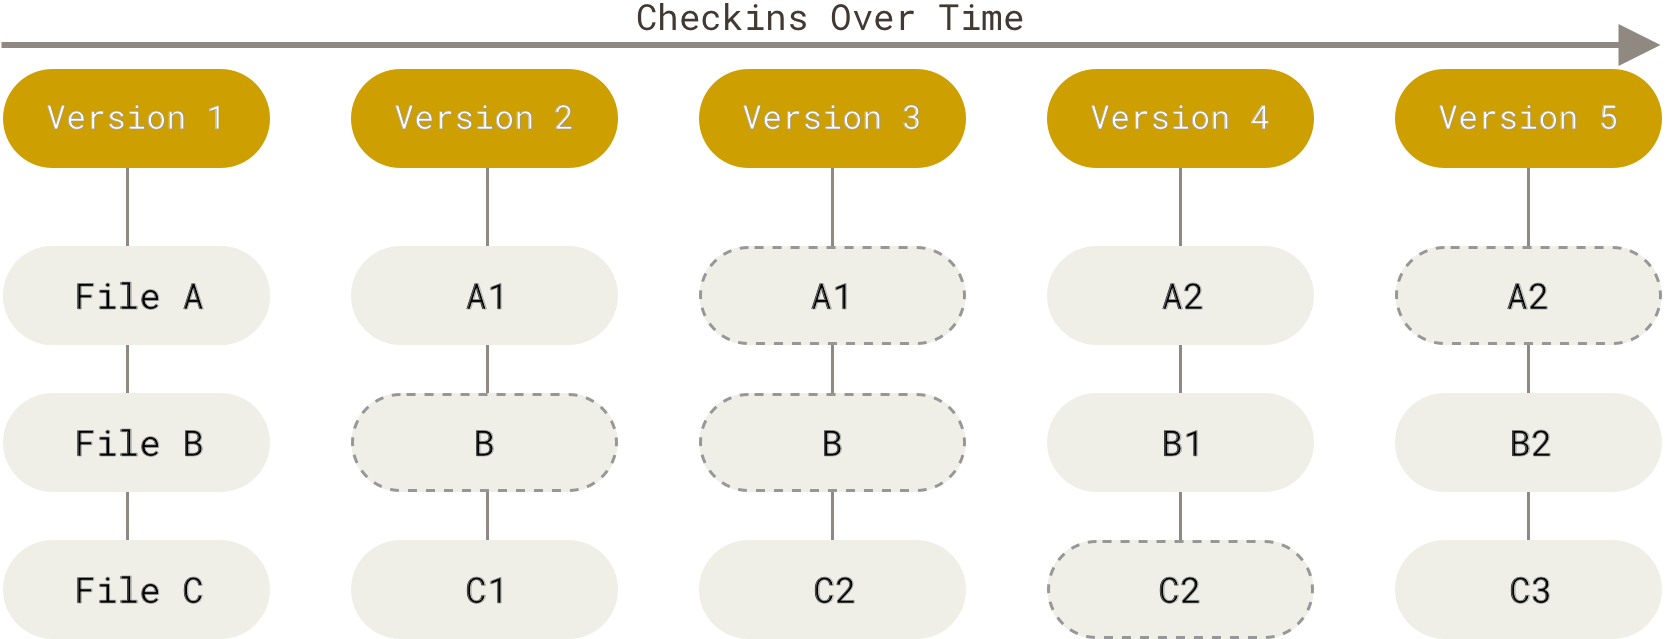
This is an important distinction between Git and nearly all other VCSs. It makes Git reconsider almost every aspect of version control that most other systems copied from the previous generation. This makes Git more like a mini filesystem with some incredibly powerful tools built on top of it, rather than simply a VCS. We’ll explore some of the benefits you gain by thinking of your data this way when we cover Git branching in Git Branching.
Nearly Every Operation Is Local
Most operations in Git need only local files and resources to operate — generally no information is needed from another computer on your network. If you’re used to a CVCS where most operations have that network latency overhead, this aspect of Git will make you think that the gods of speed have blessed Git with unworldly powers. Because you have the entire history of the project right there on your local disk, most operations seem almost instantaneous.
For example, to browse the history of the project, Git doesn’t need to go out to the server to get the history and display it for you — it simply reads it directly from your local database. This means you see the project history almost instantly. If you want to see the changes introduced between the current version of a file and the file a month ago, Git can look up the file a month ago and do a local difference calculation, instead of having to either ask a remote server to do it or pull an older version of the file from the remote server to do it locally.
This also means that there is very little you can’t do if you’re offline or off VPN. If you get on an airplane or a train and want to do a little work, you can commit happily (to your local copy, remember?) until you get to a network connection to upload. If you go home and can’t get your VPN client working properly, you can still work. In many other systems, doing so is either impossible or painful. In Perforce, for example, you can’t do much when you aren’t connected to the server; in Subversion and CVS, you can edit files, but you can’t commit changes to your database (because your database is offline). This may not seem like a huge deal, but you may be surprised what a big difference it can make.
Git Has Integrity
Everything in Git is checksummed before it is stored and is then referred to by that checksum. This means it’s impossible to change the contents of any file or directory without Git knowing about it. This functionality is built into Git at the lowest levels and is integral to its philosophy. You can’t lose information in transit or get file corruption without Git being able to detect it.
The mechanism that Git uses for this checksumming is called a SHA-1 hash. This is a 40-character string composed of hexadecimal characters (0–9 and a–f) and calculated based on the contents of a file or directory structure in Git. A SHA-1 hash looks something like this:
24b9da6552252987aa493b52f8696cd6d3b00373
You will see these hash values all over the place in Git because it uses them so much. In fact, Git stores everything in its database not by file name but by the hash value of its contents.
Git Generally Only Adds Data
When you do actions in Git, nearly all of them only add data to the Git database. It is hard to get the system to do anything that is not undoable or to make it erase data in any way. As with any VCS, you can lose or mess up changes you haven’t committed yet, but after you commit a snapshot into Git, it is very difficult to lose, especially if you regularly push your database to another repository.
This makes using Git a joy because we know we can experiment without the danger of severely screwing things up. For a more in-depth look at how Git stores its data and how you can recover data that seems lost, see Undoing Things.
The Three States
Pay attention now — here is the main thing to remember about Git if you want the rest of your learning process to go smoothly. Git has three main states that your files can reside in: modified, staged, and committed:
-
Modified means that you have changed the file but have not committed it to your database yet.
-
Staged means that you have marked a modified file in its current version to go into your next commit snapshot.
-
Committed means that the data is safely stored in your local database.
This leads us to the three main sections of a Git project: the working tree, the staging area, and the Git directory.

The working tree is a single checkout of one version of the project. These files are pulled out of the compressed database in the Git directory and placed on disk for you to use or modify.
The staging area is a file, generally contained in your Git directory, that stores information about what will go into your next commit.
Its technical name in Git parlance is the index'', but the phrase staging area'' works just as well.
The Git directory is where Git stores the metadata and object database for your project. This is the most important part of Git, and it is what is copied when you clone a repository from another computer.
The basic Git workflow goes something like this:
-
You modify files in your working tree.
-
You selectively stage just those changes you want to be part of your next commit, which adds only those changes to the staging area.
-
You do a commit, which takes the files as they are in the staging area and stores that snapshot permanently to your Git directory.
If a particular version of a file is in the Git directory, it’s considered committed. If it has been modified and was added to the staging area, it is staged. And if it was changed since it was checked out but has not been staged, it is modified. In Git Basics, you’ll learn more about these states and how you can either take advantage of them or skip the staged part entirely.
The Command Line
There are a lot of different ways to use Git. There are the original command-line tools, and there are many graphical user interfaces of varying capabilities. For this book, we will be using Git on the command line. For one, the command line is the only place you can run all Git commands — most of the GUIs implement only a partial subset of Git functionality for simplicity. If you know how to run the command-line version, you can probably also figure out how to run the GUI version, while the opposite is not necessarily true. Also, while your choice of graphical client is a matter of personal taste, all users will have the command-line tools installed and available.
So we will expect you to know how to open Terminal in macOS or Command Prompt or PowerShell in Windows. If you don’t know what we’re talking about here, you may need to stop and research that quickly so that you can follow the rest of the examples and descriptions in this book.
Installing Git
Before you start using Git, you have to make it available on your computer. Even if it’s already installed, it’s probably a good idea to update to the latest version. You can either install it as a package or via another installer, or download the source code and compile it yourself.
This book was written using Git version 2.8.0. Though most of the commands we use should work even in ancient versions of Git, some of them might not or might act slightly differently if you’re using an older version. Since Git is quite excellent at preserving backwards compatibility, any version after 2.8 should work just fine.
Installing on Linux
If you want to install the basic Git tools on Linux via a binary installer, you can generally do so through the package management tool that comes with your distribution.
If you’re on Fedora (or any closely-related RPM-based distribution, such as RHEL or CentOS), you can use dnf:
$ sudo dnf install git-all
If you’re on a Debian-based distribution, such as Ubuntu, try apt:
$ sudo apt install git-all
For more options, there are instructions for installing on several different Unix distributions on the Git website, at https://git-scm.com/download/linux.
Installing on macOS
There are several ways to install Git on a Mac. The easiest is probably to install the Xcode Command Line Tools. On Mavericks (10.9) or above you can do this simply by trying to run 'git' from the Terminal the very first time.
$ git --version
If you don’t have it installed already, it will prompt you to install it.
If you want a more up to date version, you can also install it via a binary installer. A macOS Git installer is maintained and available for download at the Git website, at https://git-scm.com/download/mac.
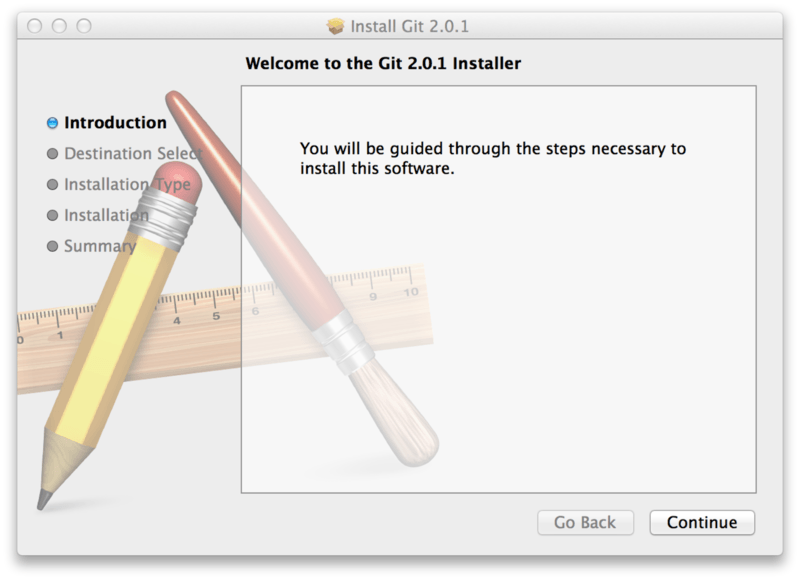
You can also install it as part of the GitHub for macOS install. Their GUI Git tool has an option to install command line tools as well. You can download that tool from the GitHub for macOS website, at https://desktop.github.com.
Installing on Windows
There are also a few ways to install Git on Windows. The most official build is available for download on the Git website. Just go to https://git-scm.com/download/win and the download will start automatically. Note that this is a project called Git for Windows, which is separate from Git itself; for more information on it, go to https://gitforwindows.org.
To get an automated installation you can use the Git Chocolatey package. Note that the Chocolatey package is community maintained.
Another easy way to get Git installed is by installing GitHub Desktop. The installer includes a command line version of Git as well as the GUI. It also works well with PowerShell, and sets up solid credential caching and sane CRLF settings. We’ll learn more about those things a little later, but suffice it to say they’re things you want. You can download this from the GitHub Desktop website.
Installing from Source
Some people may instead find it useful to install Git from source, because you’ll get the most recent version. The binary installers tend to be a bit behind, though as Git has matured in recent years, this has made less of a difference.
If you do want to install Git from source, you need to have the following libraries that Git depends on: autotools, curl, zlib, openssl, expat, and libiconv.
For example, if you’re on a system that has dnf (such as Fedora) or apt-get (such as a Debian-based system), you can use one of these commands to install the minimal dependencies for compiling and installing the Git binaries:
$ sudo dnf install dh-autoreconf curl-devel expat-devel gettext-devel \
  openssl-devel perl-devel zlib-devel
$ sudo apt-get install dh-autoreconf libcurl4-gnutls-dev libexpat1-dev \
  gettext libz-dev libssl-dev
In order to be able to add the documentation in various formats (doc, html, info), these additional dependencies are required:
$ sudo dnf install asciidoc xmlto docbook2X
$ sudo apt-get install asciidoc xmlto docbook2x
Users of RHEL and RHEL-derivatives like CentOS and Scientific Linux will have to enable the EPEL repository to download the docbook2X package.
If you’re using a Debian-based distribution (Debian/Ubuntu/Ubuntu-derivatives), you also need the install-info package:
$ sudo apt-get install install-info
If you’re using a RPM-based distribution (Fedora/RHEL/RHEL-derivatives), you also need the getopt package (which is already installed on a Debian-based distro):
$ sudo dnf install getopt
Additionally, if you’re using Fedora/RHEL/RHEL-derivatives, you need to do this
$ sudo ln -s /usr/bin/db2x_docbook2texi /usr/bin/docbook2x-texi
due to binary name differences.
When you have all the necessary dependencies, you can go ahead and grab the latest tagged release tarball from several places. You can get it via the kernel.org site, at https://www.kernel.org/pub/software/scm/git, or the mirror on the GitHub website, at https://github.com/git/git/releases. It’s generally a little clearer what the latest version is on the GitHub page, but the kernel.org page also has release signatures if you want to verify your download.
Then, compile and install:
$ tar -zxf git-2.8.0.tar.gz
$ cd git-2.8.0
$ make configure
$ ./configure --prefix=/usr
$ make all doc info
$ sudo make install install-doc install-html install-info
After this is done, you can also get Git via Git itself for updates:
$ git clone git://git.kernel.org/pub/scm/git/git.git
First-Time Git Setup
Now that you have Git on your system, you’ll want to do a few things to customize your Git environment. You should have to do these things only once on any given computer; they’ll stick around between upgrades. You can also change them at any time by running through the commands again.
Git comes with a tool called git config that lets you get and set configuration variables that control all aspects of how Git looks and operates.
These variables can be stored in three different places:
-
/etc/gitconfigfile: Contains values applied to every user on the system and all their repositories. If you pass the option--systemtogit config, it reads and writes from this file specifically. (Because this is a system configuration file, you would need administrative or superuser privilege to make changes to it.) -
~/.gitconfigor~/.config/git/configfile: Values specific personally to you, the user. You can make Git read and write to this file specifically by passing the--globaloption, and this affects all of the repositories you work with on your system. -
configfile in the Git directory (that is,.git/config) of whatever repository you’re currently using: Specific to that single repository. You can force Git to read from and write to this file with the--localoption, but that is in fact the default. (Unsurprisingly, you need to be located somewhere in a Git repository for this option to work properly.)
Each level overrides values in the previous level, so values in .git/config trump those in /etc/gitconfig.
On Windows systems, Git looks for the .gitconfig file in the $HOME directory (C:\Users\$USER for most people).
It also still looks for /etc/gitconfig, although it’s relative to the MSys root, which is wherever you decide to install Git on your Windows system when you run the installer.
If you are using version 2.x or later of Git for Windows, there is also a system-level config file at
C:\Documents and Settings\All Users\Application Data\Git\config on Windows XP, and in C:\ProgramData\Git\config on Windows Vista and newer.
This config file can only be changed by git config -f <file> as an admin.
You can view all of your settings and where they are coming from using:
$ git config --list --show-origin
Your Identity
The first thing you should do when you install Git is to set your user name and email address. This is important because every Git commit uses this information, and it’s immutably baked into the commits you start creating:
$ git config --global user.name "John Doe"
$ git config --global user.email johndoe@example.com
Again, you need to do this only once if you pass the --global option, because then Git will always use that information for anything you do on that system.
If you want to override this with a different name or email address for specific projects, you can run the command without the --global option when you’re in that project.
Many of the GUI tools will help you do this when you first run them.
Your Editor
Now that your identity is set up, you can configure the default text editor that will be used when Git needs you to type in a message. If not configured, Git uses your system’s default editor.
If you want to use a different text editor, such as Emacs, you can do the following:
$ git config --global core.editor emacs
On a Windows system, if you want to use a different text editor, you must specify the full path to its executable file. This can be different depending on how your editor is packaged.
In the case of Notepad++, a popular programming editor, you are likely to want to use the 32-bit version, since at the time of writing the 64-bit version doesn’t support all plug-ins. If you are on a 32-bit Windows system, or you have a 64-bit editor on a 64-bit system, you’ll type something like this:
$ git config --global core.editor "'C:/Program Files/Notepad++/notepad++.exe' -multiInst -notabbar -nosession -noPlugin"
Vim, Emacs and Notepad++ are popular text editors often used by developers on Unix-based systems like Linux and macOS or a Windows system. If you are using another editor, or a 32-bit version, please find specific instructions for how to set up your favorite editor with Git in git config core.editor commands.
You may find, if you don’t setup your editor like this, you get into a really confusing state when Git attempts to launch it. An example on a Windows system may include a prematurely terminated Git operation during a Git initiated edit.
Checking Your Settings
If you want to check your configuration settings, you can use the git config --list command to list all the settings Git can find at that point:
$ git config --list
user.name=John Doe
user.email=johndoe@example.com
color.status=auto
color.branch=auto
color.interactive=auto
color.diff=auto
...
You may see keys more than once, because Git reads the same key from different files (/etc/gitconfig and ~/.gitconfig, for example).
In this case, Git uses the last value for each unique key it sees.
You can also check what Git thinks a specific key’s value is by typing git config <key>:
$ git config user.name
John Doe
Since Git might read the same configuration variable value from more than one file, it’s possible that you have an unexpected value for one of these values and you don’t know why. In cases like that, you can query Git as to the origin for that value, and it will tell you which configuration file had the final say in setting that value:
$ git config --show-origin rerere.autoUpdate
file:/home/johndoe/.gitconfig	false
Getting Help
If you ever need help while using Git, there are three equivalent ways to get the comprehensive manual page (manpage) help for any of the Git commands:
$ git help <verb>
$ git <verb> --help
$ man git-<verb>
For example, you can get the manpage help for the git config command by running
$ git help config
These commands are nice because you can access them anywhere, even offline.
If the manpages and this book aren’t enough and you need in-person help, you can try the #git or #github channel on the Freenode IRC server, which can be found at https://freenode.net.
These channels are regularly filled with hundreds of people who are all very knowledgeable about Git and are often willing to help.
In addition, if you don’t need the full-blown manpage help, but just need a quick refresher on the available options for a Git command, you can ask for the more concise `help'' output with the `-h option, as in:
$ git add -h
usage: git add [<options>] [--] <pathspec>...

    -n, --dry-run         dry run
    -v, --verbose         be verbose

    -i, --interactive     interactive picking
    -p, --patch           select hunks interactively
    -e, --edit            edit current diff and apply
    -f, --force           allow adding otherwise ignored files
    -u, --update          update tracked files
    --renormalize         renormalize EOL of tracked files (implies -u)
    -N, --intent-to-add   record only the fact that the path will be added later
    -A, --all             add changes from all tracked and untracked files
    --ignore-removal      ignore paths removed in the working tree (same as --no-all)
    --refresh             don't add, only refresh the index
    --ignore-errors       just skip files which cannot be added because of errors
    --ignore-missing      check if - even missing - files are ignored in dry run
    --chmod (+|-)x        override the executable bit of the listed files
Summary
You should have a basic understanding of what Git is and how it’s different from any centralized version control systems you may have been using previously. You should also now have a working version of Git on your system that’s set up with your personal identity. It’s now time to learn some Git basics.