Git Branching
Nearly every VCS has some form of branching support. Branching means you diverge from the main line of development and continue to do work without messing with that main line. In many VCS tools, this is a somewhat expensive process, often requiring you to create a new copy of your source code directory, which can take a long time for large projects.
Some people refer to Git’s branching model as its ``killer feature,'' and it certainly sets Git apart in the VCS community. Why is it so special? The way Git branches is incredibly lightweight, making branching operations nearly instantaneous, and switching back and forth between branches generally just as fast. Unlike many other VCSs, Git encourages workflows that branch and merge often, even multiple times in a day. Understanding and mastering this feature gives you a powerful and unique tool and can entirely change the way that you develop.
Branches in a Nutshell
To really understand the way Git does branching, we need to take a step back and examine how Git stores its data.
As you may remember from Getting Started, Git doesn’t store data as a series of changesets or differences, but instead as a series of snapshots.
When you make a commit, Git stores a commit object that contains a pointer to the snapshot of the content you staged. This object also contains the author’s name and email address, the message that you typed, and pointers to the commit or commits that directly came before this commit (its parent or parents): zero parents for the initial commit, one parent for a normal commit, and multiple parents for a commit that results from a merge of two or more branches.
To visualize this, let’s assume that you have a directory containing three files, and you stage them all and commit. Staging the files computes a checksum for each one (the SHA-1 hash we mentioned in Getting Started), stores that version of the file in the Git repository (Git refers to them as blobs), and adds that checksum to the staging area:
$ git add README test.rb LICENSE
$ git commit -m 'The initial commit of my project'
When you create the commit by running git commit, Git checksums each subdirectory (in this case, just the root project directory) and stores them as a tree object in the Git repository.
Git then creates a commit object that has the metadata and a pointer to the root project tree so it can re-create that snapshot when needed.
Your Git repository now contains five objects: three blobs (each representing the contents of one of the three files), one tree that lists the contents of the directory and specifies which file names are stored as which blobs, and one commit with the pointer to that root tree and all the commit metadata.
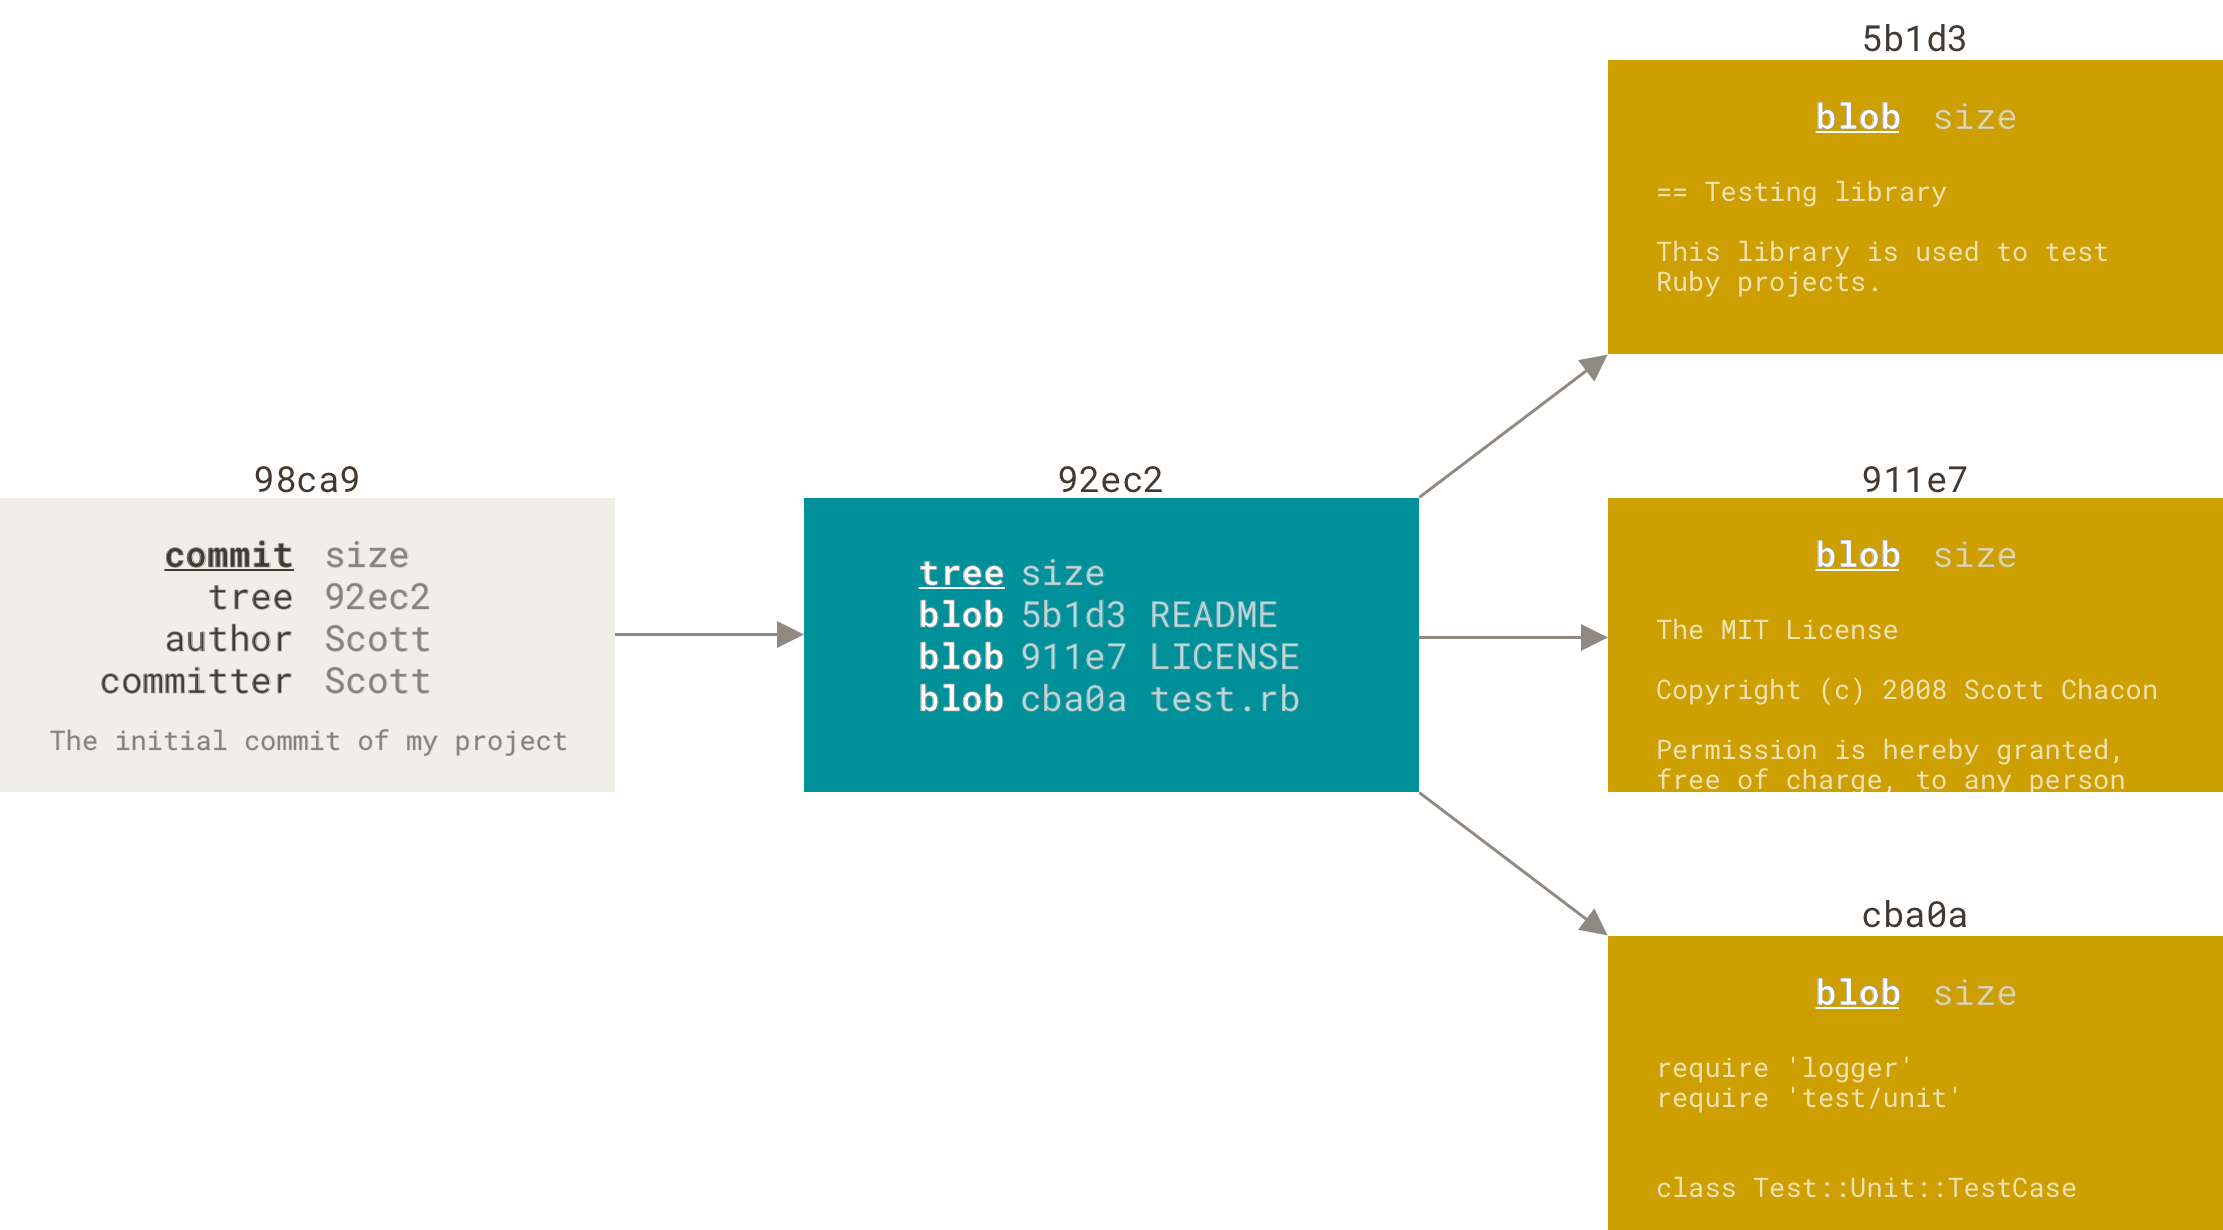
If you make some changes and commit again, the next commit stores a pointer to the commit that came immediately before it.

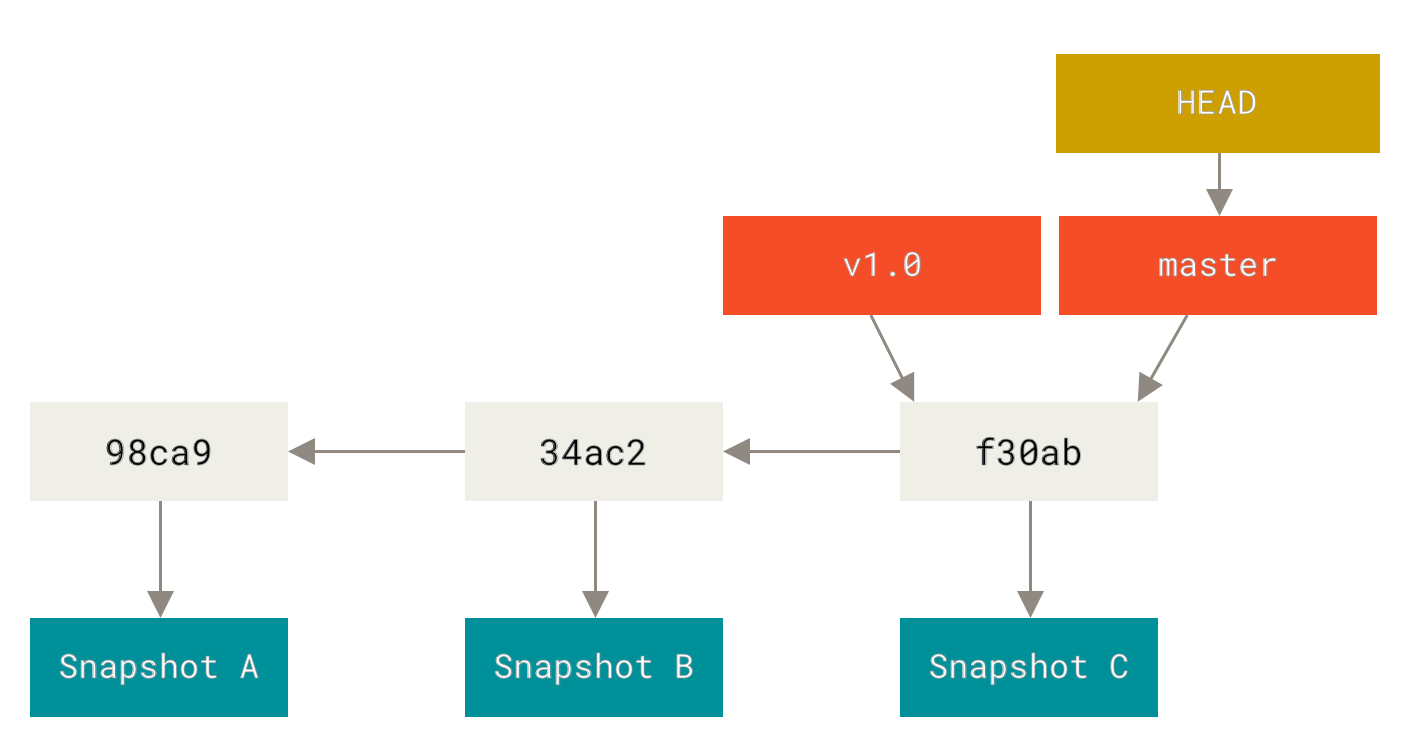
A branch in Git is simply a lightweight movable pointer to one of these commits.
The default branch name in Git is master.
As you start making commits, you’re given a master branch that points to the last commit you made.
Every time you commit, the master branch pointer moves forward automatically.
The `master'' branch in Git is not a special branch.
It is exactly like any other branch.
The only reason nearly every repository has one is that the `git init command creates it by default and most people don’t bother to change it.
Creating a New Branch
What happens when you create a new branch?
Well, doing so creates a new pointer for you to move around.
Let’s say you want to create a new branch called testing.
You do this with the git branch command:
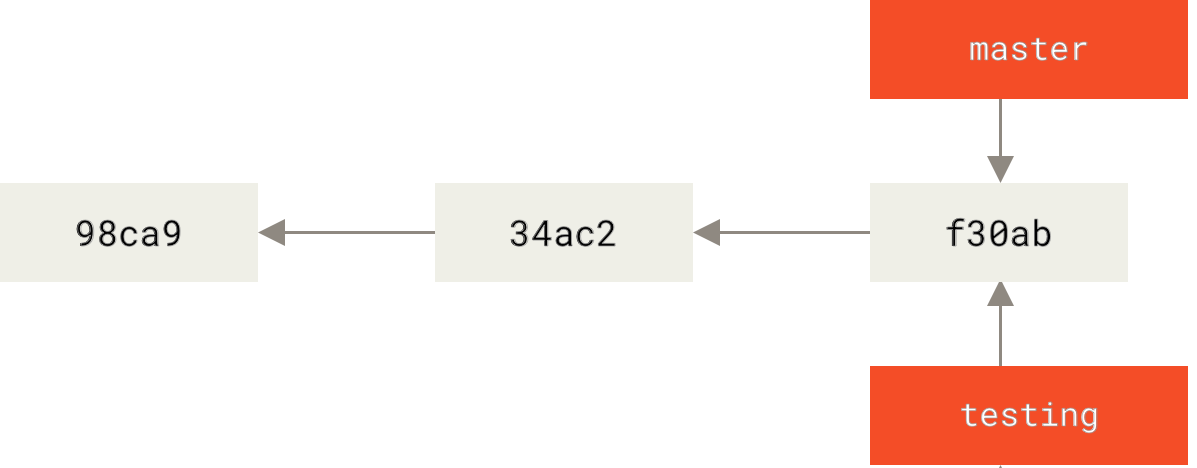
$ git branch testing
This creates a new pointer to the same commit you’re currently on.
How does Git know what branch you’re currently on?
It keeps a special pointer called HEAD.
Note that this is a lot different than the concept of HEAD in other VCSs you may be used to, such as Subversion or CVS.
In Git, this is a pointer to the local branch you’re currently on.
In this case, you’re still on master.
The git branch command only created a new branch — it didn’t switch to that branch.
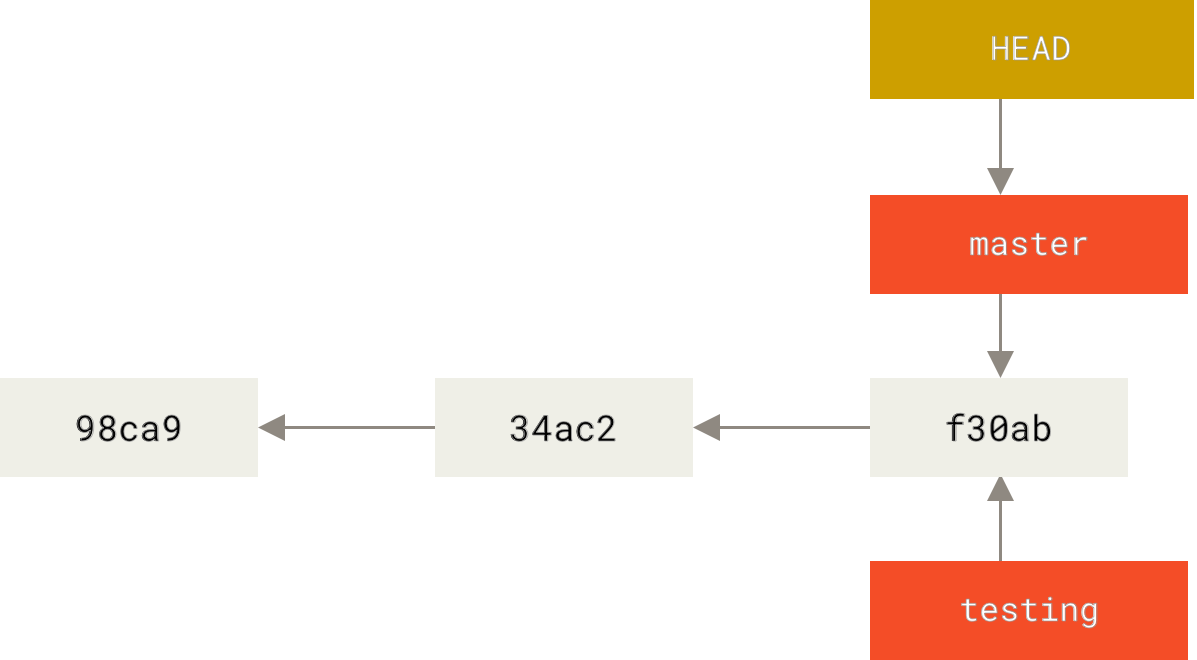
You can easily see this by running a simple git log command that shows you where the branch pointers are pointing.
This option is called --decorate.
$ git log --oneline --decorate
f30ab (HEAD -> master, testing) add feature #32 - ability to add new formats to the central interface
34ac2 Fixed bug #1328 - stack overflow under certain conditions
98ca9 The initial commit of my project
You can see the master and testing branches that are right there next to the f30ab commit.
Switching Branches
To switch to an existing branch, you run the git checkout command.
Let’s switch to the new testing branch:
$ git checkout testing
This moves HEAD to point to the testing branch.
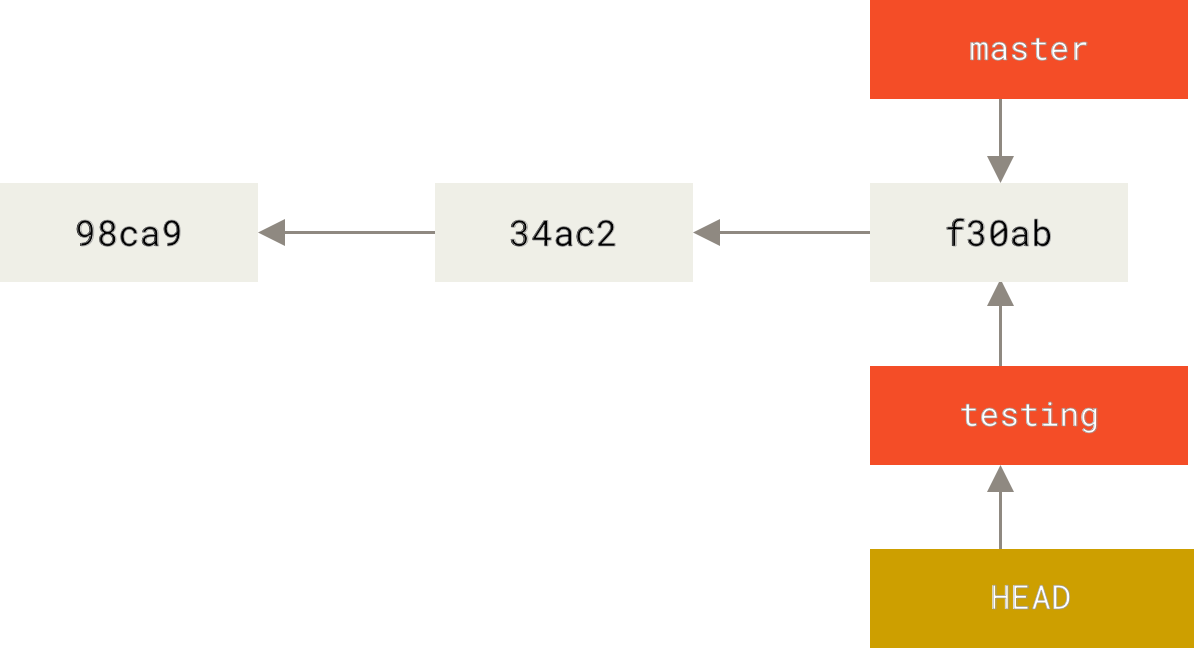
What is the significance of that? Well, let’s do another commit:
$ vim test.rb
$ git commit -a -m 'made a change'
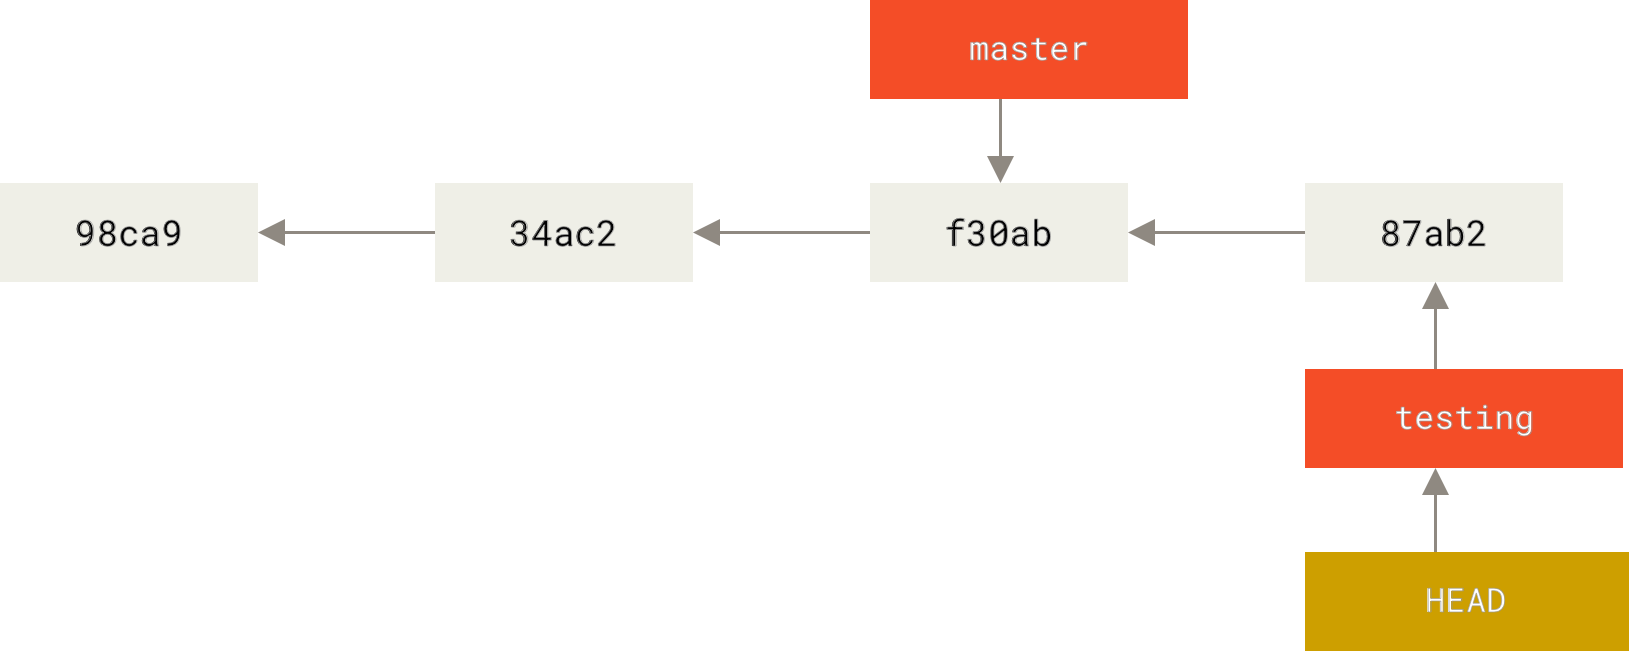
This is interesting, because now your testing branch has moved forward, but your master branch still points to the commit you were on when you ran git checkout to switch branches.
Let’s switch back to the master branch:
$ git checkout master
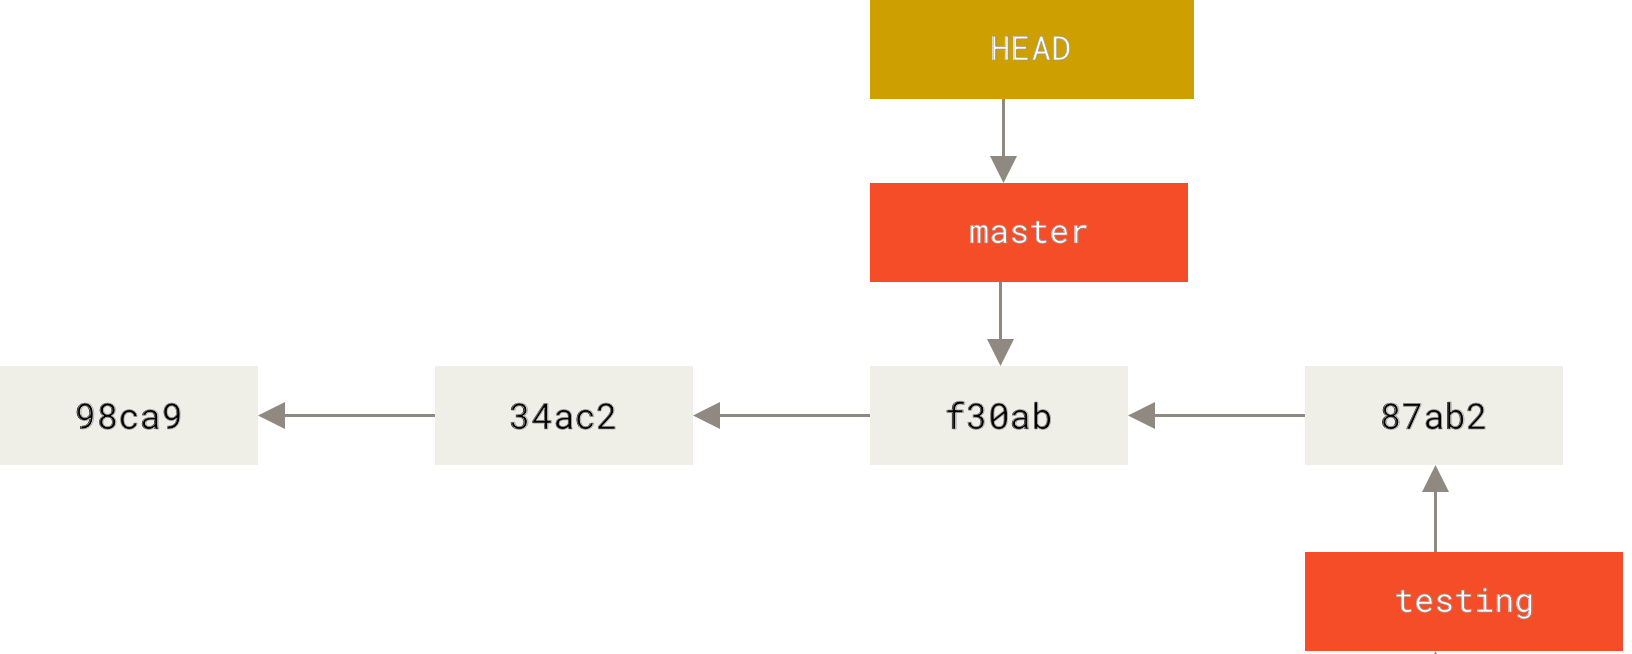
That command did two things.
It moved the HEAD pointer back to point to the master branch, and it reverted the files in your working directory back to the snapshot that master points to.
This also means the changes you make from this point forward will diverge from an older version of the project.
It essentially rewinds the work you’ve done in your testing branch so you can go in a different direction.
Switching branches changes files in your working directory
It’s important to note that when you switch branches in Git, files in your working directory will change. If you switch to an older branch, your working directory will be reverted to look like it did the last time you committed on that branch. If Git cannot do it cleanly, it will not let you switch at all.
Let’s make a few changes and commit again:
$ vim test.rb
$ git commit -a -m 'made other changes'
Now your project history has diverged (see Divergent history).
You created and switched to a branch, did some work on it, and then switched back to your main branch and did other work.
Both of those changes are isolated in separate branches: you can switch back and forth between the branches and merge them together when you’re ready.
And you did all that with simple branch, checkout, and commit commands.
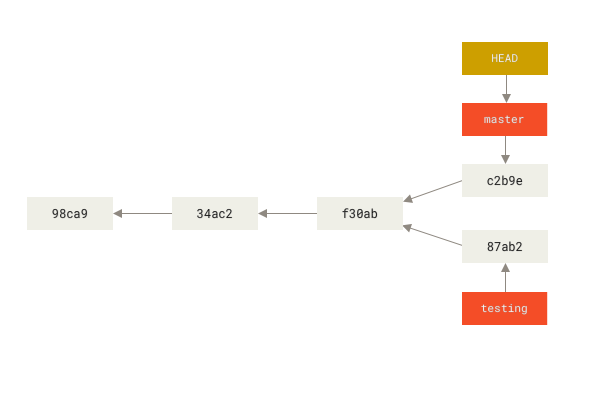
You can also see this easily with the git log command.
If you run git log --oneline --decorate --graph --all it will print out the history of your commits, showing where your branch pointers are and how your history has diverged.
$ git log --oneline --decorate --graph --all
* c2b9e (HEAD, master) made other changes
| * 87ab2 (testing) made a change
|/
* f30ab add feature #32 - ability to add new formats to the
* 34ac2 fixed bug #1328 - stack overflow under certain conditions
* 98ca9 initial commit of my project
Because a branch in Git is actually a simple file that contains the 40 character SHA-1 checksum of the commit it points to, branches are cheap to create and destroy. Creating a new branch is as quick and simple as writing 41 bytes to a file (40 characters and a newline).
This is in sharp contrast to the way most older VCS tools branch, which involves copying all of the project’s files into a second directory. This can take several seconds or even minutes, depending on the size of the project, whereas in Git the process is always instantaneous. Also, because we’re recording the parents when we commit, finding a proper merge base for merging is automatically done for us and is generally very easy to do. These features help encourage developers to create and use branches often.
Let’s see why you should do so.
Creating a new branch and switching to it at the same time
It’s typical to create a new branch and want to switch to that new branch at the same time — this can be done in one operation with git checkout -b <newbranchname>.
Basic Branching and Merging
Let’s go through a simple example of branching and merging with a workflow that you might use in the real world. You’ll follow these steps:
-
Do some work on a website.
-
Create a branch for a new user story you’re working on.
-
Do some work in that branch.
At this stage, you’ll receive a call that another issue is critical and you need a hotfix. You’ll do the following:
-
Switch to your production branch.
-
Create a branch to add the hotfix.
-
After it’s tested, merge the hotfix branch, and push to production.
-
Switch back to your original user story and continue working.
Basic Branching
First, let’s say you’re working on your project and have a couple of commits already on the master branch.

You’ve decided that you’re going to work on issue #53 in whatever issue-tracking system your company uses.
To create a new branch and switch to it at the same time, you can run the git checkout command with the -b switch:
$ git checkout -b iss53
Switched to a new branch "iss53"
This is shorthand for:
$ git branch iss53
$ git checkout iss53
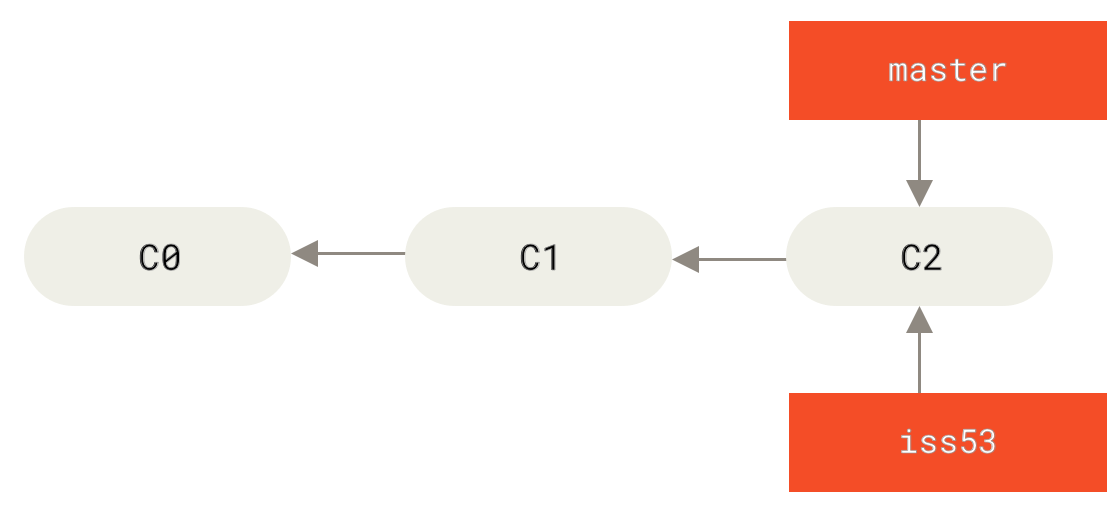
You work on your website and do some commits.
Doing so moves the iss53 branch forward, because you have it checked out (that is, your HEAD is pointing to it):
$ vim index.html
$ git commit -a -m 'added a new footer [issue 53]'
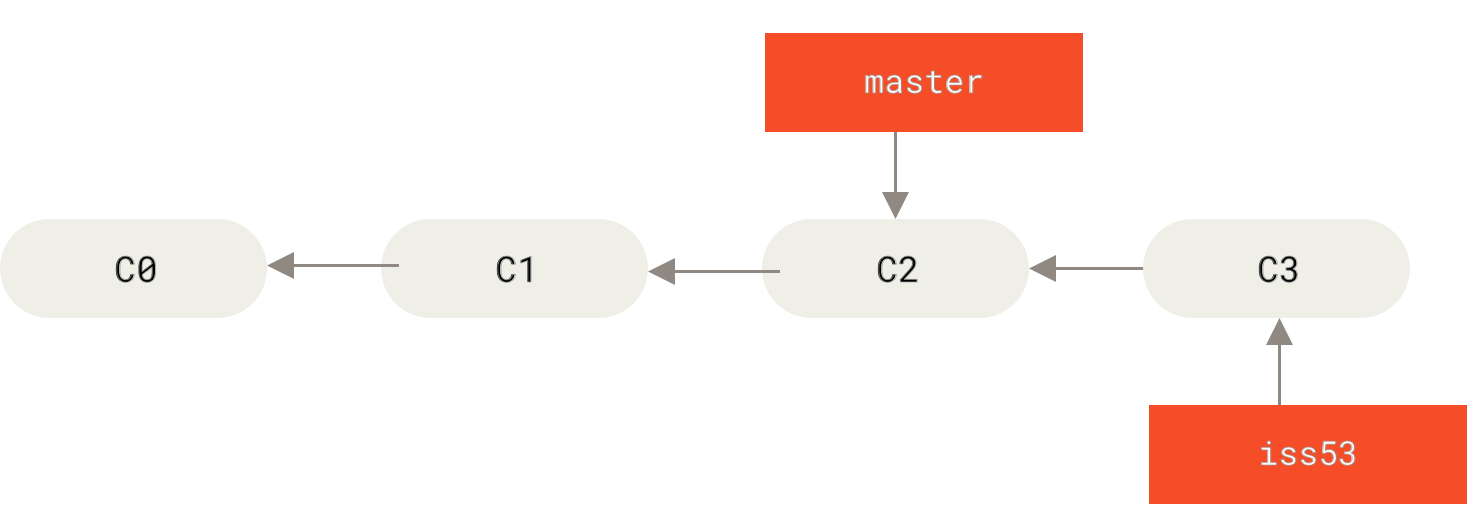
iss53 branch has moved forward with your workNow you get the call that there is an issue with the website, and you need to fix it immediately.
With Git, you don’t have to deploy your fix along with the iss53 changes you’ve made, and you don’t have to put a lot of effort into reverting those changes before you can work on applying your fix to what is in production.
All you have to do is switch back to your master branch.
However, before you do that, note that if your working directory or staging area has uncommitted changes that conflict with the branch you’re checking out, Git won’t let you switch branches.
It’s best to have a clean working state when you switch branches.
There are ways to get around this (namely, stashing and commit amending) that we’ll cover later on, in Stashing and Cleaning.
For now, let’s assume you’ve committed all your changes, so you can switch back to your master branch:
$ git checkout master
Switched to branch 'master'
At this point, your project working directory is exactly the way it was before you started working on issue #53, and you can concentrate on your hotfix. This is an important point to remember: when you switch branches, Git resets your working directory to look like it did the last time you committed on that branch. It adds, removes, and modifies files automatically to make sure your working copy is what the branch looked like on your last commit to it.
Next, you have a hotfix to make.
Let’s create a hotfix branch on which to work until it’s completed:
$ git checkout -b hotfix
Switched to a new branch 'hotfix'
$ vim index.html
$ git commit -a -m 'fixed the broken email address'
[hotfix 1fb7853] fixed the broken email address
 1 file changed, 2 insertions(+)
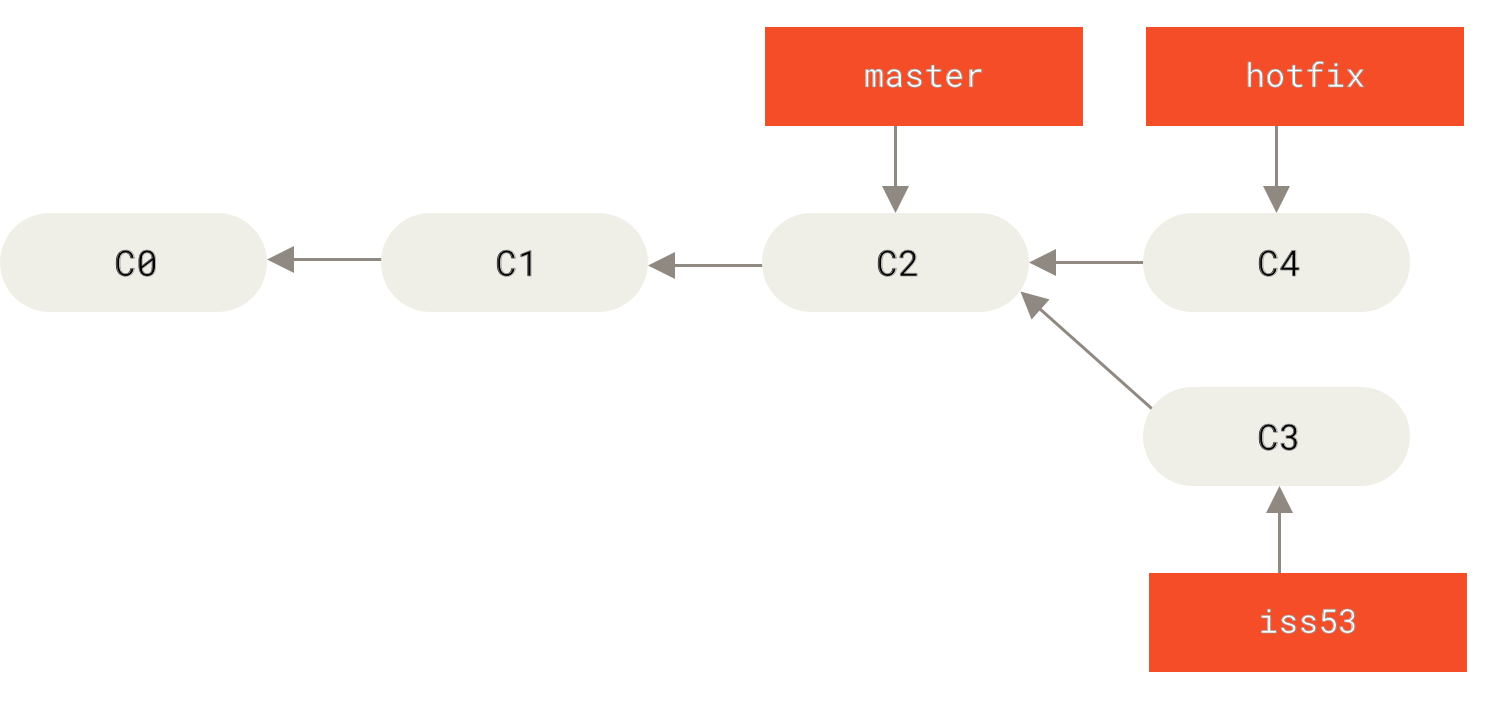
masterYou can run your tests, make sure the hotfix is what you want, and finally merge the hotfix branch back into your master branch to deploy to production.
You do this with the git merge command:
$ git checkout master
$ git merge hotfix
Updating f42c576..3a0874c
Fast-forward
 index.html | 2 ++
 1 file changed, 2 insertions(+)
You’ll notice the phrase fast-forward'' in that merge.
Because the commit fast-forward.''C4 pointed to by the branch hotfix you merged in was directly ahead of the commit C2 you’re on, Git simply moves the pointer forward.
To phrase that another way, when you try to merge one commit with a commit that can be reached by following the first commit’s history, Git simplifies things by moving the pointer forward because there is no divergent work to merge together — this is called a
Your change is now in the snapshot of the commit pointed to by the master branch, and you can deploy the fix.
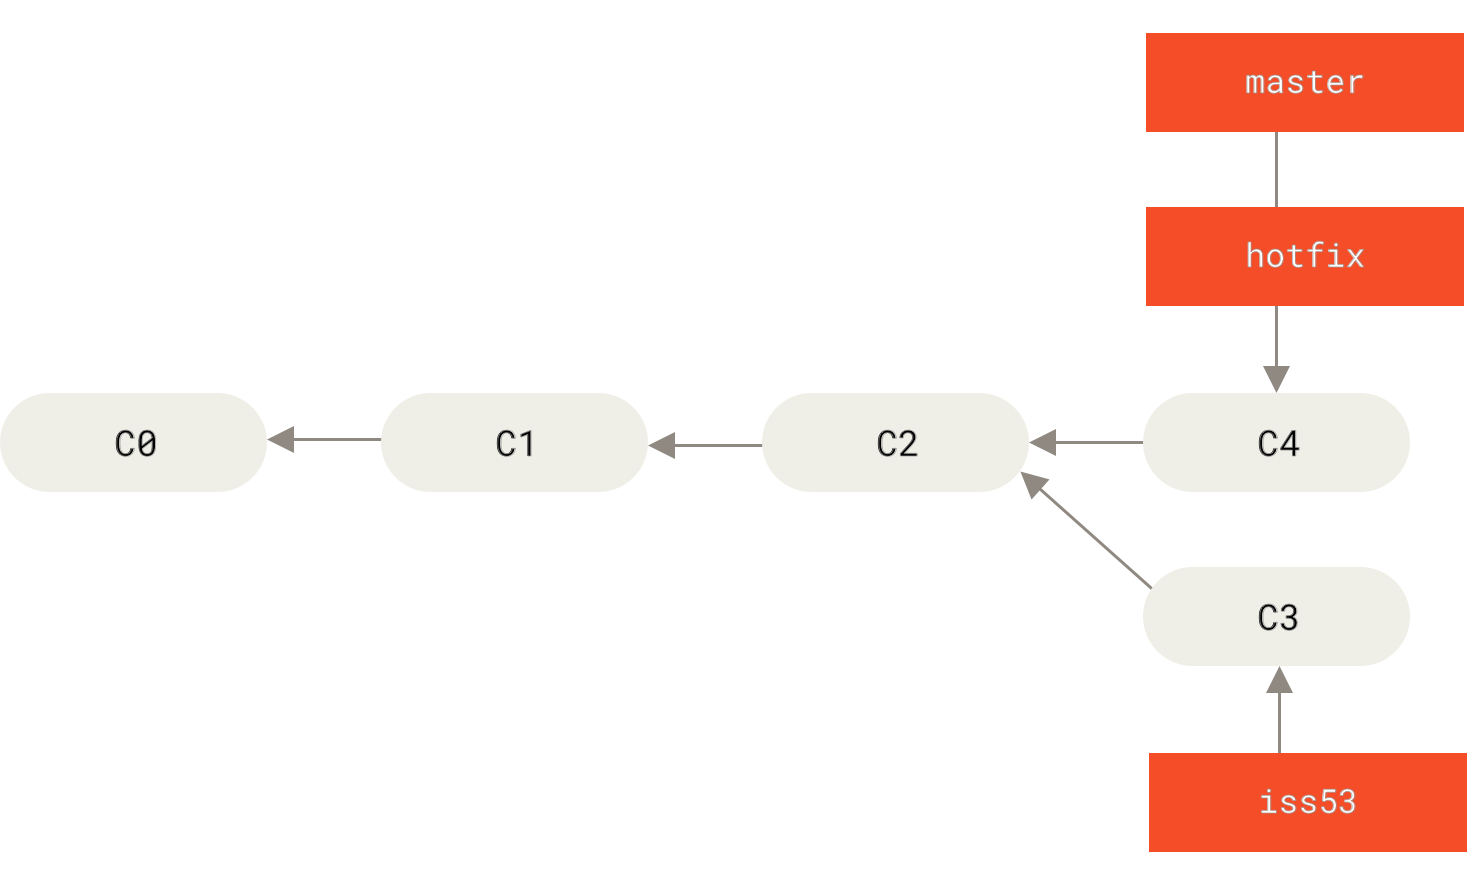
master is fast-forwarded to hotfixAfter your super-important fix is deployed, you’re ready to switch back to the work you were doing before you were interrupted.
However, first you’ll delete the hotfix branch, because you no longer need it — the master branch points at the same place.
You can delete it with the -d option to git branch:
$ git branch -d hotfix
Deleted branch hotfix (3a0874c).
Now you can switch back to your work-in-progress branch on issue #53 and continue working on it.
$ git checkout iss53
Switched to branch "iss53"
$ vim index.html
$ git commit -a -m 'finished the new footer [issue 53]'
[iss53 ad82d7a] finished the new footer [issue 53]
1 file changed, 1 insertion(+)
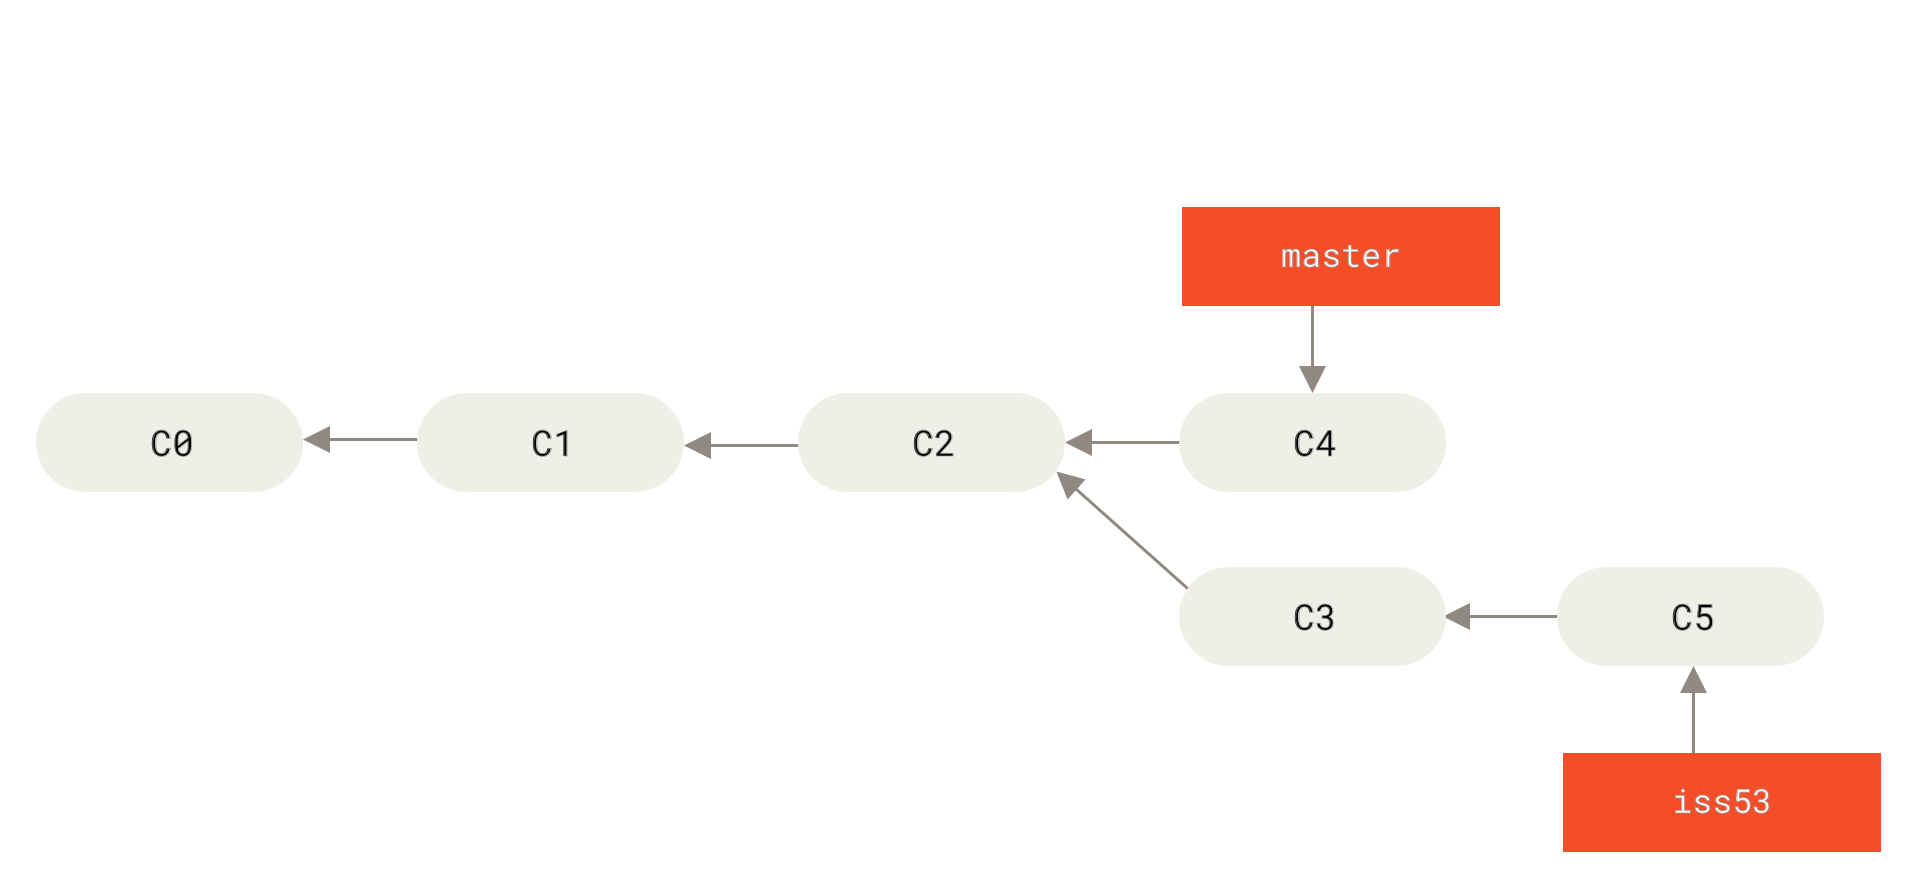
iss53It’s worth noting here that the work you did in your hotfix branch is not contained in the files in your iss53 branch.
If you need to pull it in, you can merge your master branch into your iss53 branch by running git merge master, or you can wait to integrate those changes until you decide to pull the iss53 branch back into master later.
Basic Merging
Suppose you’ve decided that your issue #53 work is complete and ready to be merged into your master branch.
In order to do that, you’ll merge your iss53 branch into master, much like you merged your hotfix branch earlier.
All you have to do is check out the branch you wish to merge into and then run the git merge command:
$ git checkout master
Switched to branch 'master'
$ git merge iss53
Merge made by the 'recursive' strategy.
index.html |    1 +
1 file changed, 1 insertion(+)
This looks a bit different than the hotfix merge you did earlier.
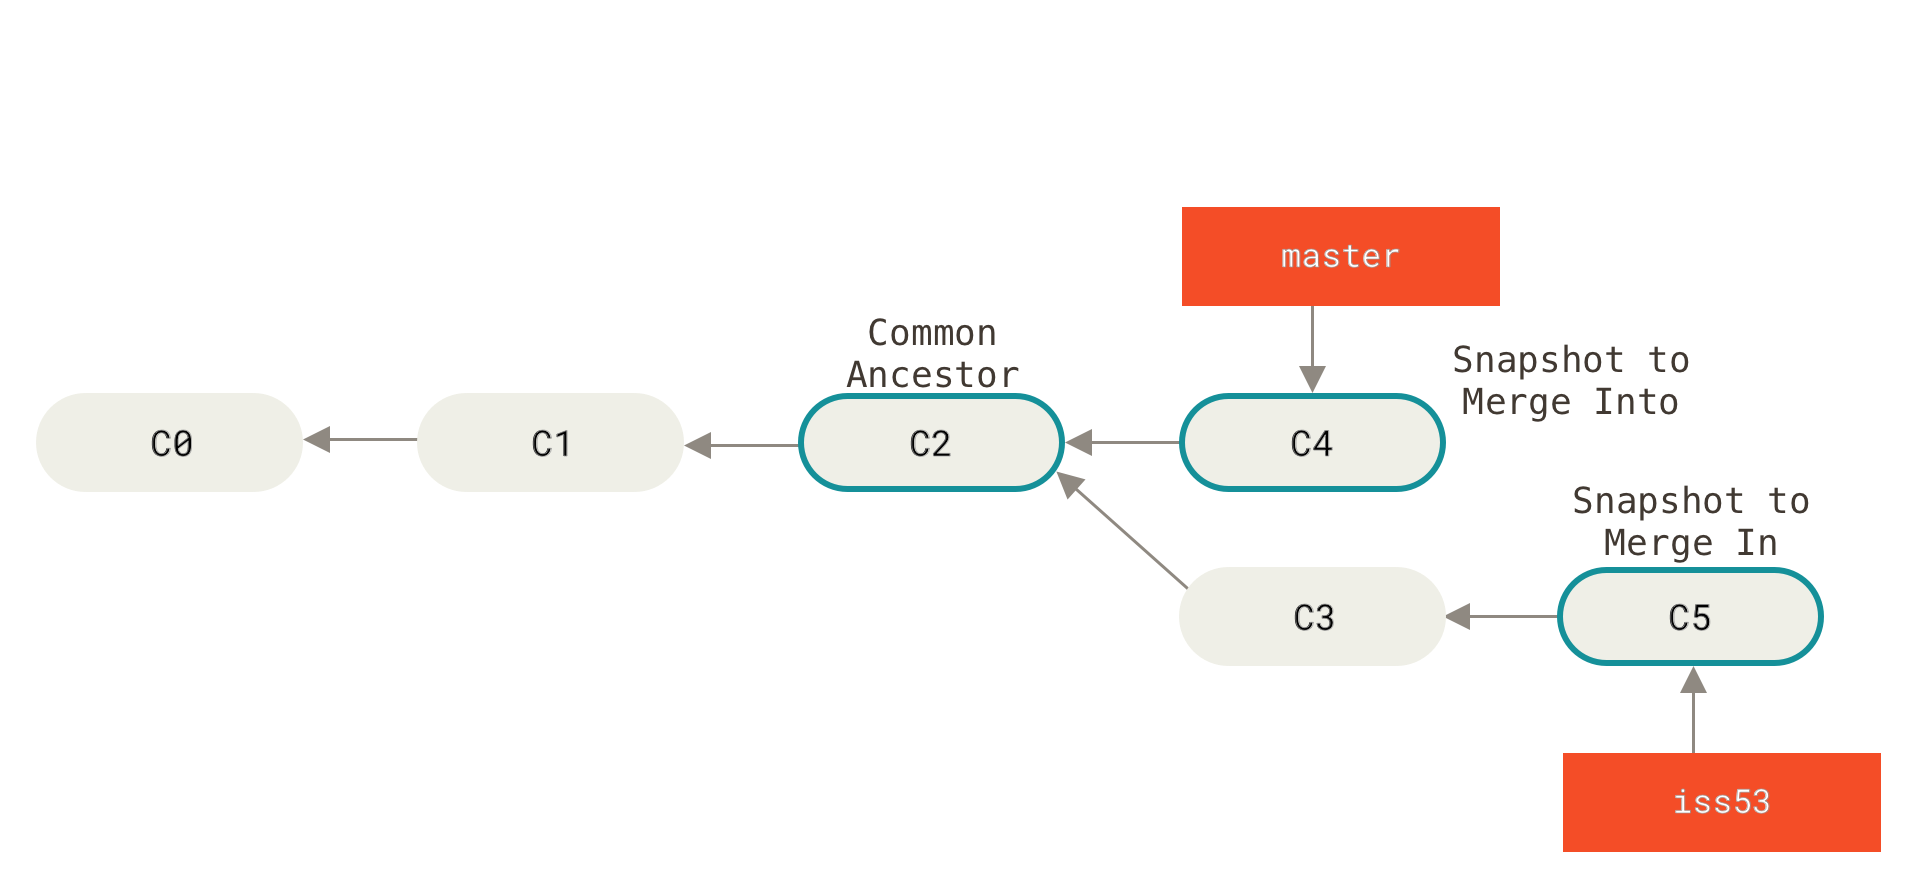
In this case, your development history has diverged from some older point.
Because the commit on the branch you’re on isn’t a direct ancestor of the branch you’re merging in, Git has to do some work.
In this case, Git does a simple three-way merge, using the two snapshots pointed to by the branch tips and the common ancestor of the two.
Instead of just moving the branch pointer forward, Git creates a new snapshot that results from this three-way merge and automatically creates a new commit that points to it. This is referred to as a merge commit, and is special in that it has more than one parent.
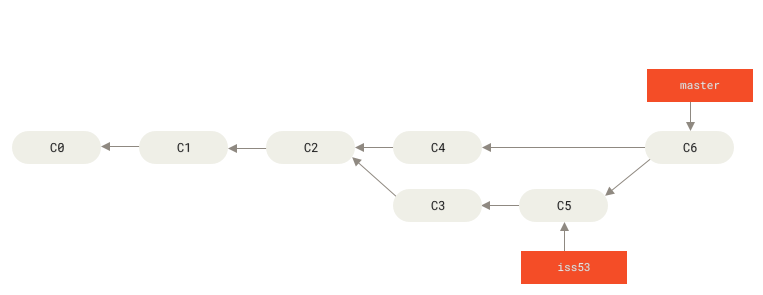
Now that your work is merged in, you have no further need for the iss53 branch.
You can close the ticket in your ticket-tracking system, and delete the branch:
$ git branch -d iss53
Basic Merge Conflicts
Occasionally, this process doesn’t go smoothly.
If you changed the same part of the same file differently in the two branches you’re merging, Git won’t be able to merge them cleanly.
If your fix for issue #53 modified the same part of a file as the hotfix branch, you’ll get a merge conflict that looks something like this:
$ git merge iss53
Auto-merging index.html
CONFLICT (content): Merge conflict in index.html
Automatic merge failed; fix conflicts and then commit the result.
Git hasn’t automatically created a new merge commit.
It has paused the process while you resolve the conflict.
If you want to see which files are unmerged at any point after a merge conflict, you can run git status:
$ git status
On branch master
You have unmerged paths.
  (fix conflicts and run "git commit")

Unmerged paths:
  (use "git add <file>..." to mark resolution)

    both modified:      index.html

no changes added to commit (use "git add" and/or "git commit -a")
Anything that has merge conflicts and hasn’t been resolved is listed as unmerged. Git adds standard conflict-resolution markers to the files that have conflicts, so you can open them manually and resolve those conflicts. Your file contains a section that looks something like this:
<<<<<<< HEAD:index.html
<div id="footer">contact : email.support@github.com</div>
=======
<div id="footer">
 please contact us at support@github.com
</div>
>>>>>>> iss53:index.html
This means the version in HEAD (your master branch, because that was what you had checked out when you ran your merge command) is the top part of that block (everything above the =======), while the version in your iss53 branch looks like everything in the bottom part.
In order to resolve the conflict, you have to either choose one side or the other or merge the contents yourself.
For instance, you might resolve this conflict by replacing the entire block with this:
<div id="footer">
please contact us at email.support@github.com
</div>
This resolution has a little of each section, and the <<<<<<<, =======, and >>>>>>> lines have been completely removed.
After you’ve resolved each of these sections in each conflicted file, run git add on each file to mark it as resolved.
Staging the file marks it as resolved in Git.
If you want to use a graphical tool to resolve these issues, you can run git mergetool, which fires up an appropriate visual merge tool and walks you through the conflicts:
$ git mergetool

This message is displayed because 'merge.tool' is not configured.
See 'git mergetool --tool-help' or 'git help config' for more details.
'git mergetool' will now attempt to use one of the following tools:
opendiff kdiff3 tkdiff xxdiff meld tortoisemerge gvimdiff diffuse diffmerge ecmerge p4merge araxis bc3 codecompare vimdiff emerge
Merging:
index.html

Normal merge conflict for 'index.html':
  {local}: modified file
  {remote}: modified file
Hit return to start merge resolution tool (opendiff):
If you want to use a merge tool other than the default (Git chose opendiff in this case because the command was run on a Mac), you can see all the supported tools listed at the top after ``one of the following tools.''
Just type the name of the tool you’d rather use.
If you need more advanced tools for resolving tricky merge conflicts, we cover more on merging in Advanced Merging.
After you exit the merge tool, Git asks you if the merge was successful.
If you tell the script that it was, it stages the file to mark it as resolved for you.
You can run git status again to verify that all conflicts have been resolved:
$ git status
On branch master
All conflicts fixed but you are still merging.
  (use "git commit" to conclude merge)

Changes to be committed:

    modified:   index.html
If you’re happy with that, and you verify that everything that had conflicts has been staged, you can type git commit to finalize the merge commit.
The commit message by default looks something like this:
Merge branch 'iss53'

Conflicts:
    index.html
#
# It looks like you may be committing a merge.
# If this is not correct, please remove the file
#	.git/MERGE_HEAD
# and try again.


# Please enter the commit message for your changes. Lines starting
# with '#' will be ignored, and an empty message aborts the commit.
# On branch master
# All conflicts fixed but you are still merging.
#
# Changes to be committed:
#	modified:   index.html
#
If you think it would be helpful to others looking at this merge in the future, you can modify this commit message with details about how you resolved the merge and explain why you did the changes you made if these are not obvious.
Branch Management
Now that you’ve created, merged, and deleted some branches, let’s look at some branch-management tools that will come in handy when you begin using branches all the time.
The git branch command does more than just create and delete branches.
If you run it with no arguments, you get a simple listing of your current branches:
$ git branch
  iss53
* master
  testing
Notice the * character that prefixes the master branch: it indicates the branch that you currently have checked out (i.e., the branch that HEAD points to).
This means that if you commit at this point, the master branch will be moved forward with your new work.
To see the last commit on each branch, you can run git branch -v:
$ git branch -v
  iss53   93b412c fix javascript issue
* master  7a98805 Merge branch 'iss53'
  testing 782fd34 add scott to the author list in the readmes
The useful --merged and --no-merged options can filter this list to branches that you have or have not yet merged into the branch you’re currently on.
To see which branches are already merged into the branch you’re on, you can run git branch --merged:
$ git branch --merged
  iss53
* master
Because you already merged in iss53 earlier, you see it in your list.
Branches on this list without the * in front of them are generally fine to delete with git branch -d; you’ve already incorporated their work into another branch, so you’re not going to lose anything.
To see all the branches that contain work you haven’t yet merged in, you can run git branch --no-merged:
$ git branch --no-merged
  testing
This shows your other branch.
Because it contains work that isn’t merged in yet, trying to delete it with git branch -d will fail:
$ git branch -d testing
error: The branch 'testing' is not fully merged.
If you are sure you want to delete it, run 'git branch -D testing'.
If you really do want to delete the branch and lose that work, you can force it with -D, as the helpful message points out.
The options described above, --merged and --no-merged will, if not given a commit or branch name as an argument, show you what is, respectively, merged or not merged into your current branch.
You can always provide an additional argument to ask about the merge state with respect to some other branch without checking that other branch out first, as in, what is not merged into the master branch?
$ git checkout testing
$ git branch --no-merged master
  topicA
  featureB
Branching Workflows
Now that you have the basics of branching and merging down, what can or should you do with them? In this section, we’ll cover some common workflows that this lightweight branching makes possible, so you can decide if you would like to incorporate them into your own development cycle.
Long-Running Branches
Because Git uses a simple three-way merge, merging from one branch into another multiple times over a long period is generally easy to do. This means you can have several branches that are always open and that you use for different stages of your development cycle; you can merge regularly from some of them into others.
Many Git developers have a workflow that embraces this approach, such as having only code that is entirely stable in their master branch — possibly only code that has been or will be released.
They have another parallel branch named develop or next that they work from or use to test stability — it isn’t necessarily always stable, but whenever it gets to a stable state, it can be merged into master.
It’s used to pull in topic branches (short-lived branches, like your earlier iss53 branch) when they’re ready, to make sure they pass all the tests and don’t introduce bugs.
In reality, we’re talking about pointers moving up the line of commits you’re making. The stable branches are farther down the line in your commit history, and the bleeding-edge branches are farther up the history.

It’s generally easier to think about them as work silos, where sets of commits graduate to a more stable silo when they’re fully tested.
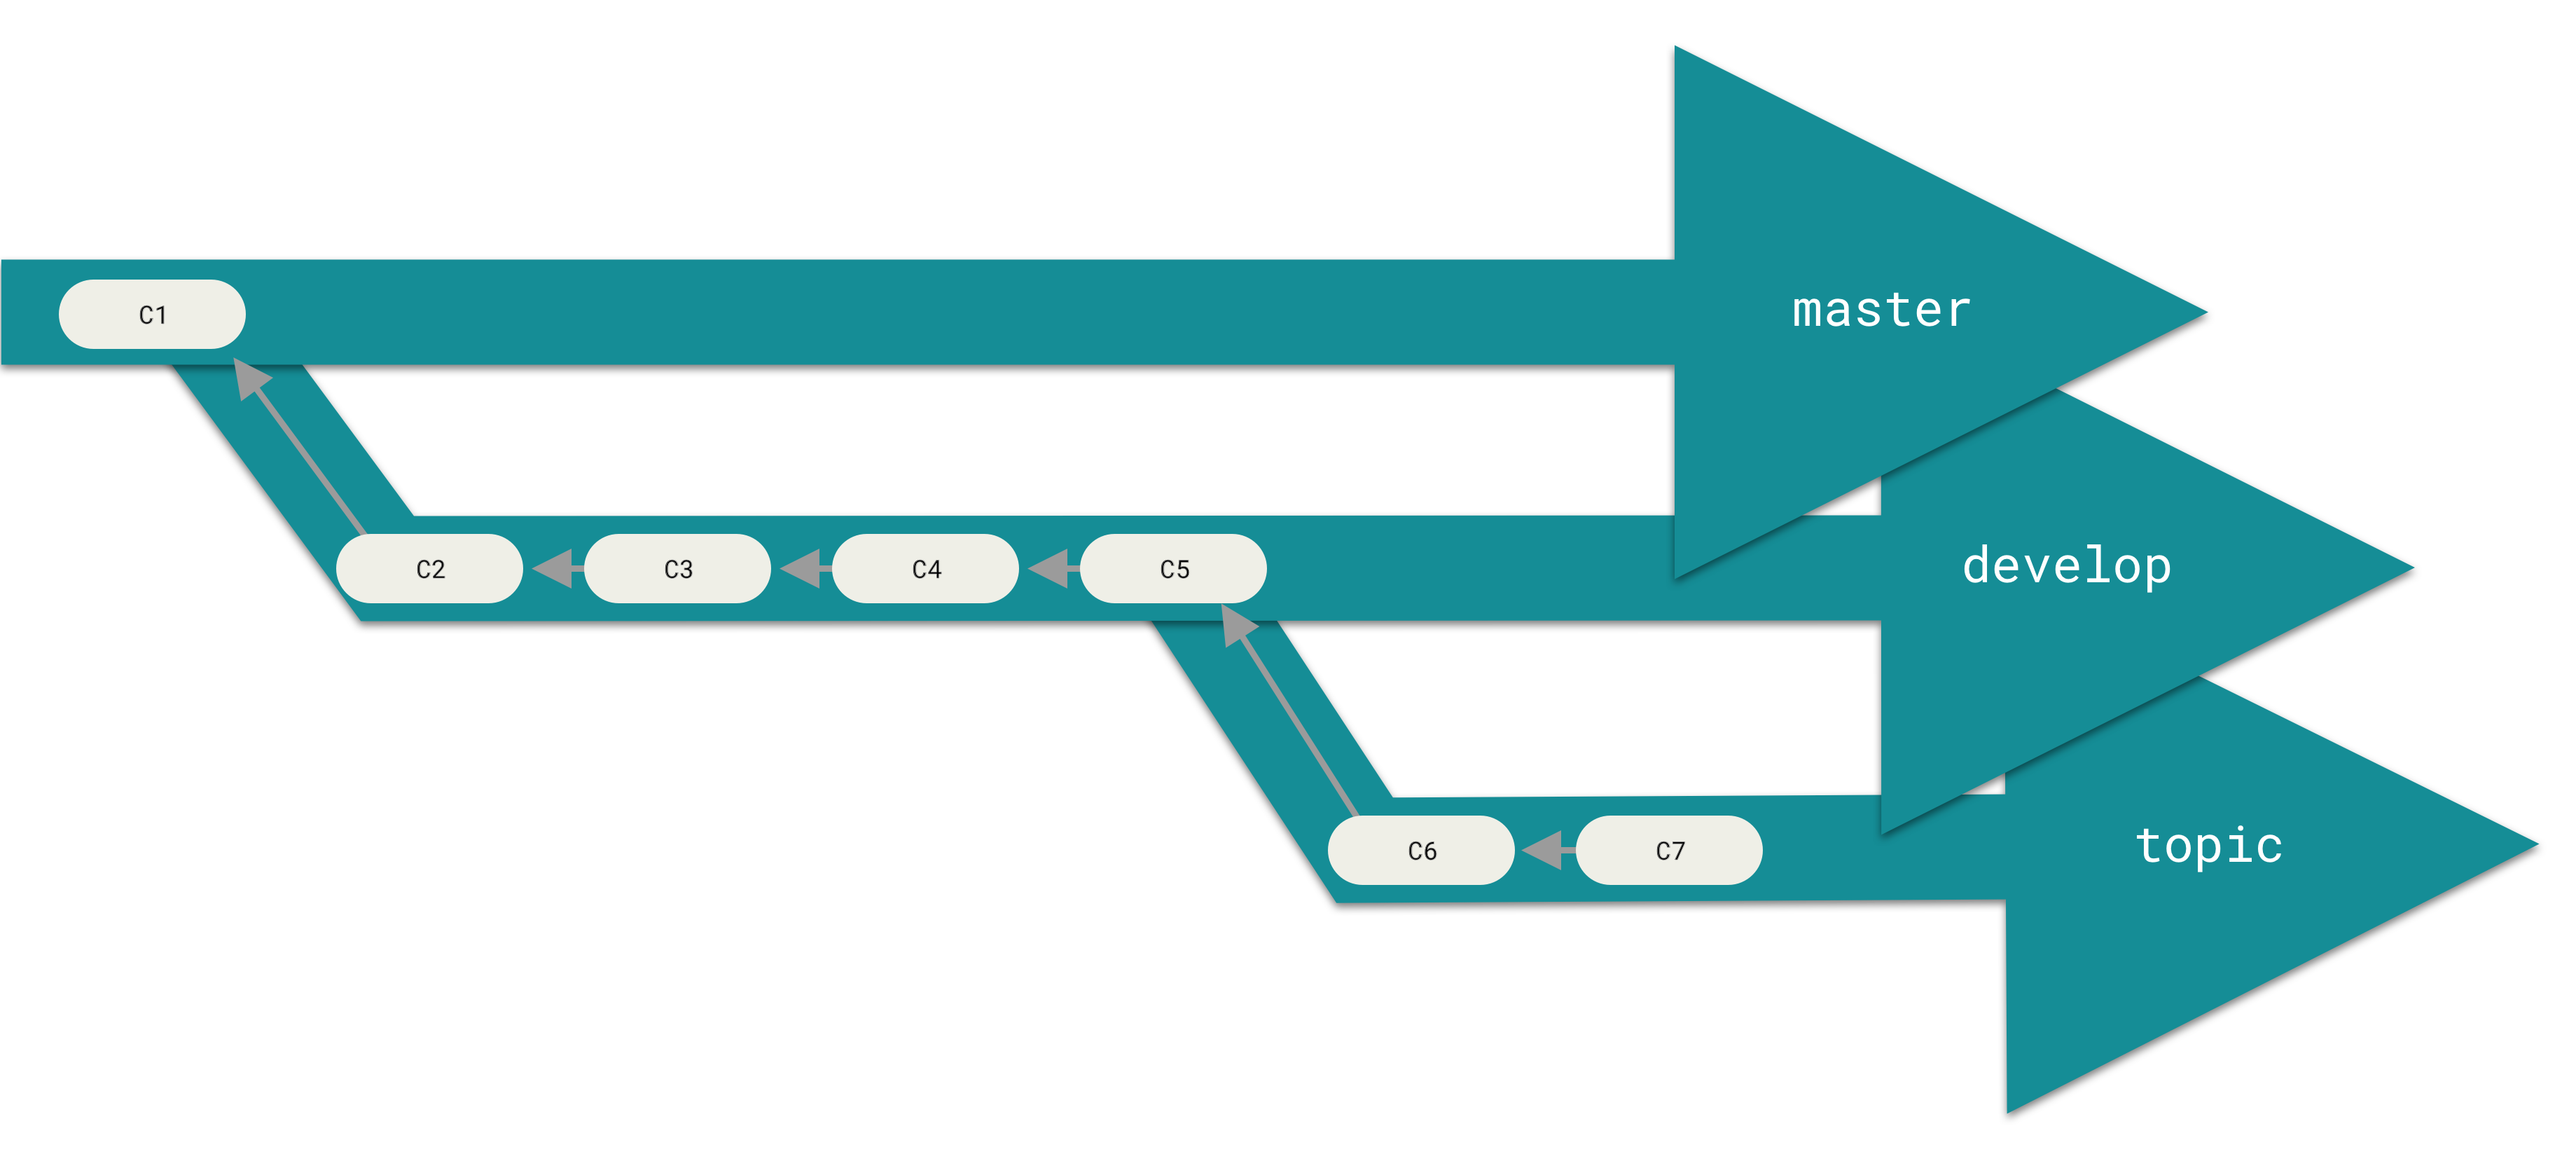
You can keep doing this for several levels of stability.
Some larger projects also have a proposed or pu (proposed updates) branch that has integrated branches that may not be ready to go into the next or master branch.
The idea is that your branches are at various levels of stability; when they reach a more stable level, they’re merged into the branch above them.
Again, having multiple long-running branches isn’t necessary, but it’s often helpful, especially when you’re dealing with very large or complex projects.
Topic Branches
Topic branches, however, are useful in projects of any size. A topic branch is a short-lived branch that you create and use for a single particular feature or related work. This is something you’ve likely never done with a VCS before because it’s generally too expensive to create and merge branches. But in Git it’s common to create, work on, merge, and delete branches several times a day.
You saw this in the last section with the iss53 and hotfix branches you created.
You did a few commits on them and deleted them directly after merging them into your main branch.
This technique allows you to context-switch quickly and completely — because your work is separated into silos where all the changes in that branch have to do with that topic, it’s easier to see what has happened during code review and such.
You can keep the changes there for minutes, days, or months, and merge them in when they’re ready, regardless of the order in which they were created or worked on.
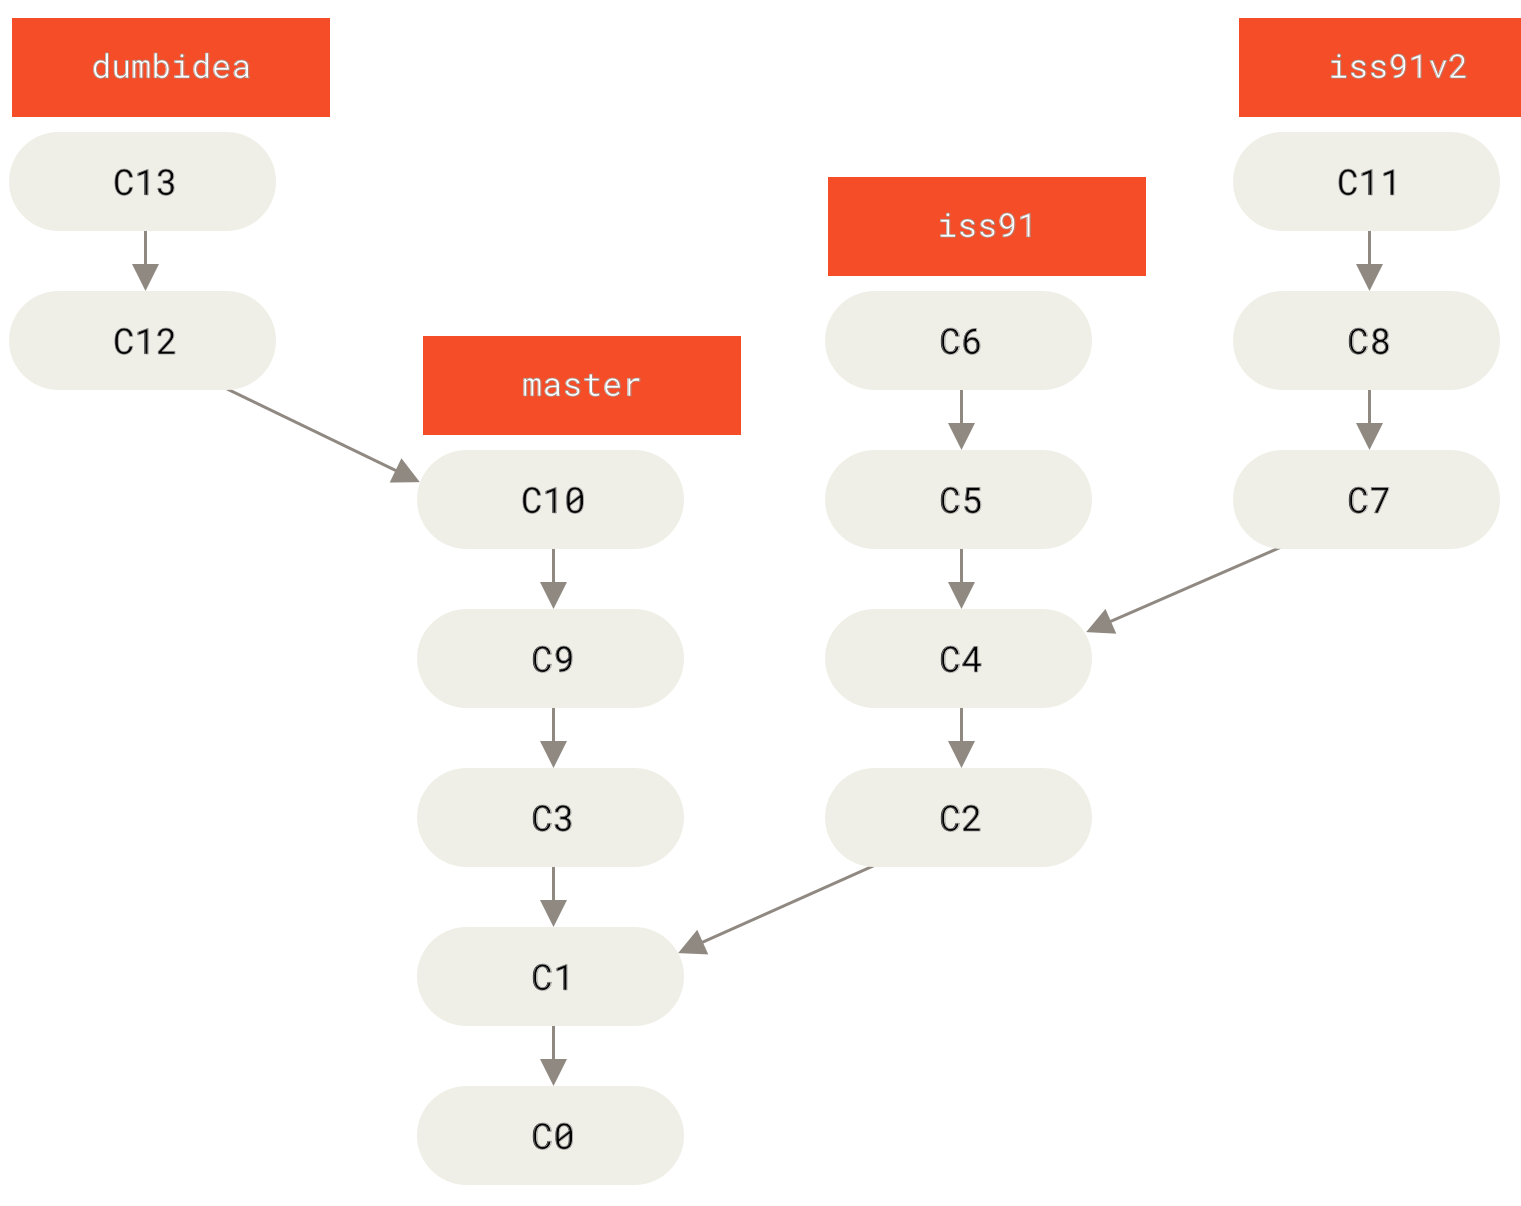
Consider an example of doing some work (on master), branching off for an issue (iss91), working on it for a bit, branching off the second branch to try another way of handling the same thing (iss91v2), going back to your master branch and working there for a while, and then branching off there to do some work that you’re not sure is a good idea (dumbidea branch).
Your commit history will look something like this:
Now, let’s say you decide you like the second solution to your issue best (iss91v2); and you showed the dumbidea branch to your coworkers, and it turns out to be genius.
You can throw away the original iss91 branch (losing commits C5 and C6) and merge in the other two.
Your history then looks like this:
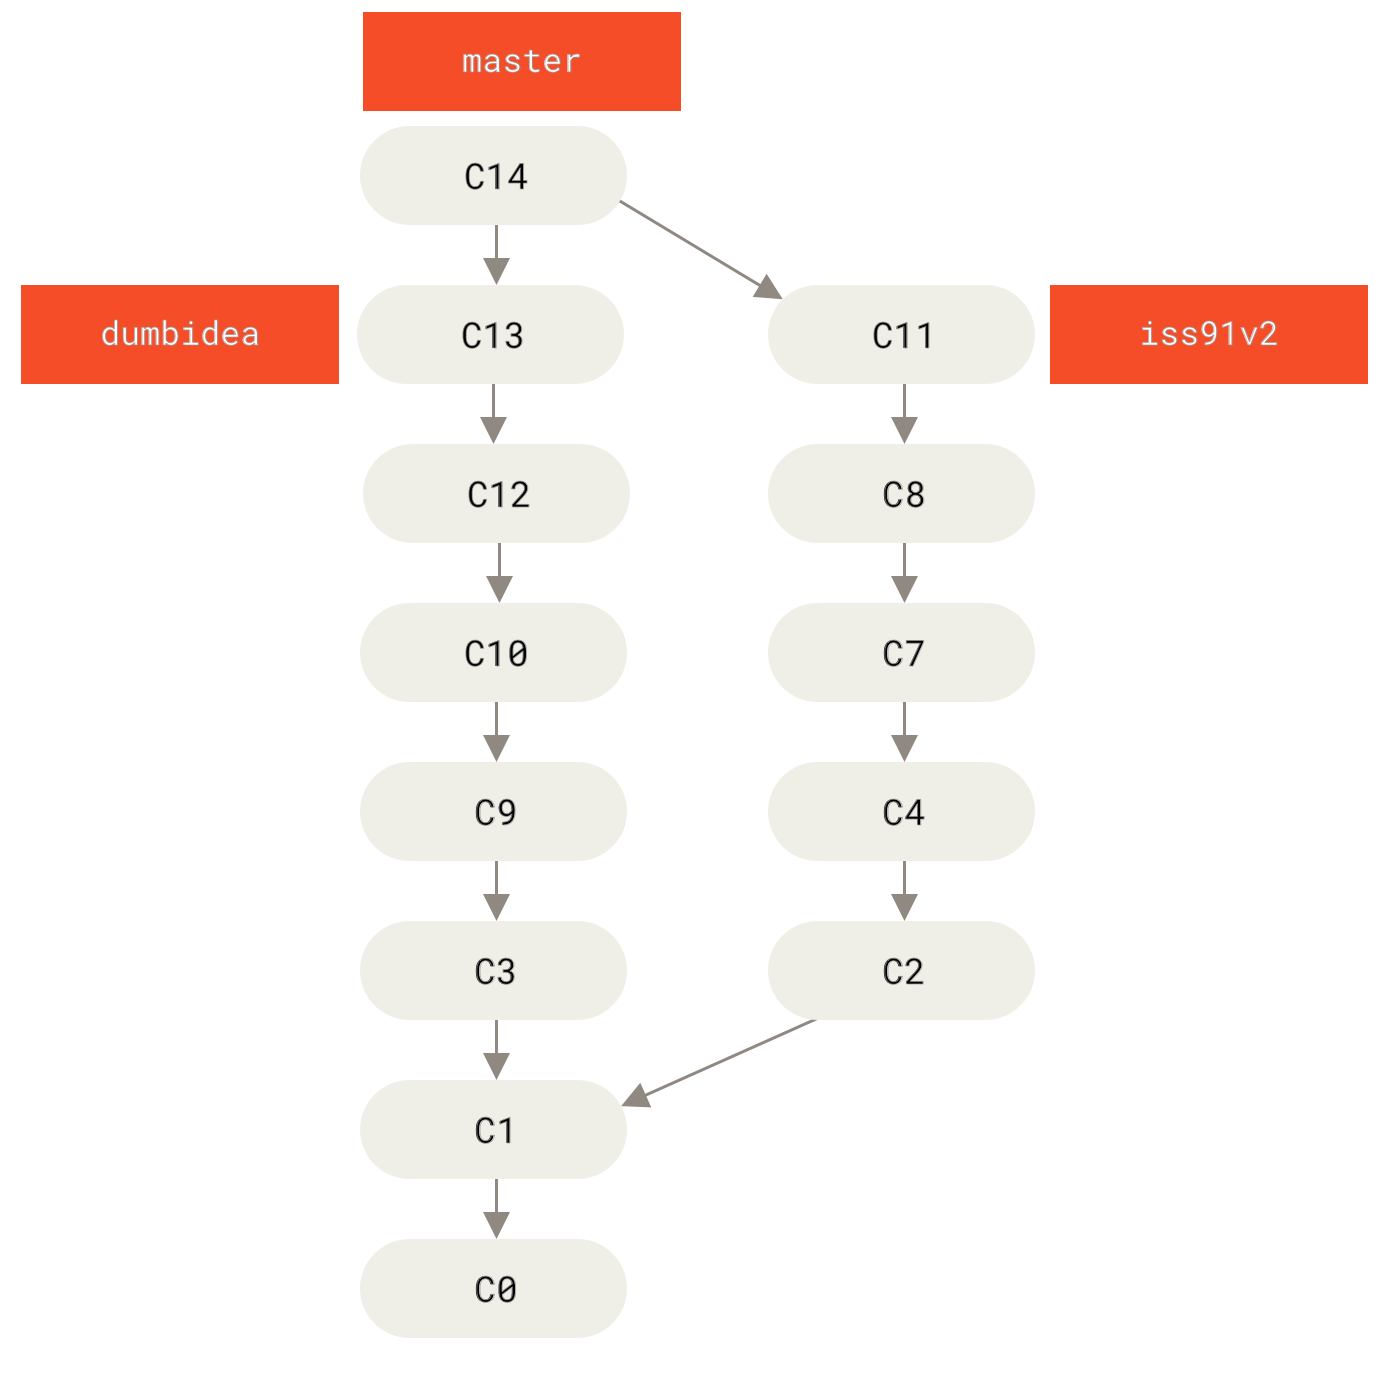
dumbidea and iss91v2We will go into more detail about the various possible workflows for your Git project in Distributed Git, so before you decide which branching scheme your next project will use, be sure to read that chapter.
It’s important to remember when you’re doing all this that these branches are completely local. When you’re branching and merging, everything is being done only in your Git repository — there is no communication with the server.
Remote Branches
Remote references are references (pointers) in your remote repositories, including branches, tags, and so on.
You can get a full list of remote references explicitly with git ls-remote <remote>, or git remote show <remote> for remote branches as well as more information.
Nevertheless, a more common way is to take advantage of remote-tracking branches.
Remote-tracking branches are references to the state of remote branches. They’re local references that you can’t move; Git moves them for you whenever you do any network communication, to make sure they accurately represent the state of the remote repository. Think of them as bookmarks, to remind you where the branches in your remote repositories were the last time you connected to them.
Remote-tracking branch names take the form <remote>/<branch>.
For instance, if you wanted to see what the master branch on your origin remote looked like as of the last time you communicated with it, you would check the origin/master branch.
If you were working on an issue with a partner and they pushed up an iss53 branch, you might have your own local iss53 branch, but the branch on the server would be represented by the remote-tracking branch origin/iss53.
This may be a bit confusing, so let’s look at an example.
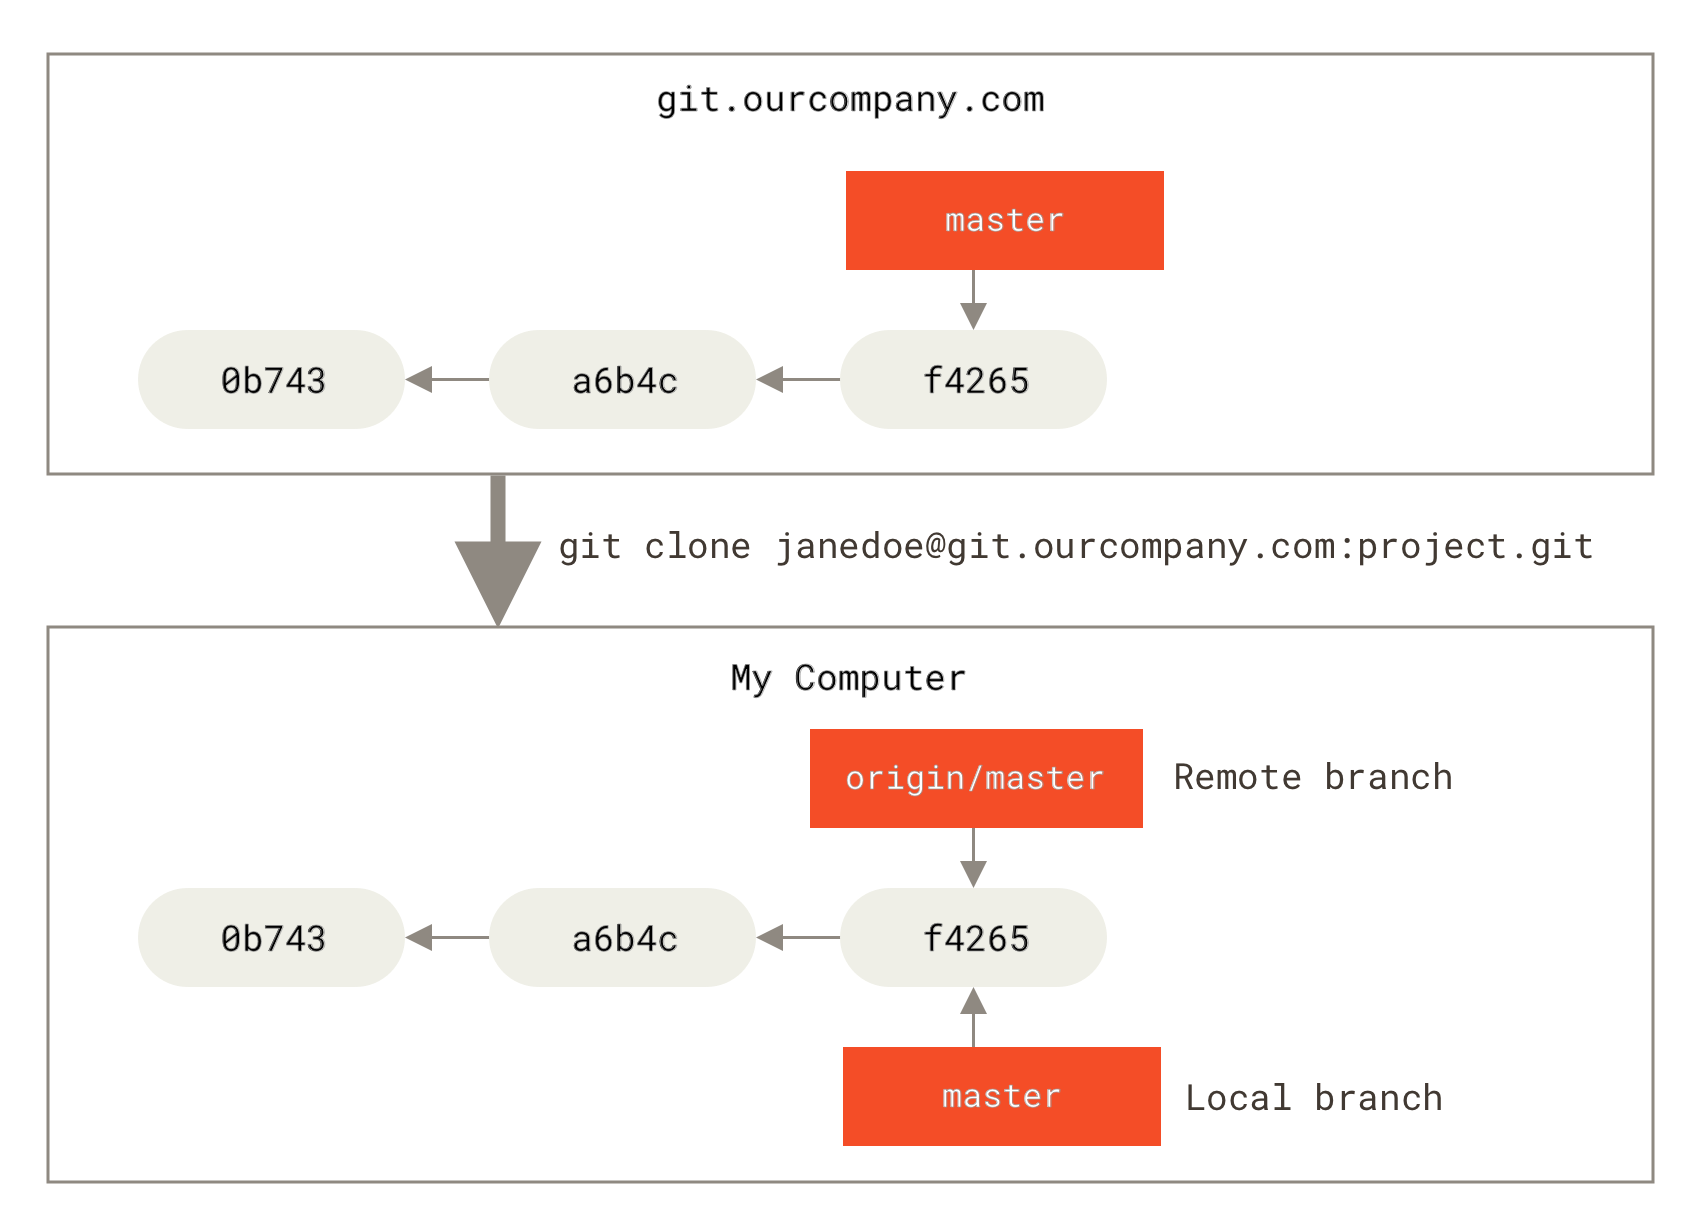
Let’s say you have a Git server on your network at git.ourcompany.com.
If you clone from this, Git’s clone command automatically names it origin for you, pulls down all its data, creates a pointer to where its master branch is, and names it origin/master locally.
Git also gives you your own local master branch starting at the same place as origin’s master branch, so you have something to work from.
``origin'' is not special
Just like the branch name master'' does not have any special meaning in Git, neither does origin''.
While master'' is the default name for a starting branch when you run origin'' is the default name for a remote when you run git init which is the only reason it’s widely used, git clone.
If you run git clone -o booyah instead, then you will have booyah/master as your default remote branch.
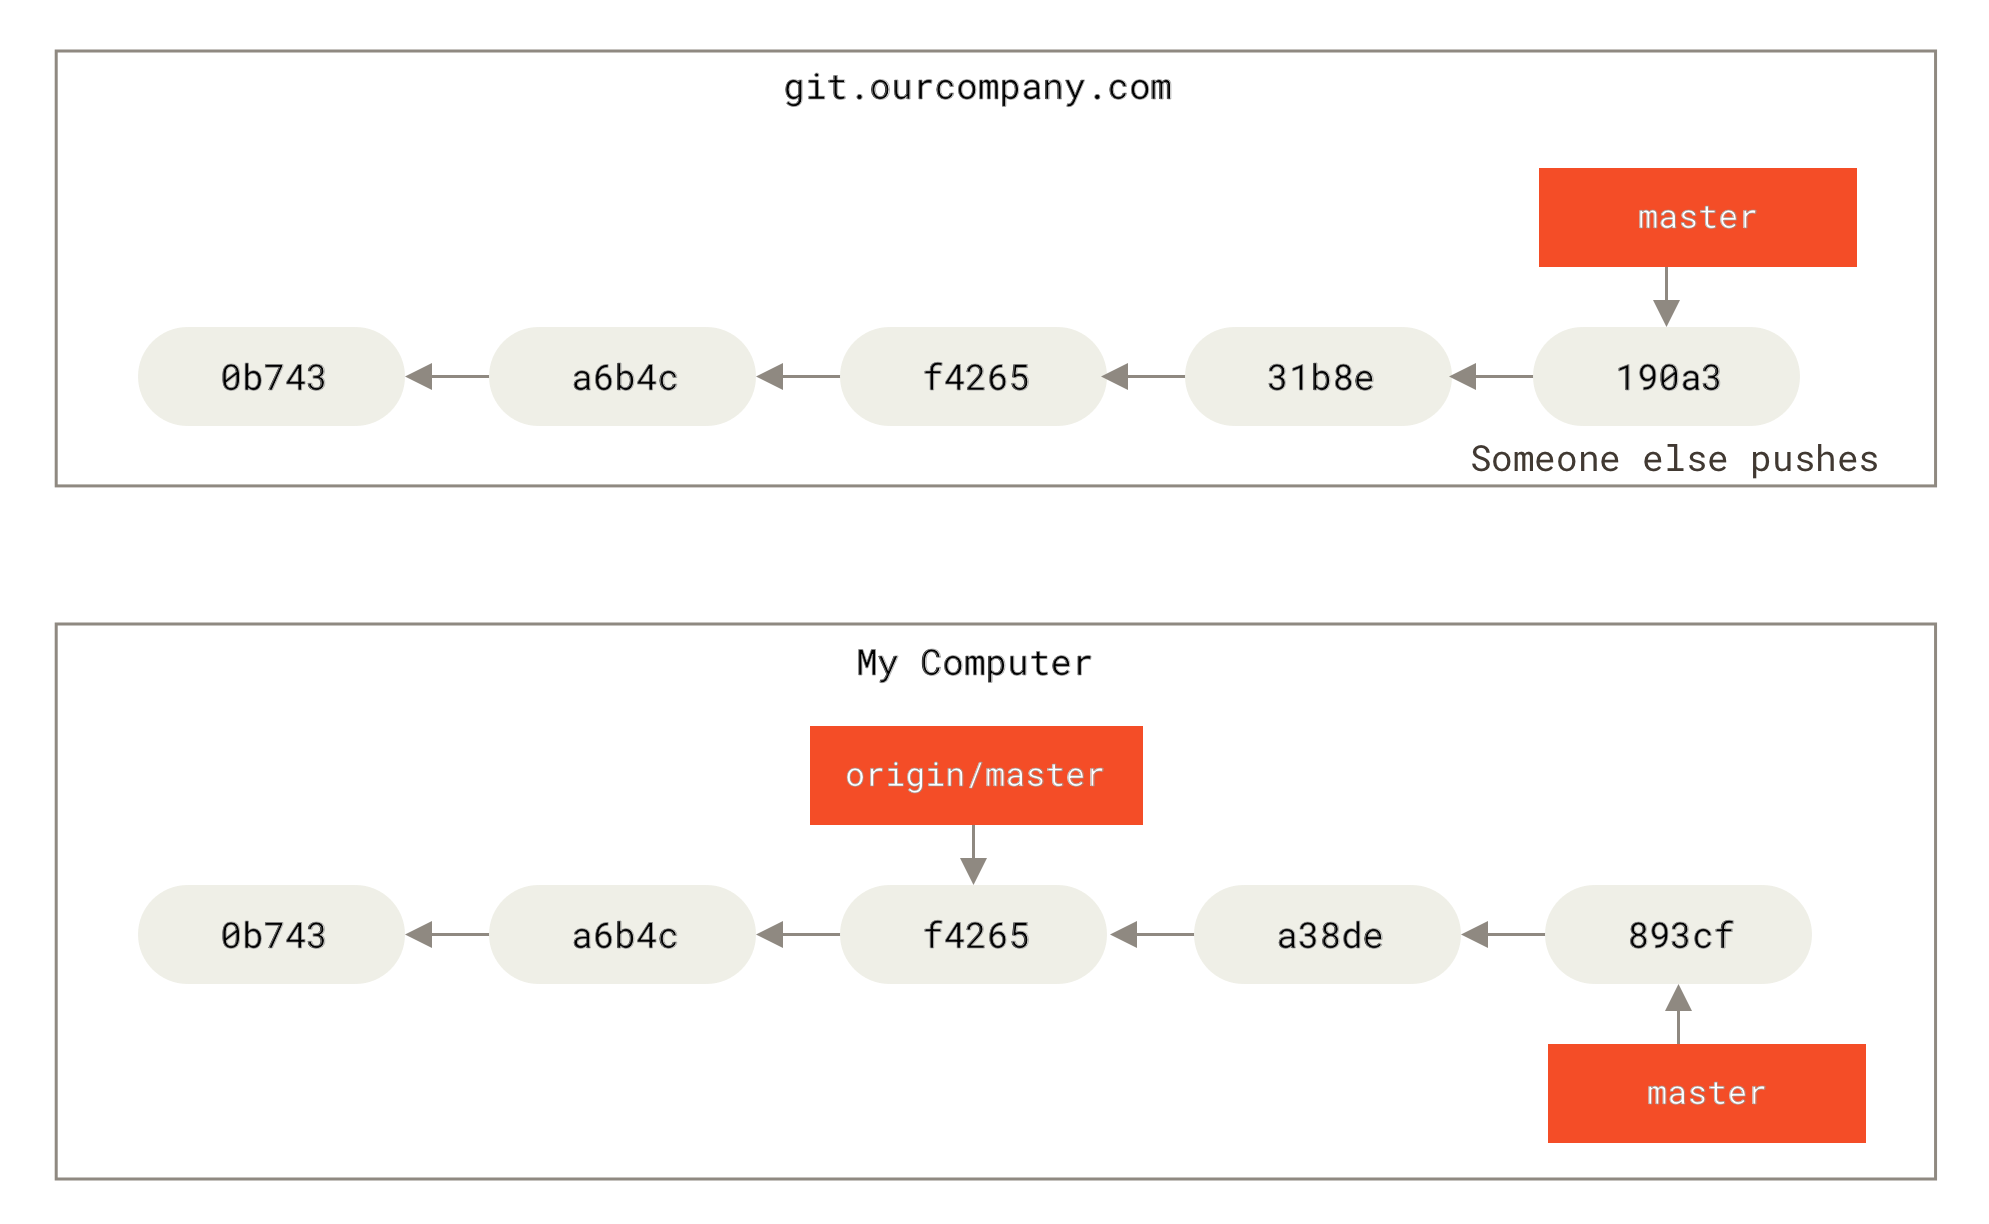
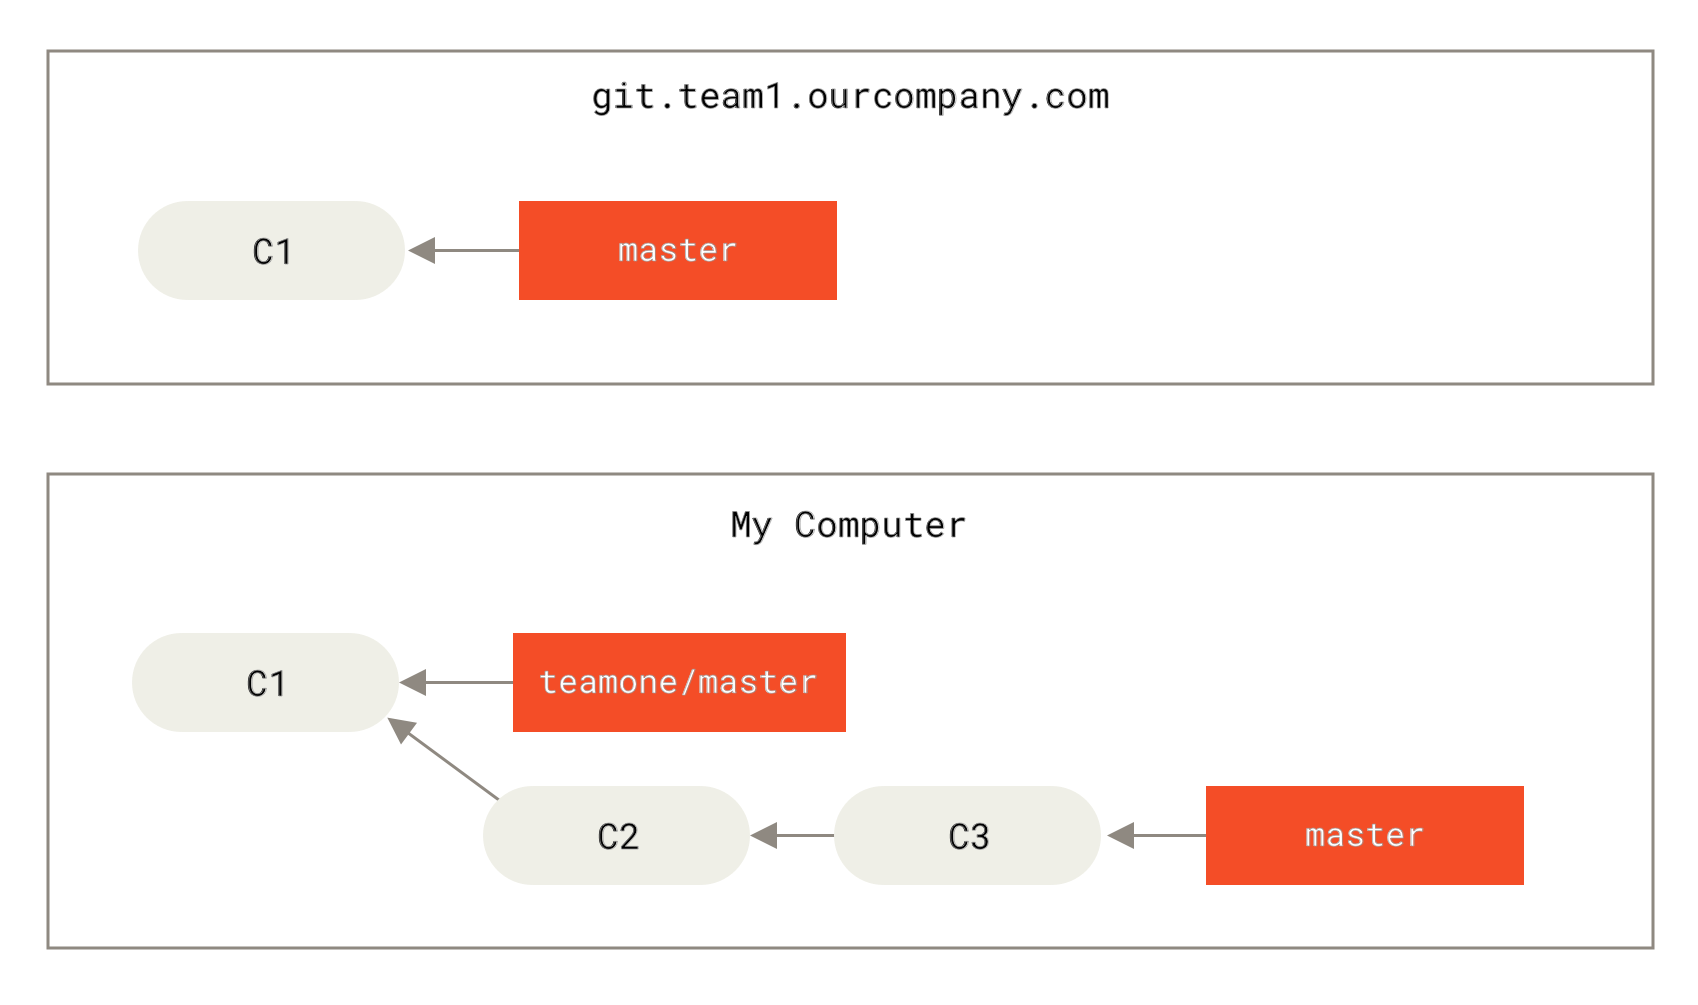
If you do some work on your local master branch, and, in the meantime, someone else pushes to git.ourcompany.com and updates its master branch, then your histories move forward differently.
Also, as long as you stay out of contact with your origin server, your origin/master pointer doesn’t move.
To synchronize your work with a given remote, you run a git fetch <remote> command (in our case, git fetch origin).
This command looks up which server `origin'' is (in this case, it’s `git.ourcompany.com), fetches any data from it that you don’t yet have, and updates your local database, moving your origin/master pointer to its new, more up-to-date position.
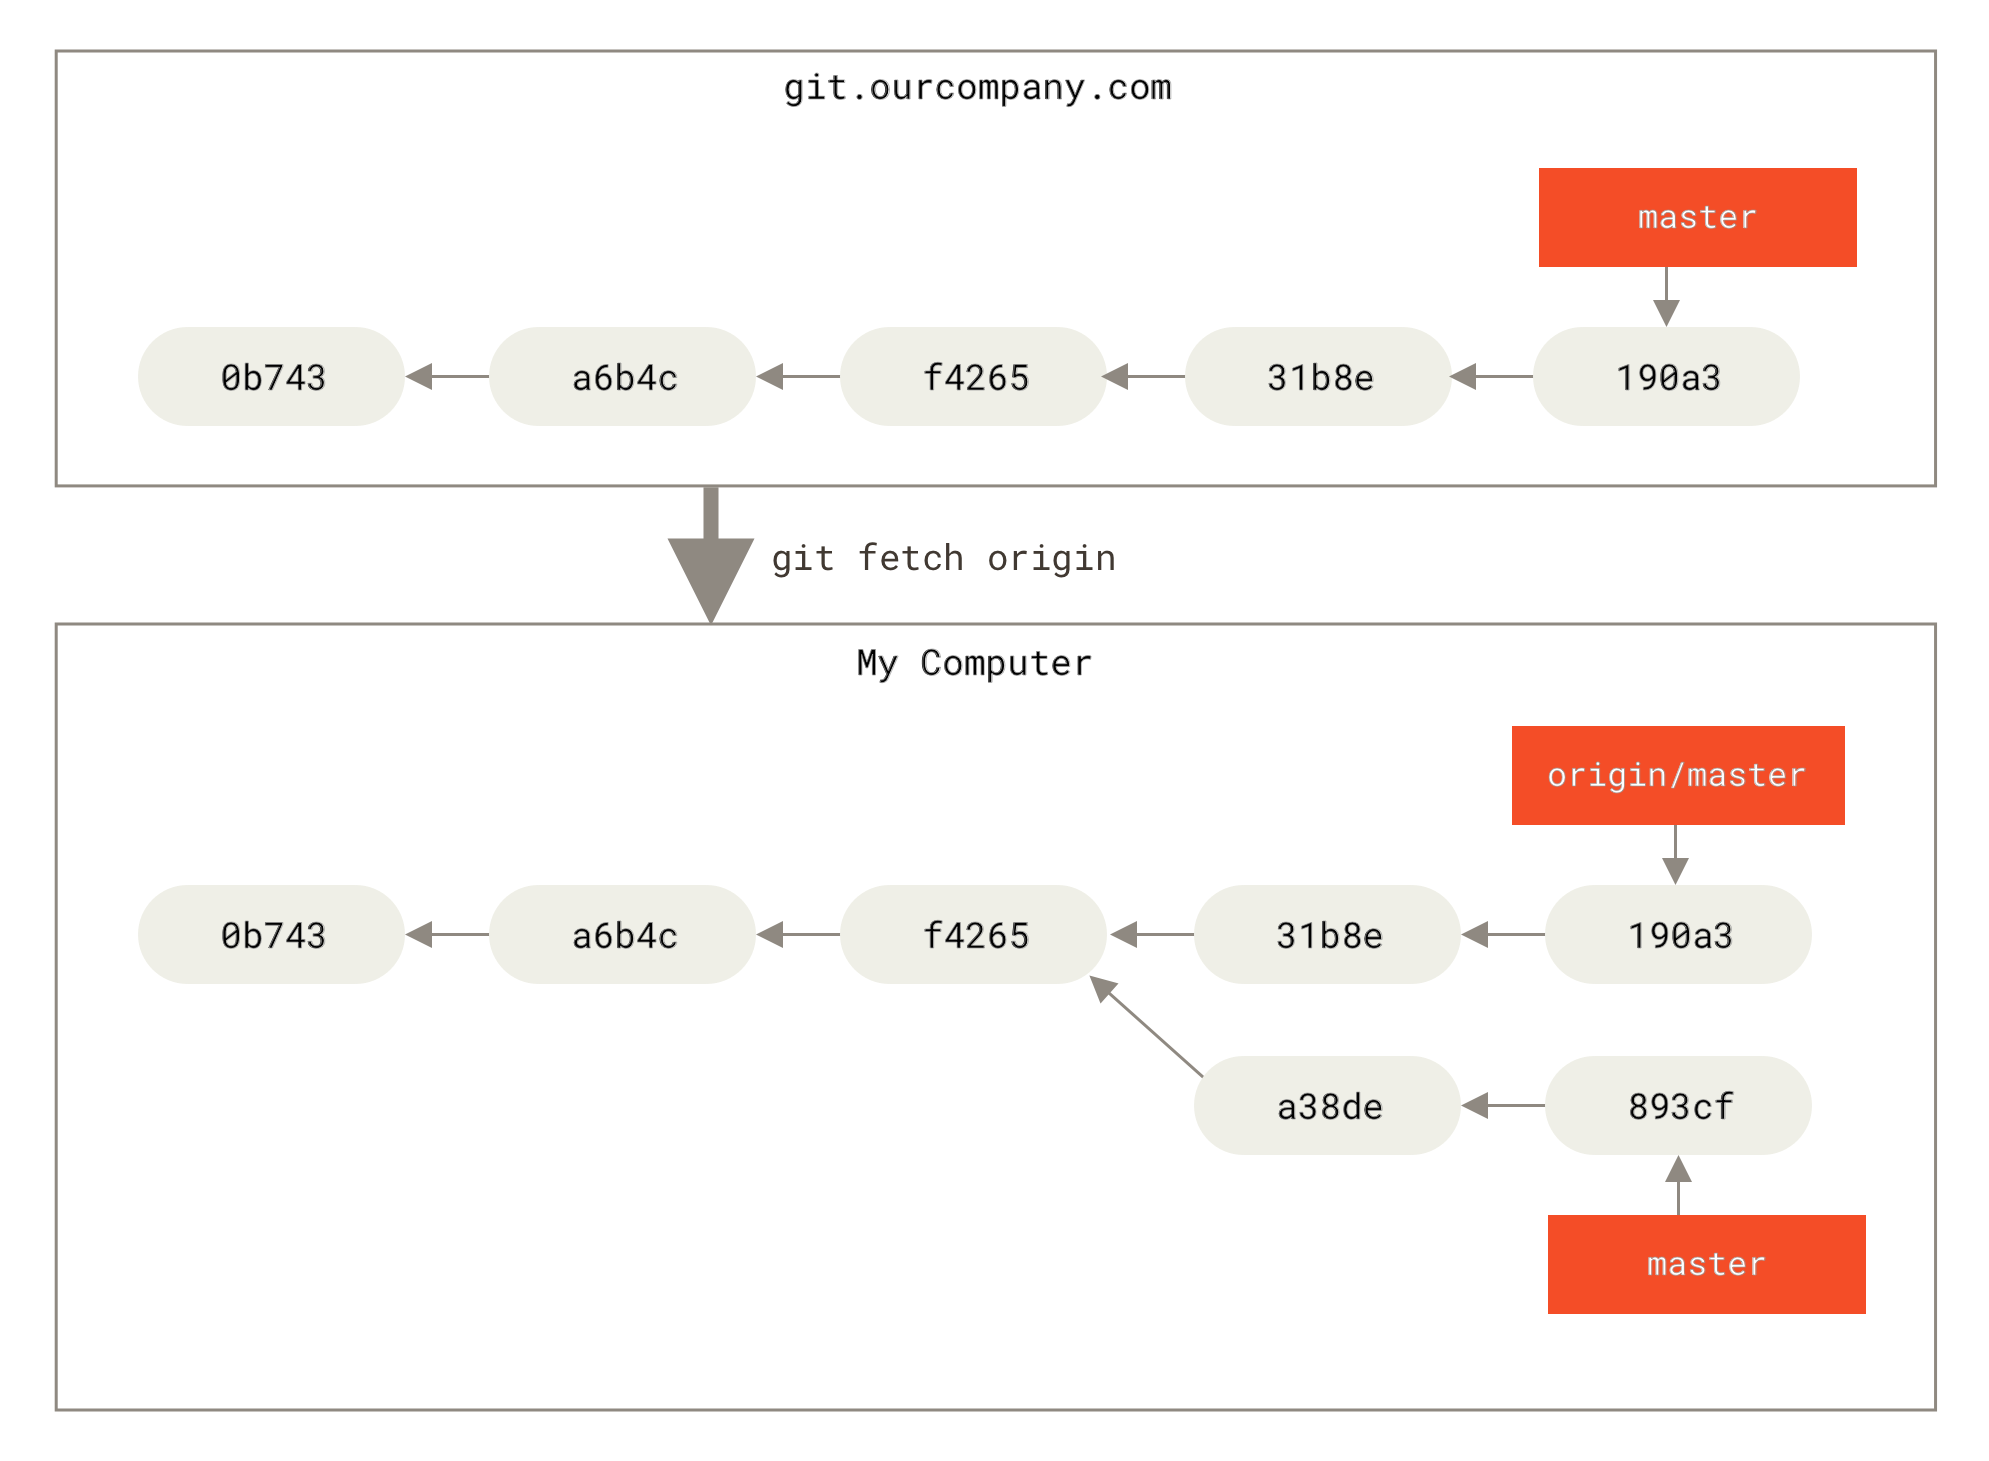
git fetch updates your remote-tracking branchesTo demonstrate having multiple remote servers and what remote branches for those remote projects look like, let’s assume you have another internal Git server that is used only for development by one of your sprint teams.
This server is at git.team1.ourcompany.com.
You can add it as a new remote reference to the project you’re currently working on by running the git remote add command as we covered in Git Basics.
Name this remote teamone, which will be your shortname for that whole URL.
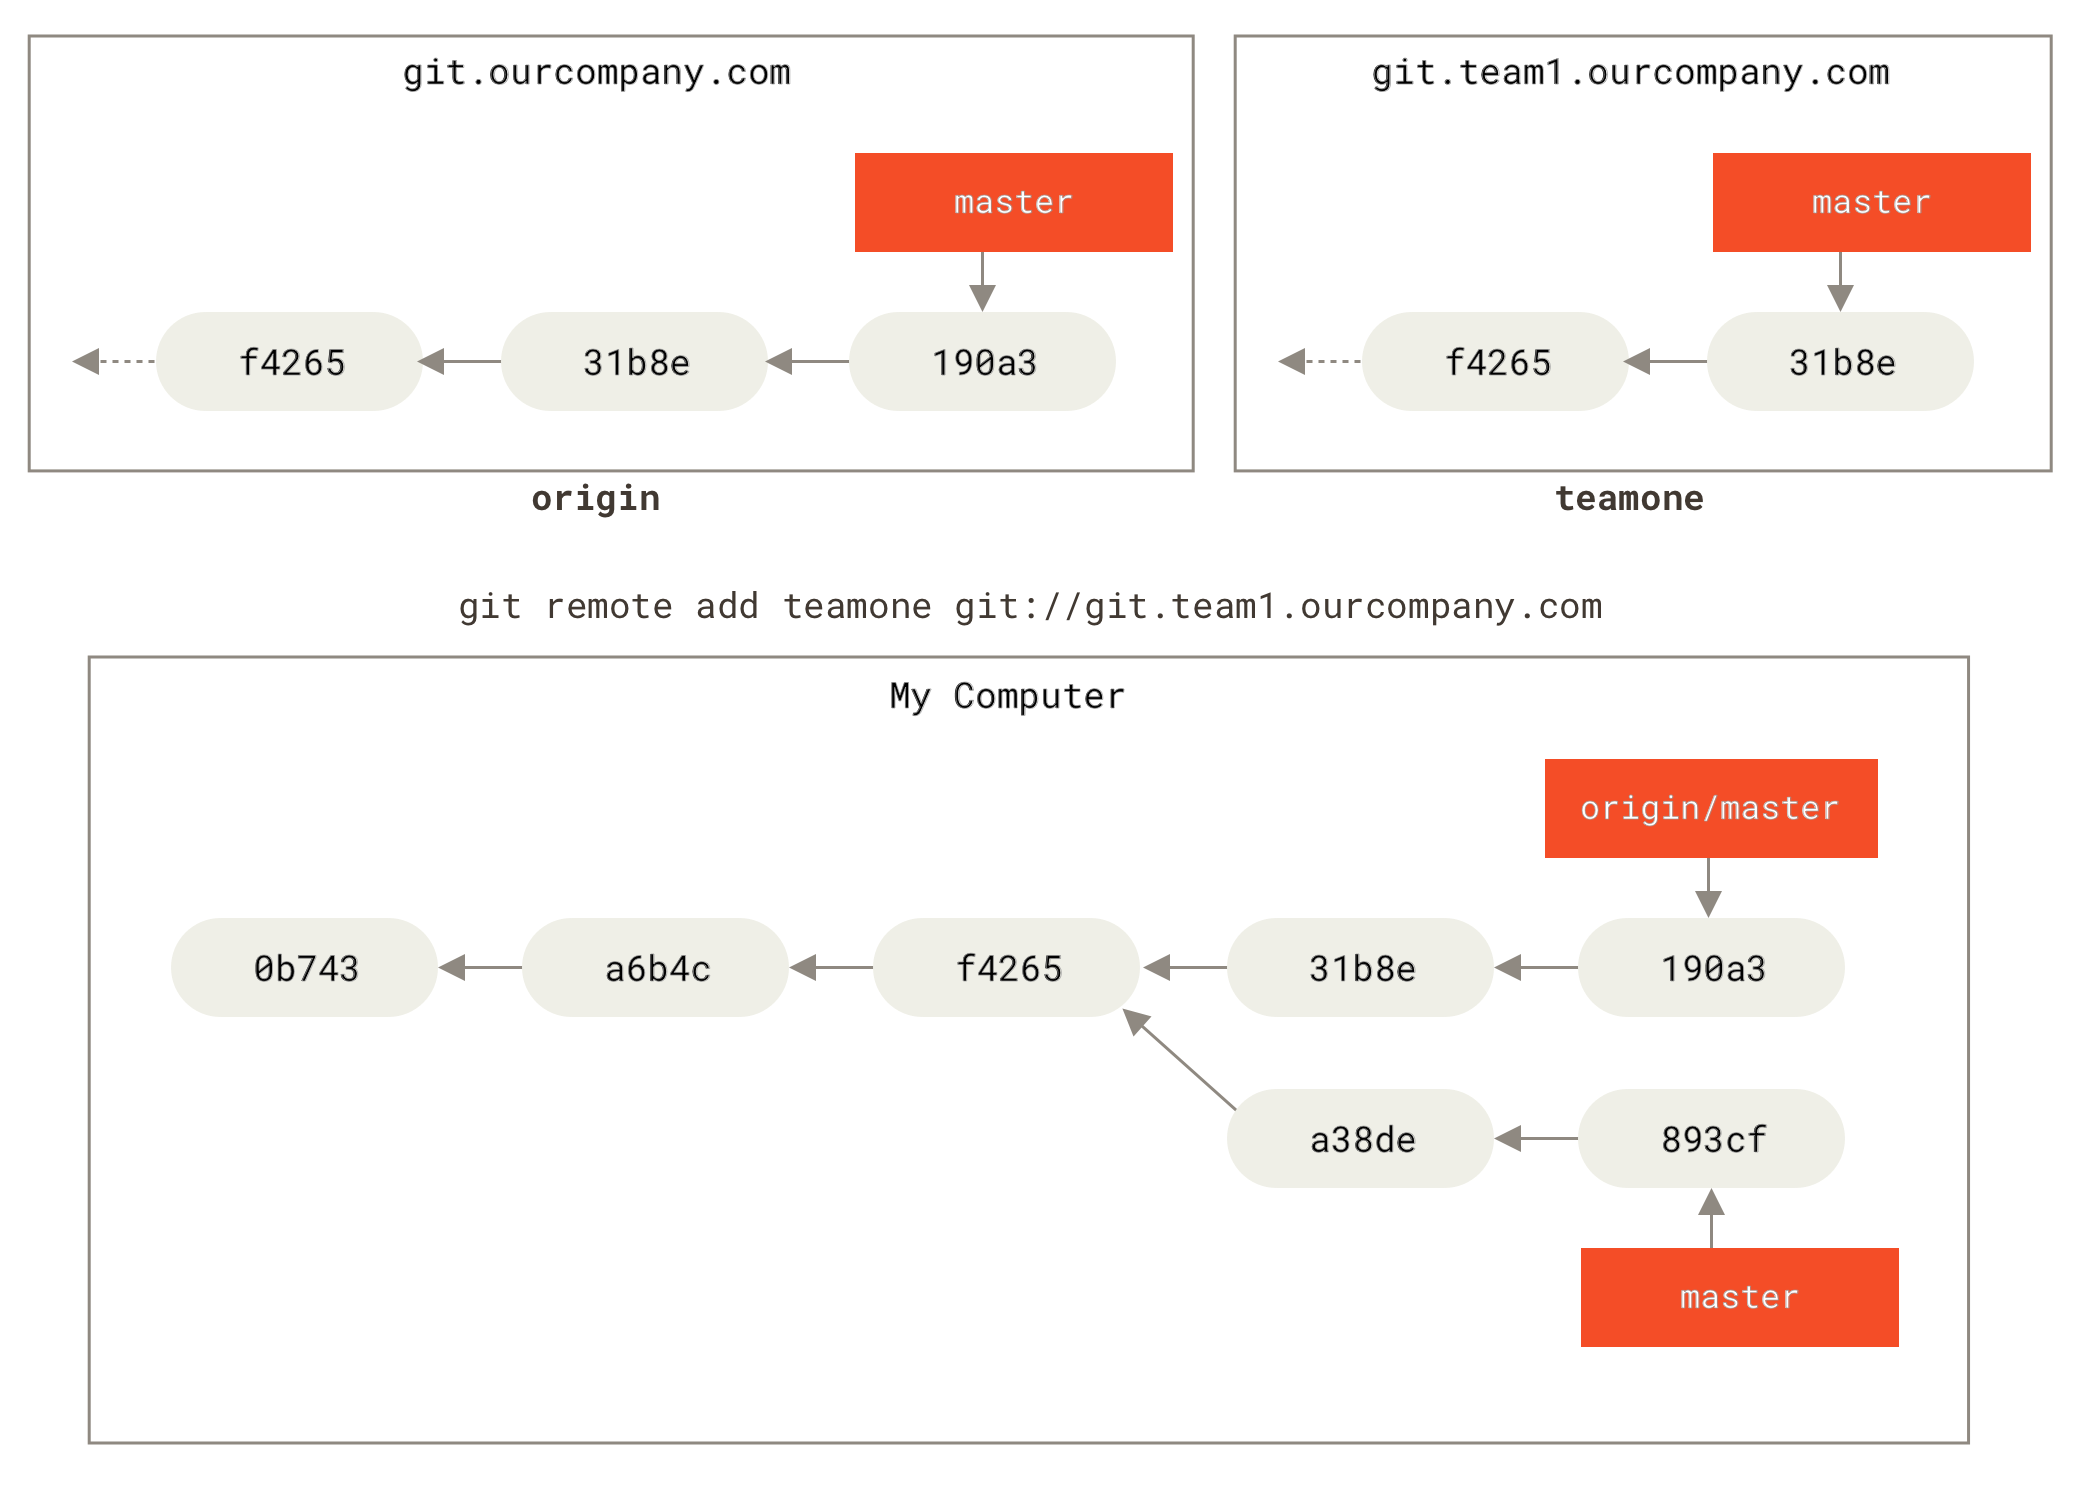
Now, you can run git fetch teamone to fetch everything the remote teamone server has that you don’t have yet.
Because that server has a subset of the data your origin server has right now, Git fetches no data but sets a remote-tracking branch called teamone/master to point to the commit that teamone has as its master branch.
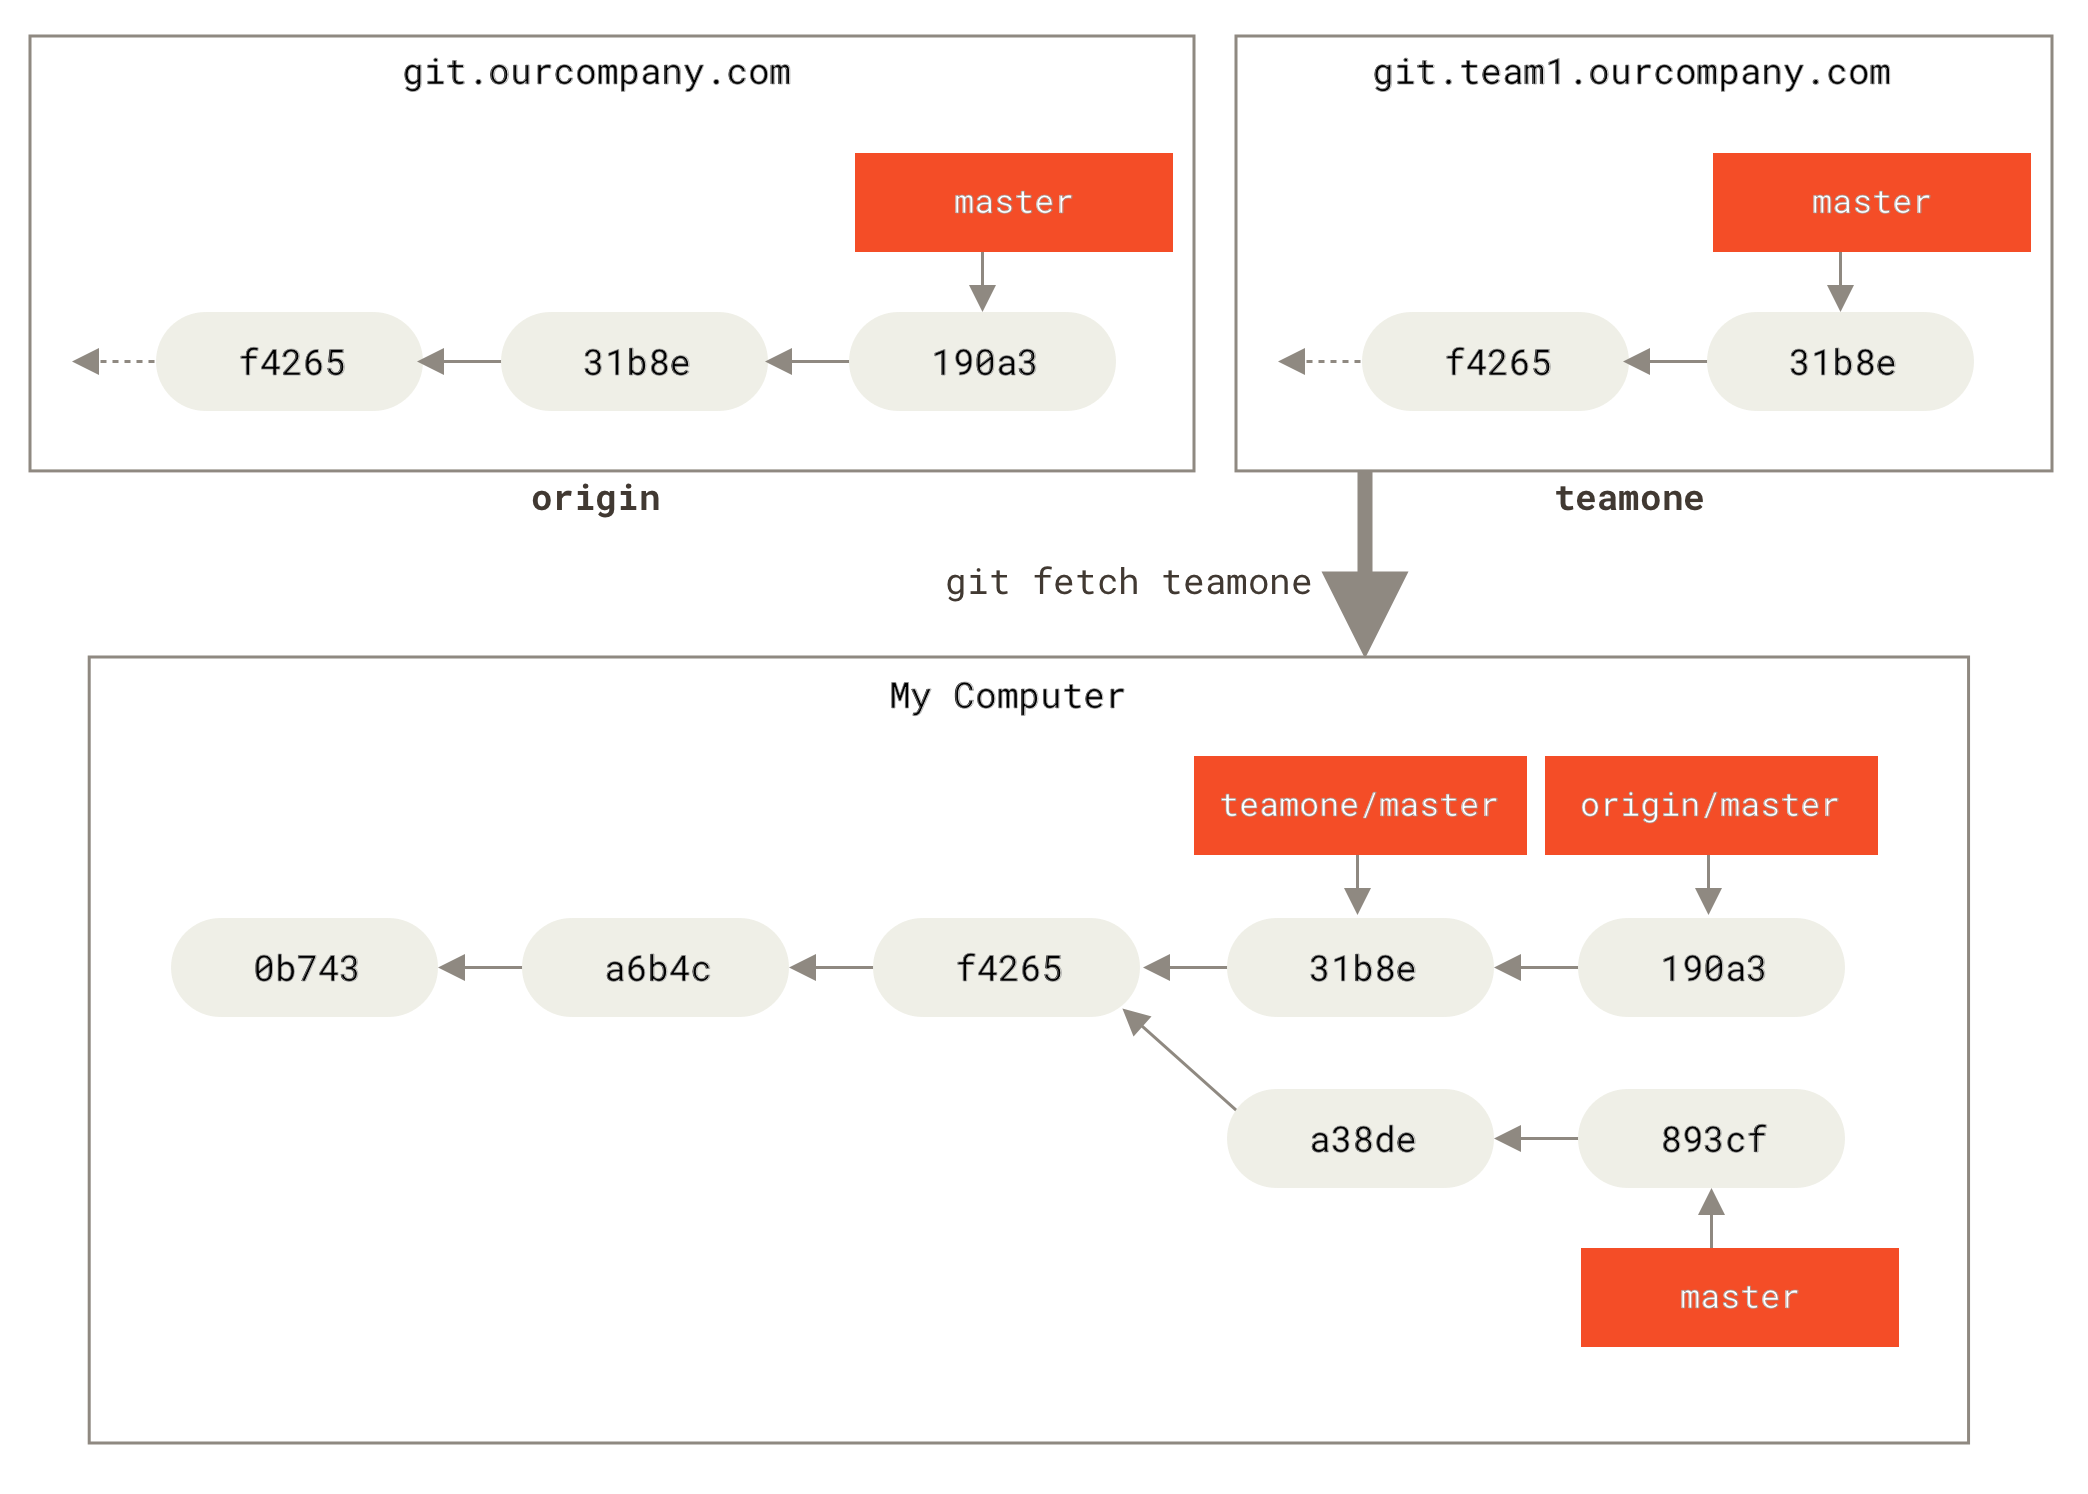
teamone/masterPushing
When you want to share a branch with the world, you need to push it up to a remote to which you have write access. Your local branches aren’t automatically synchronized to the remotes you write to — you have to explicitly push the branches you want to share. That way, you can use private branches for work you don’t want to share, and push up only the topic branches you want to collaborate on.
If you have a branch named serverfix that you want to work on with others, you can push it up the same way you pushed your first branch.
Run git push <remote> <branch>:
$ git push origin serverfix
Counting objects: 24, done.
Delta compression using up to 8 threads.
Compressing objects: 100% (15/15), done.
Writing objects: 100% (24/24), 1.91 KiB | 0 bytes/s, done.
Total 24 (delta 2), reused 0 (delta 0)
To https://github.com/schacon/simplegit
 * [new branch]      serverfix -> serverfix
This is a bit of a shortcut.
Git automatically expands the serverfix branchname out to refs/heads/serverfix:refs/heads/serverfix, which means, Take my Take my serverfix and make it the remote’s serverfix.''
You can use this format to push a local branch into a remote branch that is named differently.
If you didn’t want it to be called serverfix local branch and push it to update the remote’s serverfix branch.''
We’ll go over the refs/heads/ part in detail in Git Internals, but you can generally leave it off.
You can also do git push origin serverfix:serverfix, which does the same thing — it says, serverfix on the remote, you could instead run git push origin serverfix:awesomebranch to push your local serverfix branch to the awesomebranch branch on the remote project.
Don’t type your password every time
If you’re using an HTTPS URL to push over, the Git server will ask you for your username and password for authentication. By default it will prompt you on the terminal for this information so the server can tell if you’re allowed to push.
If you don’t want to type it every single time you push, you can set up a `credential cache''.
The simplest is just to keep it in memory for a few minutes, which you can easily set up by running `git config --global credential.helper cache.
For more information on the various credential caching options available, see Credential Storage.
The next time one of your collaborators fetches from the server, they will get a reference to where the server’s version of serverfix is under the remote branch origin/serverfix:
$ git fetch origin
remote: Counting objects: 7, done.
remote: Compressing objects: 100% (2/2), done.
remote: Total 3 (delta 0), reused 3 (delta 0)
Unpacking objects: 100% (3/3), done.
From https://github.com/schacon/simplegit
 * [new branch]      serverfix    -> origin/serverfix
It’s important to note that when you do a fetch that brings down new remote-tracking branches, you don’t automatically have local, editable copies of them.
In other words, in this case, you don’t have a new serverfix branch — you have only an origin/serverfix pointer that you can’t modify.
To merge this work into your current working branch, you can run git merge origin/serverfix.
If you want your own serverfix branch that you can work on, you can base it off your remote-tracking branch:
$ git checkout -b serverfix origin/serverfix
Branch serverfix set up to track remote branch serverfix from origin.
Switched to a new branch 'serverfix'
This gives you a local branch that you can work on that starts where origin/serverfix is.
Tracking Branches
Checking out a local branch from a remote-tracking branch automatically creates what is called a tracking branch'' (and the branch it tracks is called an upstream branch'').
Tracking branches are local branches that have a direct relationship to a remote branch.
If you’re on a tracking branch and type git pull, Git automatically knows which server to fetch from and which branch to merge in.
When you clone a repository, it generally automatically creates a master branch that tracks origin/master.
However, you can set up other tracking branches if you wish — ones that track branches on other remotes, or don’t track the master branch.
The simple case is the example you just saw, running git checkout -b <branch> <remote>/<branch>.
This is a common enough operation that Git provides the --track shorthand:
$ git checkout --track origin/serverfix
Branch serverfix set up to track remote branch serverfix from origin.
Switched to a new branch 'serverfix'
In fact, this is so common that there’s even a shortcut for that shortcut. If the branch name you’re trying to checkout (a) doesn’t exist and (b) exactly matches a name on only one remote, Git will create a tracking branch for you:
$ git checkout serverfix
Branch serverfix set up to track remote branch serverfix from origin.
Switched to a new branch 'serverfix'
To set up a local branch with a different name than the remote branch, you can easily use the first version with a different local branch name:
$ git checkout -b sf origin/serverfix
Branch sf set up to track remote branch serverfix from origin.
Switched to a new branch 'sf'
Now, your local branch sf will automatically pull from origin/serverfix.
If you already have a local branch and want to set it to a remote branch you just pulled down, or want to change the upstream branch you’re tracking, you can use the -u or --set-upstream-to option to git branch to explicitly set it at any time.
$ git branch -u origin/serverfix
Branch serverfix set up to track remote branch serverfix from origin.
If you want to see what tracking branches you have set up, you can use the -vv option to git branch.
This will list out your local branches with more information including what each branch is tracking and if your local branch is ahead, behind or both.
$ git branch -vv
  iss53     7e424c3 [origin/iss53: ahead 2] forgot the brackets
  master    1ae2a45 [origin/master] deploying index fix
* serverfix f8674d9 [teamone/server-fix-good: ahead 3, behind 1] this should do it
  testing   5ea463a trying something new
So here we can see that our iss53 branch is tracking origin/iss53 and is `ahead'' by two, meaning that we have two commits locally that are not pushed to the server.
We can also see that our `master branch is tracking origin/master and is up to date.
Next we can see that our serverfix branch is tracking the server-fix-good branch on our teamone server and is ahead by three and behind by one, meaning that there is one commit on the server we haven’t merged in yet and three commits locally that we haven’t pushed.
Finally we can see that our testing branch is not tracking any remote branch.
It’s important to note that these numbers are only since the last time you fetched from each server. This command does not reach out to the servers, it’s telling you about what it has cached from these servers locally. If you want totally up to date ahead and behind numbers, you’ll need to fetch from all your remotes right before running this. You could do that like this:
$ git fetch --all; git branch -vv
Pulling
While the git fetch command will fetch all the changes on the server that you don’t have yet, it will not modify your working directory at all.
It will simply get the data for you and let you merge it yourself.
However, there is a command called git pull which is essentially a git fetch immediately followed by a git merge in most cases.
If you have a tracking branch set up as demonstrated in the last section, either by explicitly setting it or by having it created for you by the clone or checkout commands, git pull will look up what server and branch your current branch is tracking, fetch from that server and then try to merge in that remote branch.
Generally it’s better to simply use the fetch and merge commands explicitly as the magic of git pull can often be confusing.
Deleting Remote Branches
Suppose you’re done with a remote branch — say you and your collaborators are finished with a feature and have merged it into your remote’s master branch (or whatever branch your stable codeline is in).
You can delete a remote branch using the --delete option to git push.
If you want to delete your serverfix branch from the server, you run the following:
$ git push origin --delete serverfix
To https://github.com/schacon/simplegit
 - [deleted]         serverfix
Basically all this does is remove the pointer from the server. The Git server will generally keep the data there for a while until a garbage collection runs, so if it was accidentally deleted, it’s often easy to recover.
Rebasing
In Git, there are two main ways to integrate changes from one branch into another: the merge and the rebase.
In this section you’ll learn what rebasing is, how to do it, why it’s a pretty amazing tool, and in what cases you won’t want to use it.
The Basic Rebase
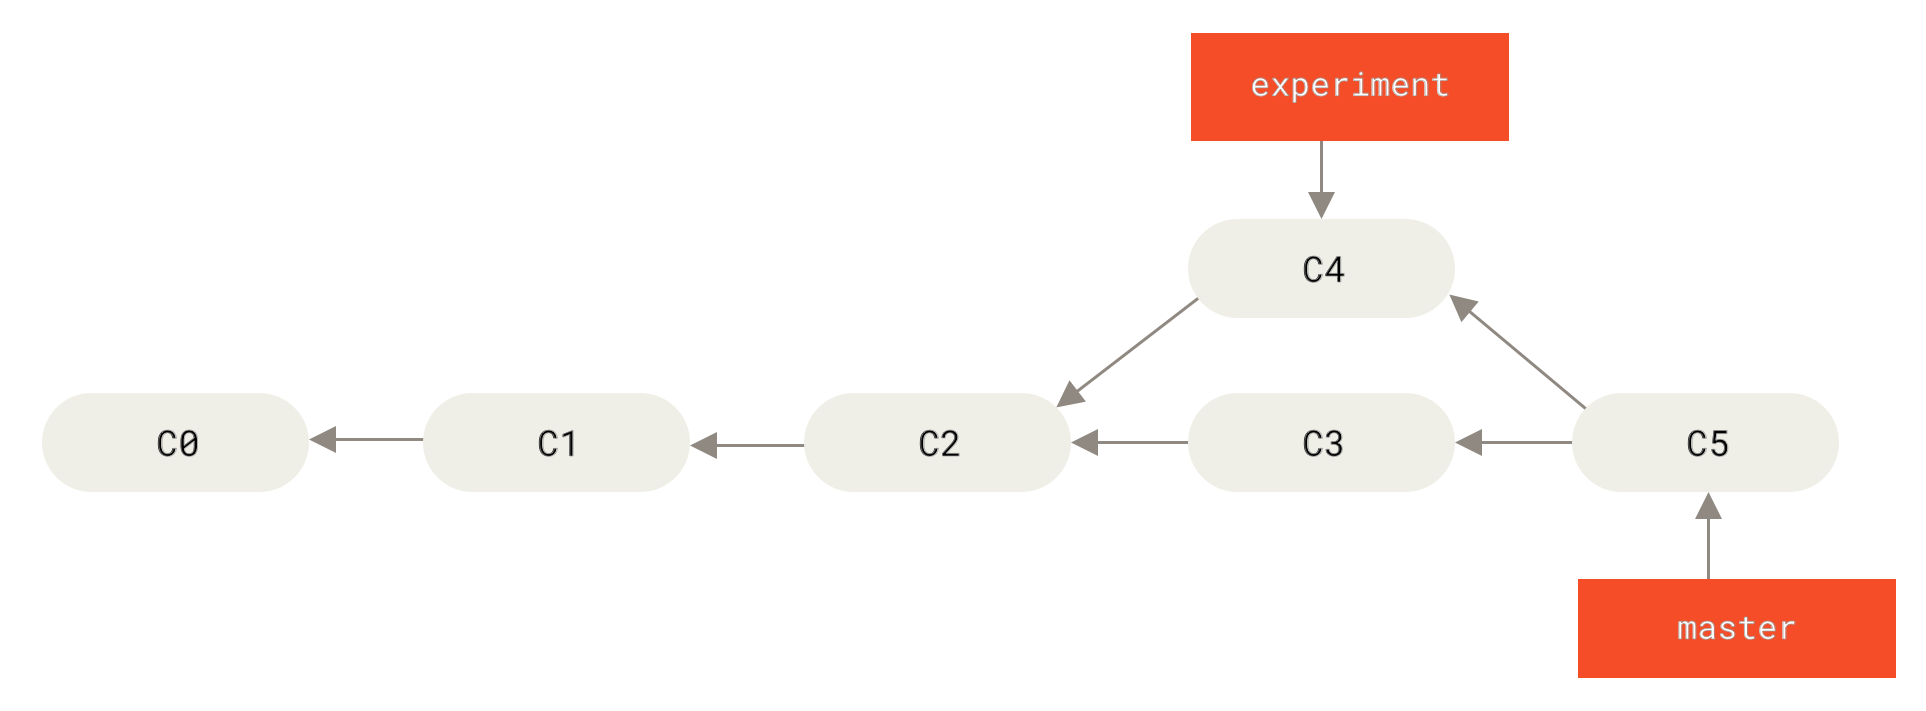
If you go back to an earlier example from Basic Merging, you can see that you diverged your work and made commits on two different branches.
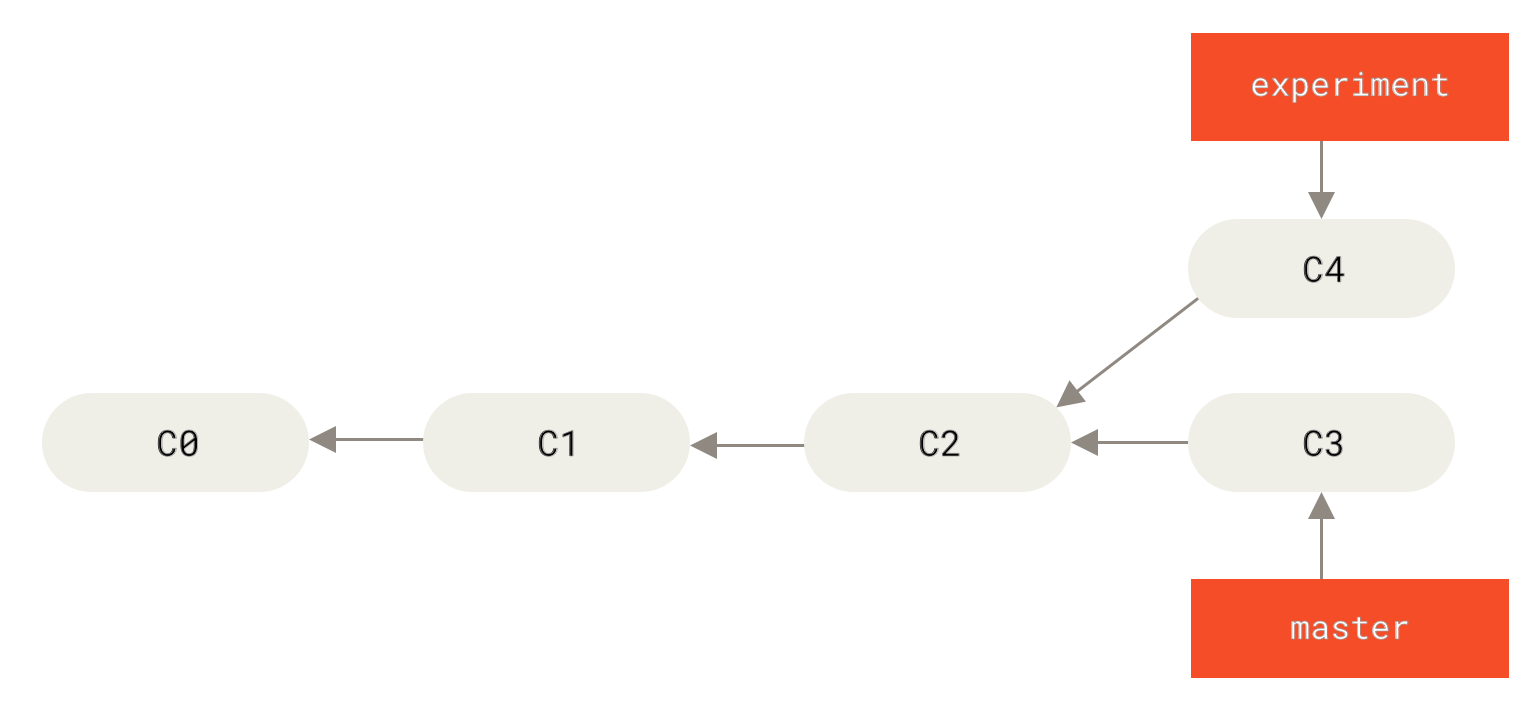
The easiest way to integrate the branches, as we’ve already covered, is the merge command.
It performs a three-way merge between the two latest branch snapshots (C3 and C4) and the most recent common ancestor of the two (C2), creating a new snapshot (and commit).
However, there is another way: you can take the patch of the change that was introduced in C4 and reapply it on top of C3.
In Git, this is called rebasing.
With the rebase command, you can take all the changes that were committed on one branch and replay them on a different branch.
For this example, you would check out the experiment branch, and then rebase it onto the master branch as follows:
$ git checkout experiment
$ git rebase master
First, rewinding head to replay your work on top of it...
Applying: added staged command
This operation works by going to the common ancestor of the two branches (the one you’re on and the one you’re rebasing onto), getting the diff introduced by each commit of the branch you’re on, saving those diffs to temporary files, resetting the current branch to the same commit as the branch you are rebasing onto, and finally applying each change in turn.

C4 onto C3At this point, you can go back to the master branch and do a fast-forward merge.
$ git checkout master
$ git merge experiment

master branchNow, the snapshot pointed to by C4' is exactly the same as the one that was pointed to by C5 in the merge example.
There is no difference in the end product of the integration, but rebasing makes for a cleaner history.
If you examine the log of a rebased branch, it looks like a linear history: it appears that all the work happened in series, even when it originally happened in parallel.
Often, you’ll do this to make sure your commits apply cleanly on a remote branch — perhaps in a project to which you’re trying to contribute but that you don’t maintain.
In this case, you’d do your work in a branch and then rebase your work onto origin/master when you were ready to submit your patches to the main project.
That way, the maintainer doesn’t have to do any integration work — just a fast-forward or a clean apply.
Note that the snapshot pointed to by the final commit you end up with, whether it’s the last of the rebased commits for a rebase or the final merge commit after a merge, is the same snapshot — it’s only the history that is different. Rebasing replays changes from one line of work onto another in the order they were introduced, whereas merging takes the endpoints and merges them together.
More Interesting Rebases
You can also have your rebase replay on something other than the rebase target branch.
Take a history like A history with a topic branch off another topic branch, for example.
You branched a topic branch (server) to add some server-side functionality to your project, and made a commit.
Then, you branched off that to make the client-side changes (client) and committed a few times.
Finally, you went back to your server branch and did a few more commits.
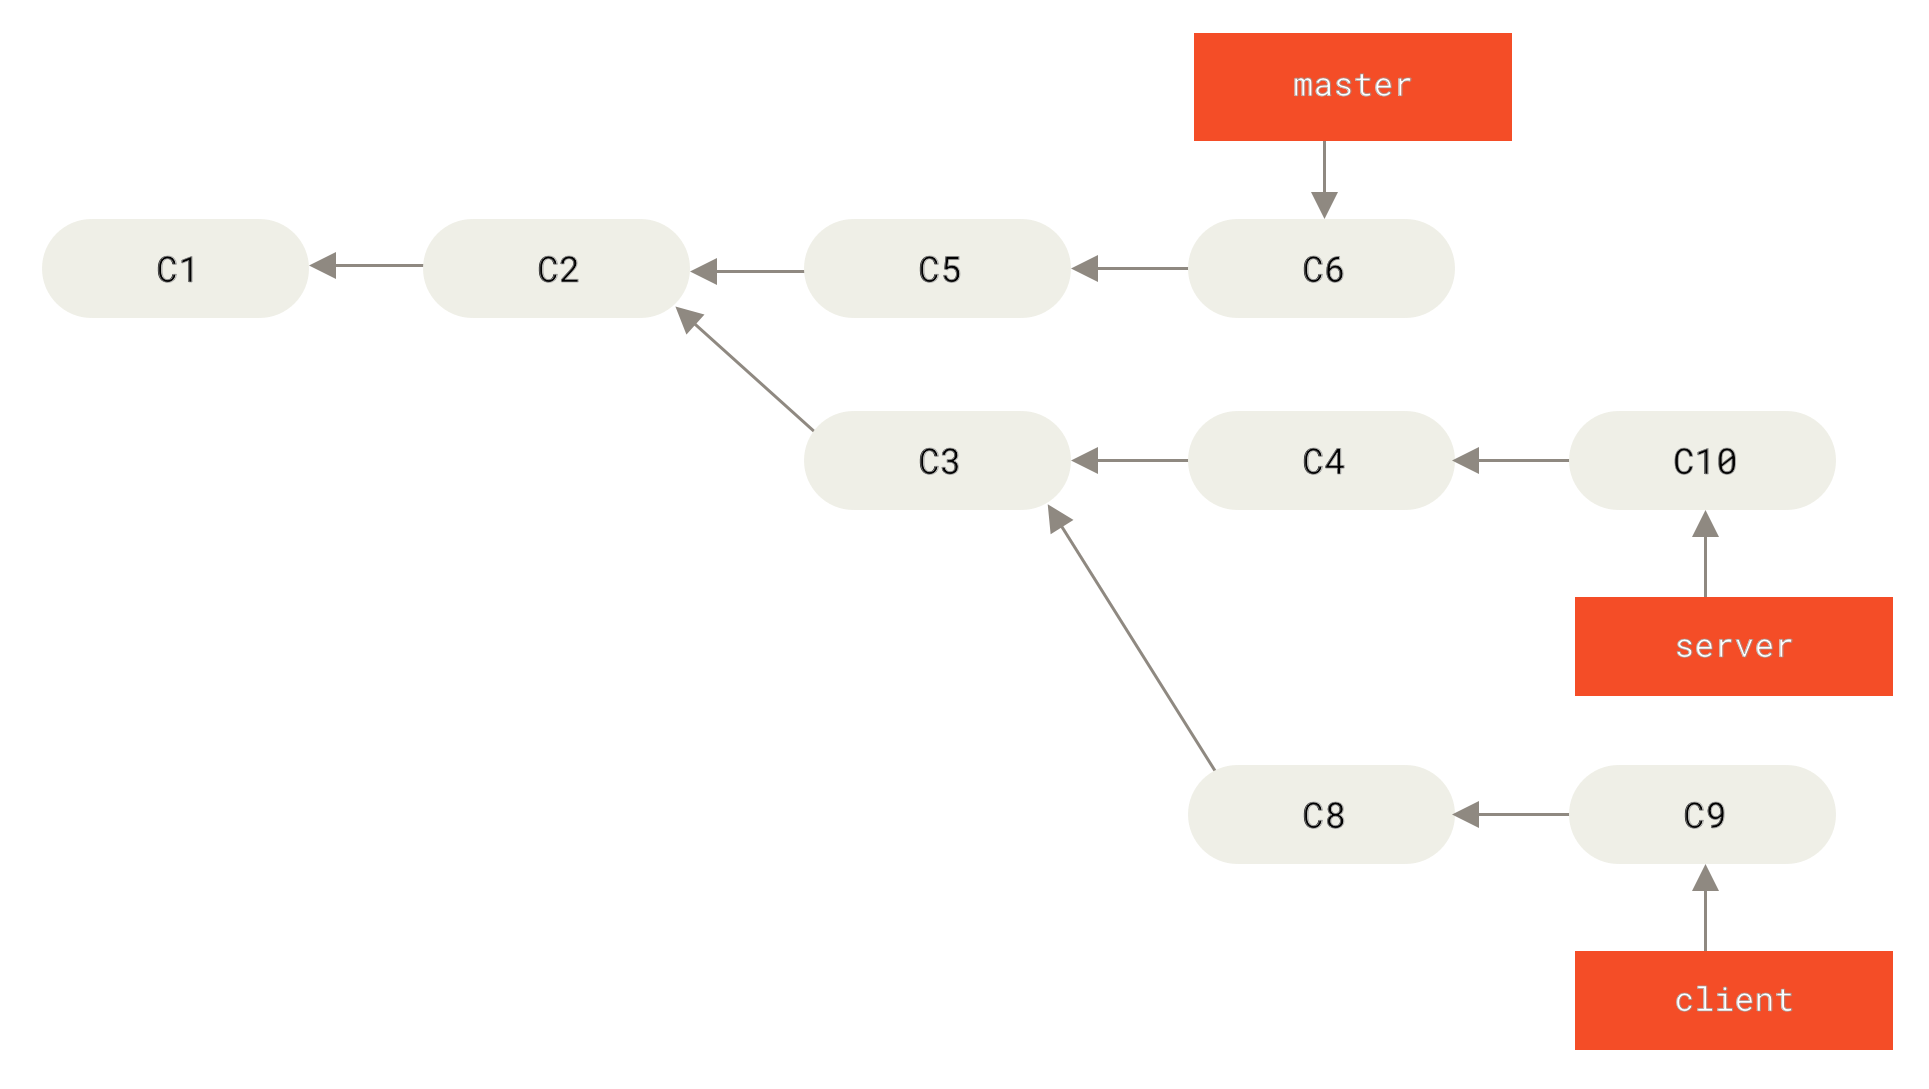
Suppose you decide that you want to merge your client-side changes into your mainline for a release, but you want to hold off on the server-side changes until it’s tested further.
You can take the changes on client that aren’t on server (C8 and C9) and replay them on your master branch by using the --onto option of git rebase:
$ git rebase --onto master server client
This basically says, `Take the `client branch, figure out the patches since it diverged from the server branch, and replay these patches in the client branch as if it was based directly off the master branch instead.''
It’s a bit complex, but the result is pretty cool.
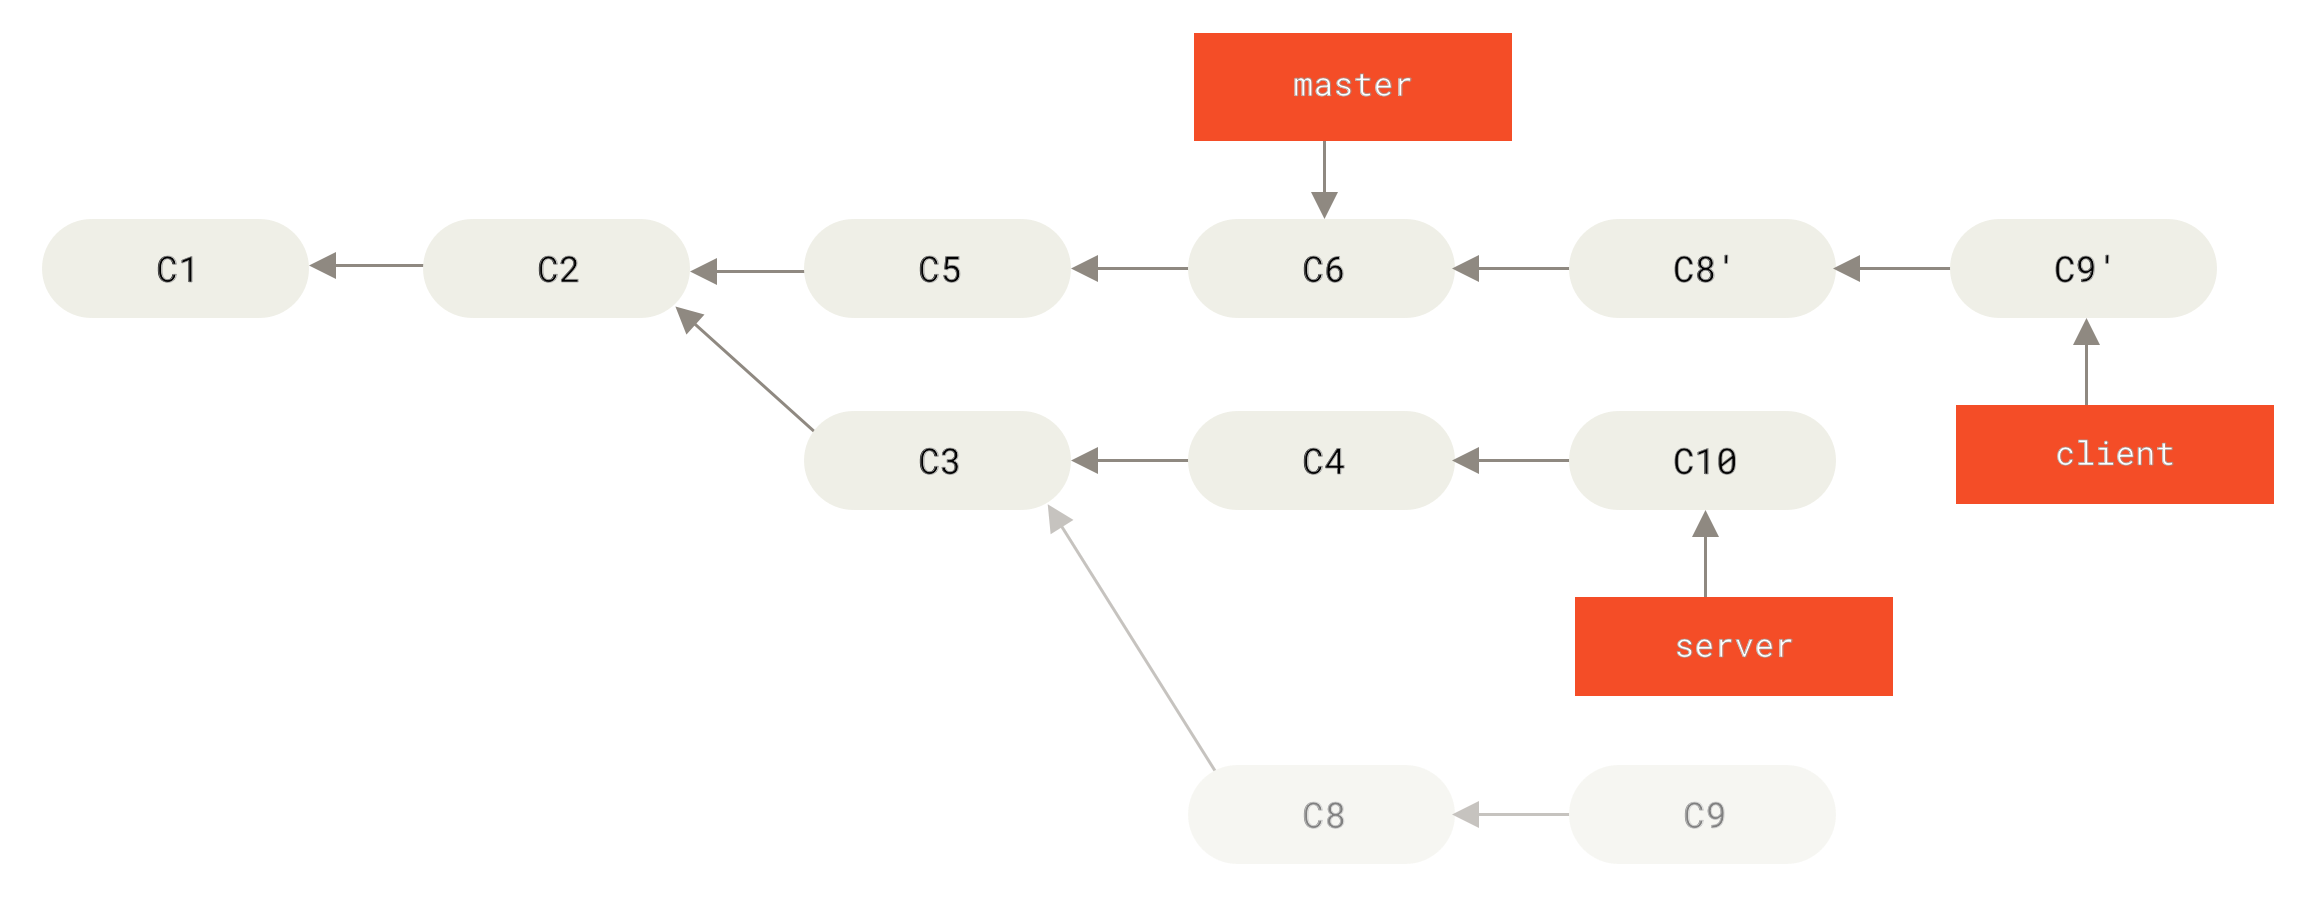
Now you can fast-forward your master branch (see Fast-forwarding your master branch to include the client branch changes):
$ git checkout master
$ git merge client

master branch to include the client branch changesLet’s say you decide to pull in your server branch as well.
You can rebase the server branch onto the master branch without having to check it out first by running git rebase <basebranch> <topicbranch> — which checks out the topic branch (in this case, server) for you and replays it onto the base branch (master):
$ git rebase master server
This replays your server work on top of your master work, as shown in Rebasing your server branch on top of your master branch.

master branchThen, you can fast-forward the base branch (master):
$ git checkout master
$ git merge server
You can remove the client and server branches because all the work is integrated and you don’t need them anymore, leaving your history for this entire process looking like Final commit history:
$ git branch -d client
$ git branch -d server

The Perils of Rebasing
Ahh, but the bliss of rebasing isn’t without its drawbacks, which can be summed up in a single line:
Do not rebase commits that exist outside your repository and that people may have based work on.
If you follow that guideline, you’ll be fine. If you don’t, people will hate you, and you’ll be scorned by friends and family.
When you rebase stuff, you’re abandoning existing commits and creating new ones that are similar but different.
If you push commits somewhere and others pull them down and base work on them, and then you rewrite those commits with git rebase and push them up again, your collaborators will have to re-merge their work and things will get messy when you try to pull their work back into yours.
Let’s look at an example of how rebasing work that you’ve made public can cause problems. Suppose you clone from a central server and then do some work off that. Your commit history looks like this:
Now, someone else does more work that includes a merge, and pushes that work to the central server. You fetch it and merge the new remote branch into your work, making your history look something like this:
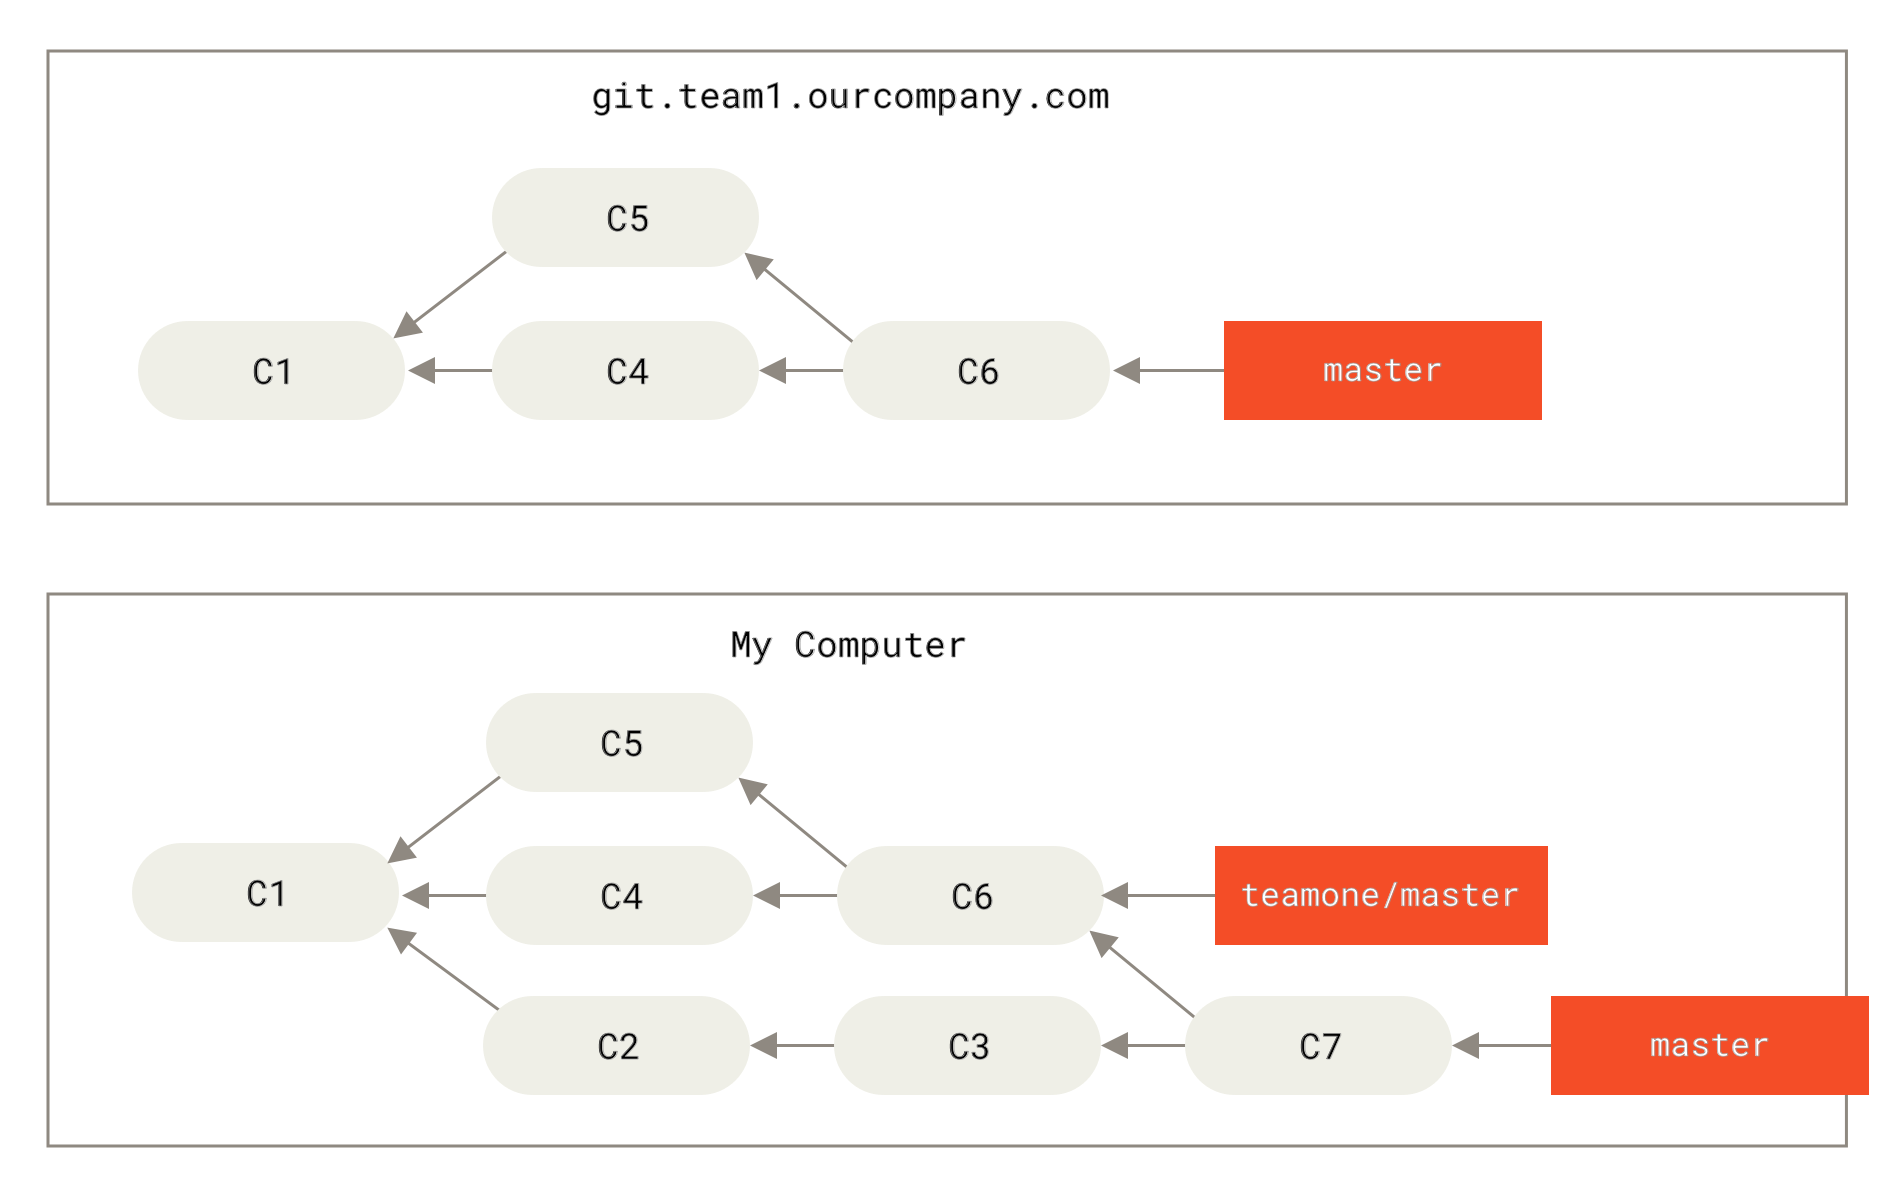
Next, the person who pushed the merged work decides to go back and rebase their work instead; they do a git push --force to overwrite the history on the server.
You then fetch from that server, bringing down the new commits.
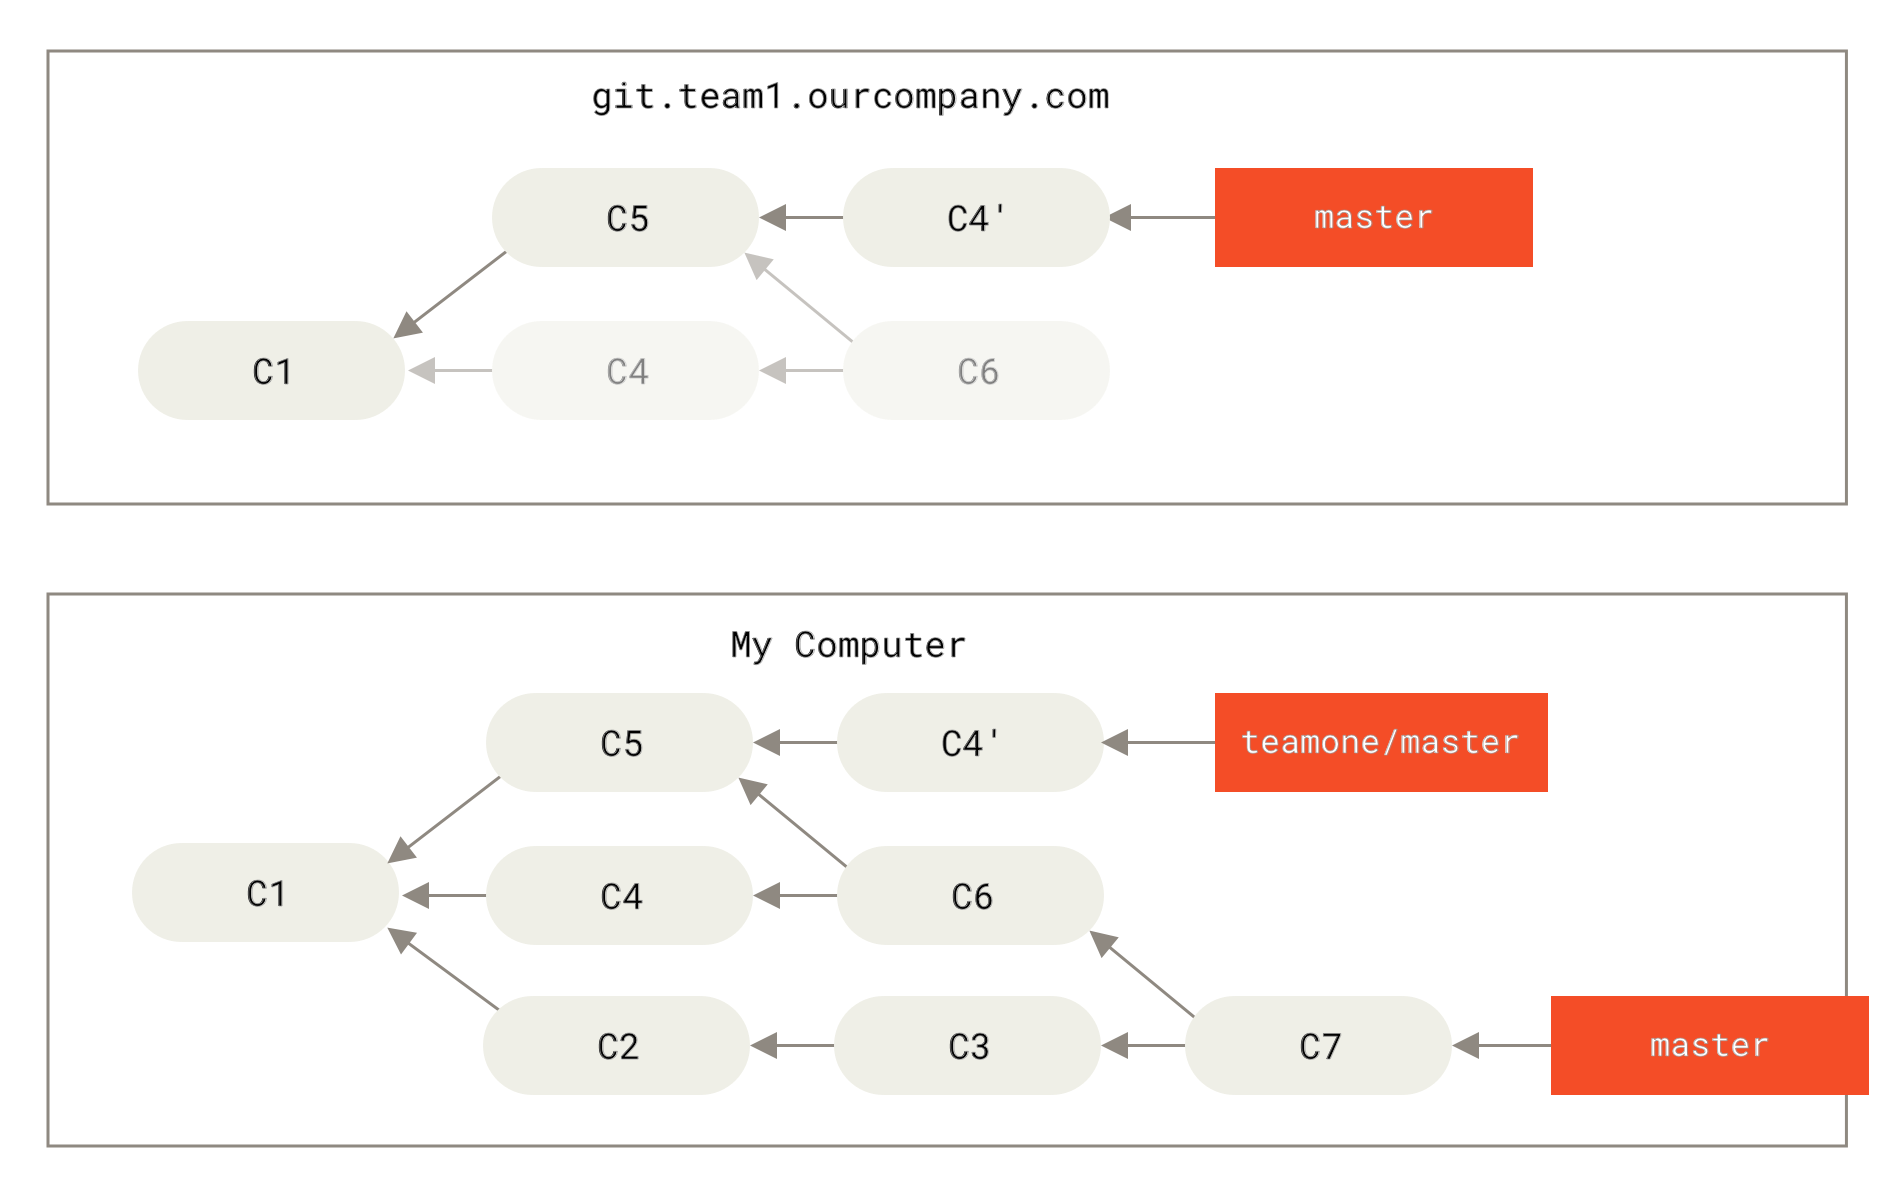
Now you’re both in a pickle.
If you do a git pull, you’ll create a merge commit which includes both lines of history, and your repository will look like this:
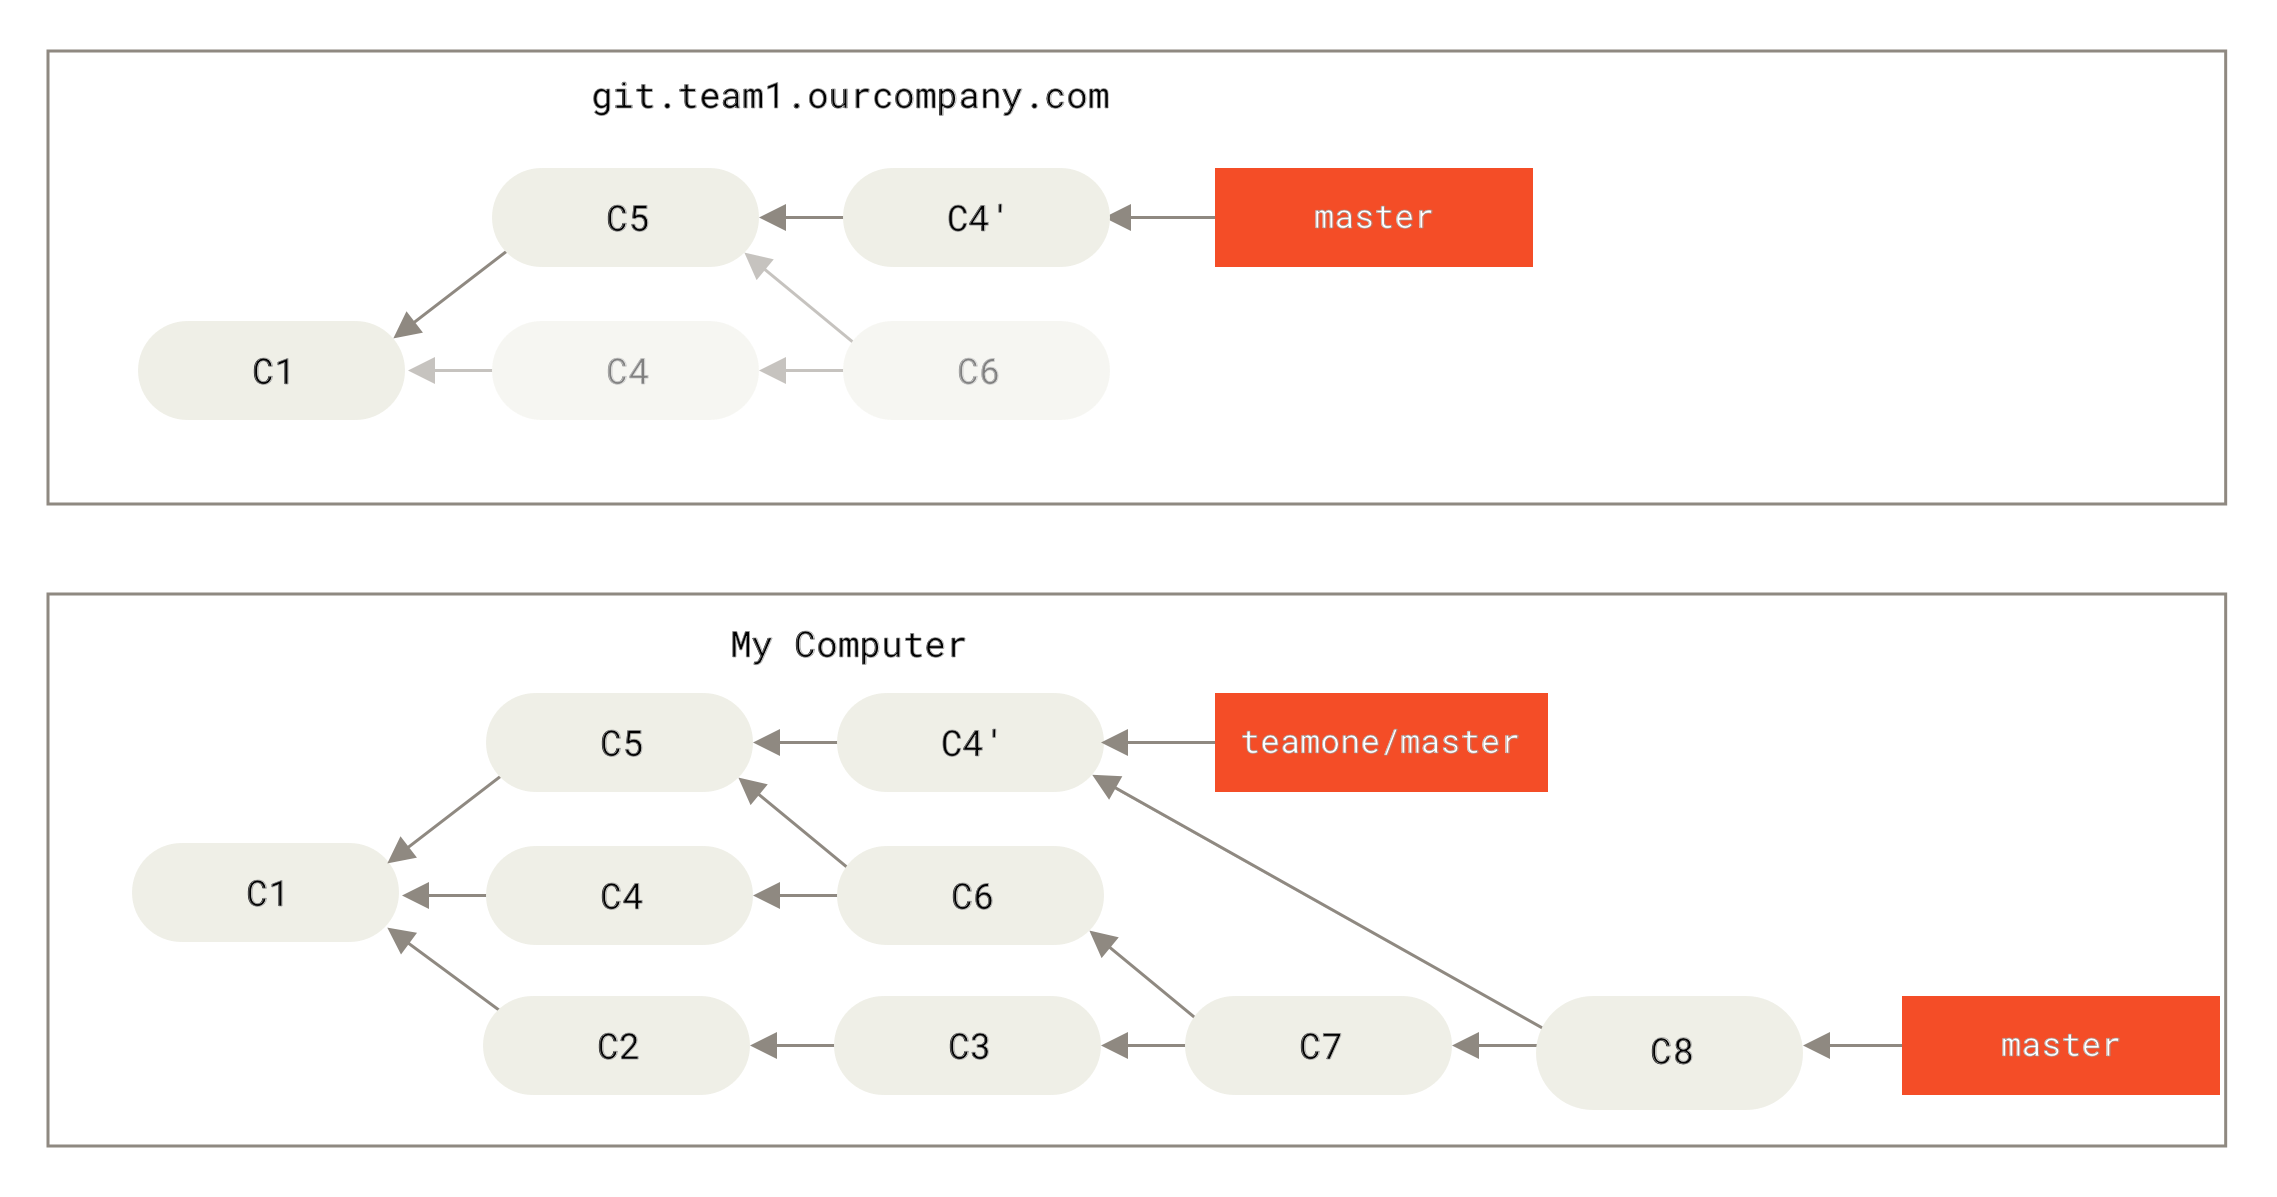
If you run a git log when your history looks like this, you’ll see two commits that have the same author, date, and message, which will be confusing.
Furthermore, if you push this history back up to the server, you’ll reintroduce all those rebased commits to the central server, which can further confuse people.
It’s pretty safe to assume that the other developer doesn’t want C4 and C6 to be in the history; that’s why they rebased in the first place.
Rebase When You Rebase
If you do find yourself in a situation like this, Git has some further magic that might help you out. If someone on your team force pushes changes that overwrite work that you’ve based work on, your challenge is to figure out what is yours and what they’ve rewritten.
It turns out that in addition to the commit SHA-1 checksum, Git also calculates a checksum that is based just on the patch introduced with the commit. This is called a ``patch-id''.
If you pull down work that was rewritten and rebase it on top of the new commits from your partner, Git can often successfully figure out what is uniquely yours and apply them back on top of the new branch.
For instance, in the previous scenario, if instead of doing a merge when we’re at Someone pushes rebased commits, abandoning commits you’ve based your work on we run git rebase teamone/master, Git will:
-
Determine what work is unique to our branch (C2, C3, C4, C6, C7)
-
Determine which are not merge commits (C2, C3, C4)
-
Determine which have not been rewritten into the target branch (just C2 and C3, since C4 is the same patch as C4')
-
Apply those commits to the top of
teamone/master
So instead of the result we see in You merge in the same work again into a new merge commit, we would end up with something more like Rebase on top of force-pushed rebase work..
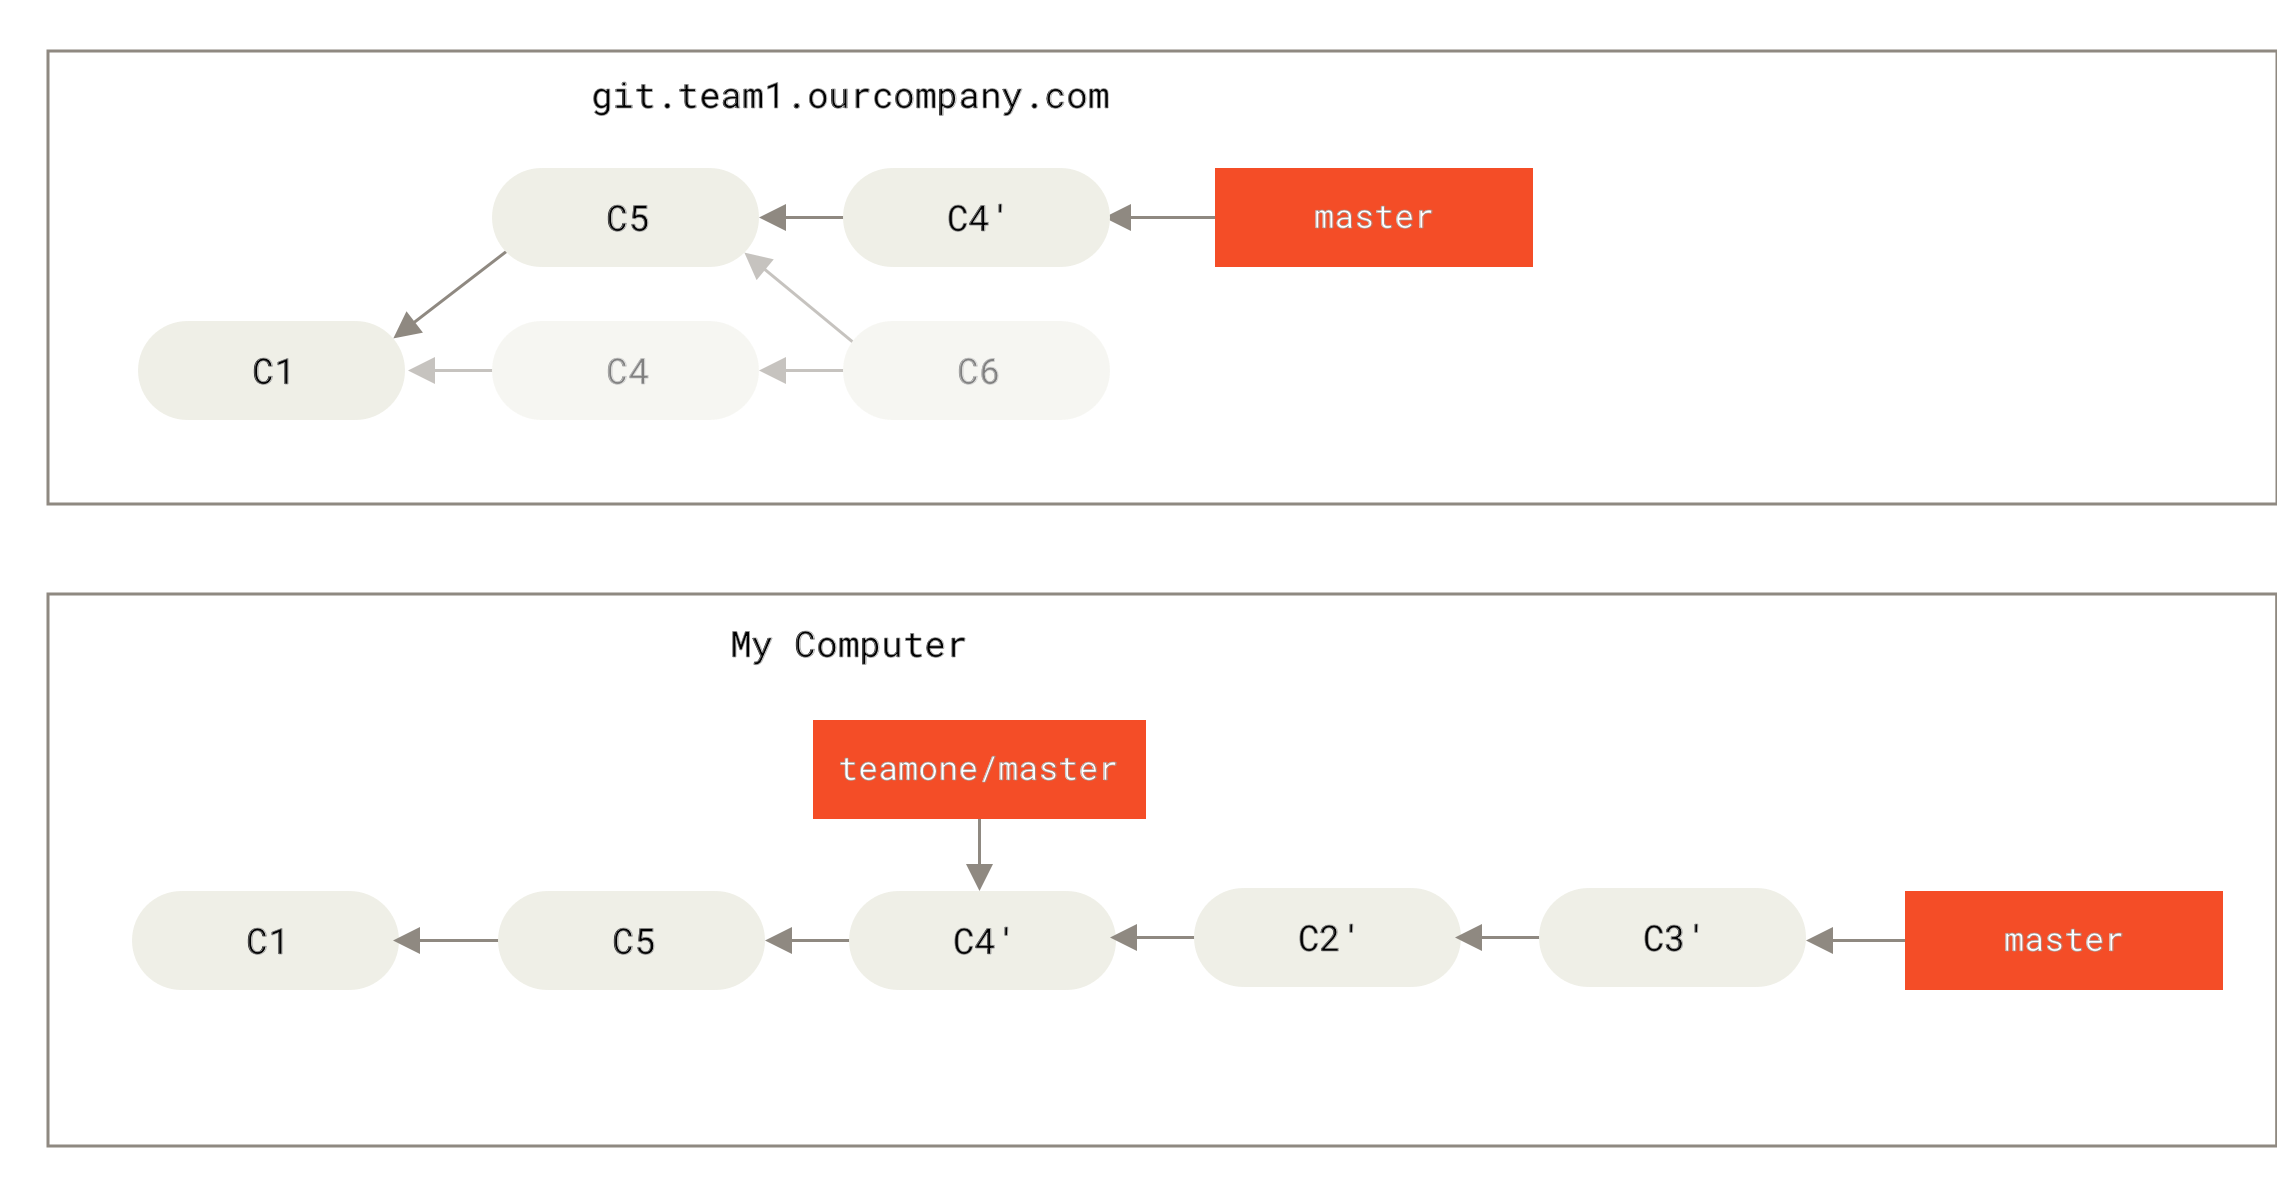
This only works if C4 and C4' that your partner made are almost exactly the same patch.
Otherwise the rebase won’t be able to tell that it’s a duplicate and will add another C4-like patch (which will probably fail to apply cleanly, since the changes would already be at least somewhat there).
You can also simplify this by running a git pull --rebase instead of a normal git pull.
Or you could do it manually with a git fetch followed by a git rebase teamone/master in this case.
If you are using git pull and want to make --rebase the default, you can set the pull.rebase config value with something like git config --global pull.rebase true.
If you only ever rebase commits that have never left your own computer, you’ll be just fine. If you rebase commits that have been pushed, but that no one else has based commits from, you’ll also be fine. If you rebase commits that have already been pushed publicly, and people may have based work on those commits, then you may be in for some frustrating trouble, and the scorn of your teammates.
If you or a partner does find it necessary at some point, make sure everyone knows to run git pull --rebase to try to make the pain after it happens a little bit simpler.
Rebase vs. Merge
Now that you’ve seen rebasing and merging in action, you may be wondering which one is better. Before we can answer this, let’s step back a bit and talk about what history means.
One point of view on this is that your repository’s commit history is a record of what actually happened. It’s a historical document, valuable in its own right, and shouldn’t be tampered with. From this angle, changing the commit history is almost blasphemous; you’re lying about what actually transpired. So what if there was a messy series of merge commits? That’s how it happened, and the repository should preserve that for posterity.
The opposing point of view is that the commit history is the story of how your project was made.
You wouldn’t publish the first draft of a book, and the manual for how to maintain your software deserves careful editing.
This is the camp that uses tools like rebase and filter-branch to tell the story in the way that’s best for future readers.
Now, to the question of whether merging or rebasing is better: hopefully you’ll see that it’s not that simple. Git is a powerful tool, and allows you to do many things to and with your history, but every team and every project is different. Now that you know how both of these things work, it’s up to you to decide which one is best for your particular situation.
In general the way to get the best of both worlds is to rebase local changes you’ve made but haven’t shared yet before you push them in order to clean up your story, but never rebase anything you’ve pushed somewhere.
Summary
We’ve covered basic branching and merging in Git. You should feel comfortable creating and switching to new branches, switching between branches and merging local branches together. You should also be able to share your branches by pushing them to a shared server, working with others on shared branches and rebasing your branches before they are shared. Next, we’ll cover what you’ll need to run your own Git repository-hosting server.